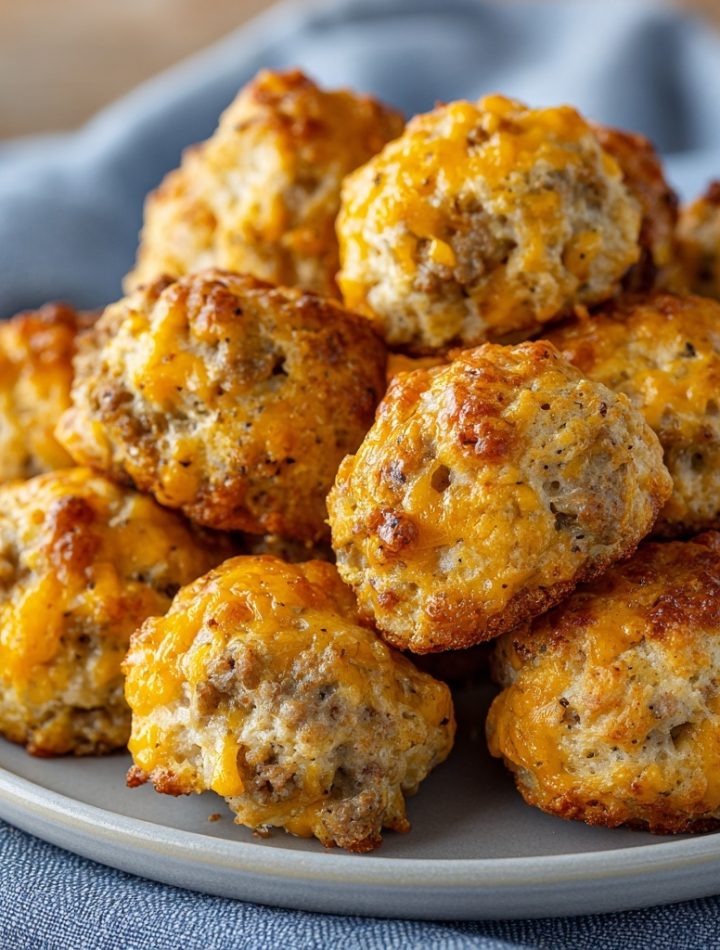
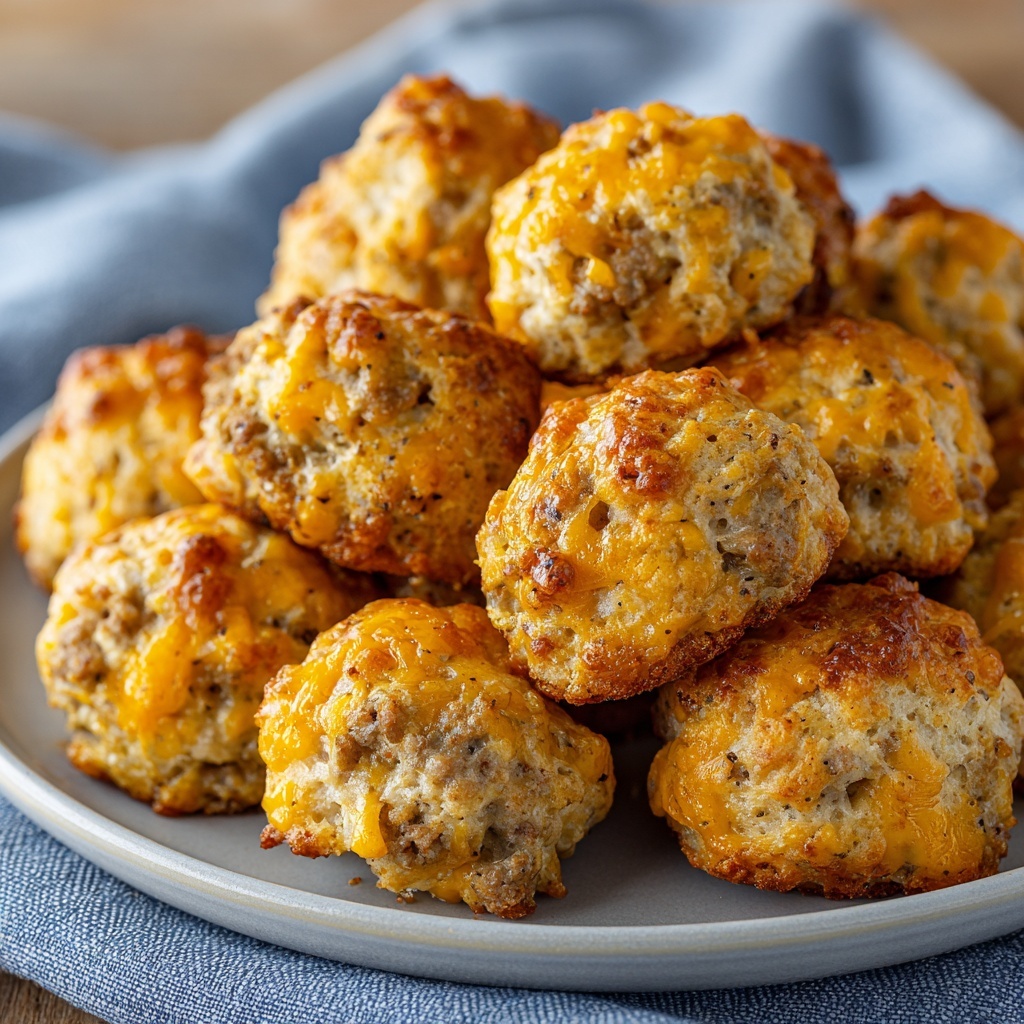
3-Ingredient Bisquick Sausage Balls: Your New Go-To Party Hero
Hey there, my fellow flavor adventurer! Let’s be real for a second. We all have those days. The ones where you need to whip up something incredibly delicious, impress a crowd (or just your hungry family), and do it all without spending hours in the kitchen or dirtying every single bowl you own. Sound familiar? I see you nodding.
Well, my friend, today we’re pulling a culinary rabbit out of a hat. We’re talking about a recipe that feels like a secret handshake among home cooks, a legendary little bite that has saved potlucks, brunches, and holiday parties for generations. I’m so excited to share my love for the one, the only, the magically simple: 3-Ingredient Bisquick Sausage Balls.
Now, I know what you might be thinking. “Clara, you’re all about vibrant, feel-good meals and glow bowls!” And yes, absolutely! But part of glowing from the inside out is embracing joy, ease, and the pure, unadulterated happiness of a cheesy, savory, perfectly-portioned bite that makes everyone gather around the plate. These sausage balls are the ultimate proof that sometimes, the simplest things are the most spectacular. They’re crispy on the outside, tender and cheesy on the inside, and so ridiculously easy you’ll have the recipe memorized after one batch. So, tie on your apron (or don’t, things are about to get very low-fuss), and let’s make some magic happen.
The Little Bite That Sparked a Thousand Parties
My love affair with these sausage balls started long before Unknown was even a messy notebook. Picture this: I’m about ten years old, standing on a wobbly step-stool in my grandma’s kitchen. The air is thick with the scent of pine and cinnamon, but the most intoxicating smell is coming from the oven—a savory, cheesy, porky aroma that made my stomach rumble like a tiny thunderstorm.
My grandma, a woman who believed that love was best expressed through food you could eat with your hands, would let me help roll the mixture into little, lumpy spheres. I’d get cheese under my fingernails and Bisquick dust on my nose, and she’d just laugh. To me, those golden-brown balls coming out of the oven weren’t just an appetizer; they were the official start of the holiday season. They were the first thing to disappear from the platter, the thing that cousins, aunts, and uncles would sneak before dinner was officially served. They taught me that the best food isn’t always the fanciest—it’s the food that brings people together, sparks conversation, and creates the kind of warm, fuzzy memories you carry for a lifetime.
Print
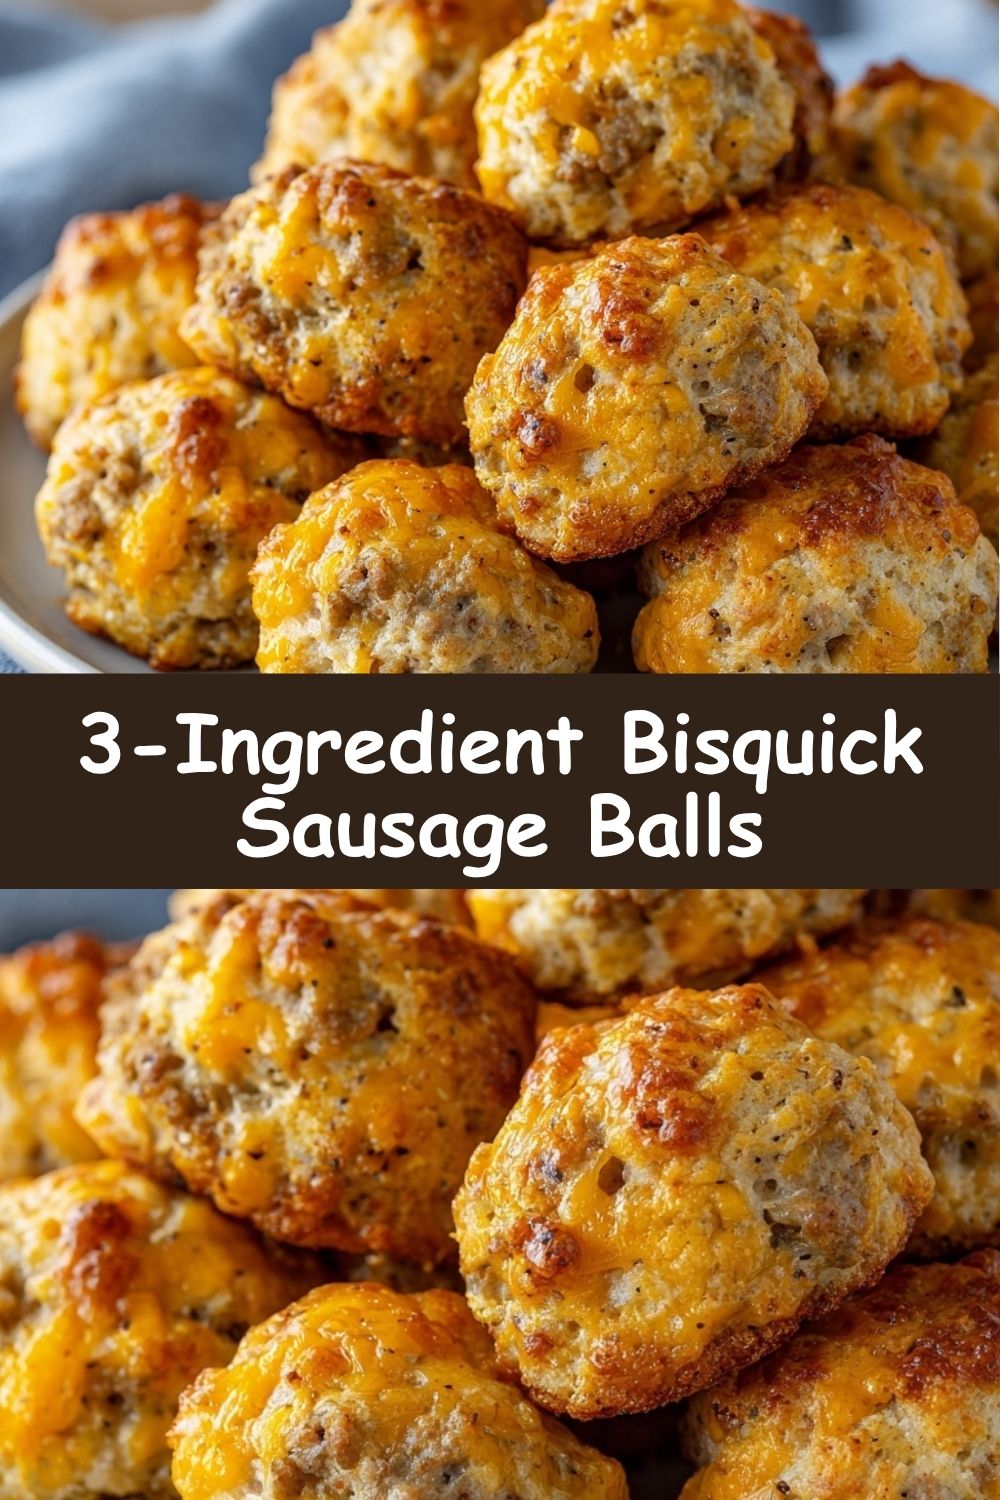
3-Ingredient Bisquick Sausage Balls
- Total Time: 35 minutes
- Yield: 24 balls
Description
These Bisquick sausage balls are the ultimate quick-and-easy appetizer—savory, cheesy, and perfect for holidays, brunches, or party snacks. With just three ingredients and zero fuss, you’ll have a crowd-pleasing bite-sized treat that’s crispy on the outside and tender inside. Kid-approved and totally addictive!
Ingredients
These Bisquick sausage balls are the ultimate quick-and-easy appetizer—savory, cheesy, and perfect for holidays, brunches, or party snacks. With just three ingredients and zero fuss, you’ll have a crowd-pleasing bite-sized treat that’s crispy on the outside and tender inside. Kid-approved and totally addictive!
Instructions
Preheat oven to 350°F (175°C). Line a baking sheet with parchment paper.
Mix everything in a large bowl until fully combined (use hands or a mixer).
Roll into 1-inch balls and place on the sheet.
Bake for 20–25 minutes until golden brown and cooked through.
Cool slightly and serve warm with mustard, ranch, or dipping sauce of choice.
- Prep Time: 10 mins
- Cook Time: 25 mins
- Category: Snack
Nutrition
- Calories: 110
- Fat: 8g
- Carbohydrates: 4g
Gathering Your Trio of Superstars
The beauty of this recipe is in its simplicity. Just three core ingredients work together in perfect harmony. But as your curious cook, I’m going to break down exactly why each one is so important and how you can play around with them.
What You’ll Need:
- 1 lb Ground Pork Sausage: This is your flavor foundation! I highly recommend using a sausage with seasoning already in it—a classic sage breakfast sausage is perfect. The fat content here is also key; it’s what makes the balls so moist and helps them brown beautifully. Chef’s Insight: For a leaner option, you can use turkey or chicken sausage, but just know your balls might be a tad drier. If you’re feeling adventurous, hot Italian sausage is a fantastic, spicy swap!
- 2 cups Shredded Sharp Cheddar Cheese : Cheese, glorious cheese! Sharp cheddar brings a tangy, robust flavor that can stand up to the sausage. Pro-Tip: For the love of all that is melty and good, please shred your own cheese from a block! The pre-shredded stuff is coated with anti-caking agents (like potato starch) that can prevent it from melting as smoothly and seamlessly into your dough. Trust me on this—it’s a game-changer for texture.
- 1½ cups Bisquick Baking Mix: The unsung hero that holds our dream team together. Bisquick is a pre-mixed blend of flour, leavening, fat, and salt, which acts as our binder and gives the balls a slight, biscuit-like rise and tenderness. Substitution Tip: If you don’t have Bisquick, you can make a DIY version by whisking together 1½ cups of all-purpose flour, 2¼ teaspoons of baking powder, 1 teaspoon of salt, and 2 tablespoons of cold, cubed butter. Cut the butter in until the mixture looks like coarse crumbs.
Let’s Get Rolling: Your Foolproof Guide
Ready to see how this all comes together? It’s almost embarrassingly easy. I’ll walk you through each step with my favorite little hacks to ensure your sausage balls are the talk of the table.
- Preheat and Prep. First things first, get that oven roaring to a cozy 350°F (175°C). This is the perfect temperature to cook the sausage through while giving the outside a gorgeous golden-brown color. Now, line a baking sheet with parchment paper. Chef’s Hack: Don’t skip the parchment! This isn’t just for easy cleanup (though that’s a huge bonus). It prevents the bottoms from getting too dark and ensures nothing sticks. If you don’t have parchment, a light spritz of cooking spray will work in a pinch.
- The Big Mix. In a large bowl, combine your sausage, shredded cheese, and Bisquick. Now, here’s where you have a choice. You can use a sturdy wooden spoon or the paddle attachment of a stand mixer, but my preferred method? Get in there with clean hands! Why hands? You can feel when the mixture is perfectly combined—it should be a bit crumbly but hold together when you squeeze it. Using your hands ensures no pockets of dry mix are left, and it’s surprisingly therapeutic! Mix just until everything is incorporated; over-mixing can make the balls a bit tough.
- Rolling Time. Using a tablespoon, a small cookie scoop (this is a lifesaver for uniform size!), or just your hands, portion out the mixture and roll it into 1-inch balls. You’re aiming for the size of a hearty walnut. Pro-Tip for Non-Stick Rolling: If the mixture is sticking to your hands, lightly dampen them with a bit of water. This creates a thin barrier and makes the rolling process smooth and effortless. Place the balls about an inch apart on your prepared baking sheet—they don’t spread much, but they do need a little room for hot air to circulate.
- Bake to Perfection. Slide your tray into the preheated oven and bake for 20-25 minutes. You’re looking for that perfect trifecta: golden brown on the outside, firm to the touch, and most importantly, the sausage should be cooked through. Doneness Check: The safest way to know they’re done is to use an instant-read thermometer inserted into the center of a ball; it should read at least 160°F (71°C) for pork. They will also feel firm and sound a little hollow if you tap them.
- The Hardest Part: The Cool Down. Once they’re gorgeously golden, pull them out and let them rest on the baking sheet for about 5 minutes. Why wait? This allows the cheese to set slightly so they don’t fall apart when you pick them up, and it keeps you from burning the roof of your mouth on molten cheese (a noble cause, but we’ve all been there!).
Plating Up Your Party Perfect Bites
Presentation is part of the fun! Don’t just dump these beauties on a plate. Arrange them on a beautiful platter or in a low basket lined with a cute tea towel. Pile them high—they look abundant and inviting. Now, for the dipping situation. I always, always serve these with a couple of dipping sauces on the side. A grainy mustard adds a fantastic tangy punch, classic ranch is a crowd-pleaser for all ages, and for something a little different, a spicy sriracha mayo or a sweet and spicy pepper jelly is absolutely divine. Pop in a few decorative toothpicks, and watch them vanish before your eyes.
Let’s Get Creative: Flavor Twists & Swaps
Once you’ve mastered the classic, the kitchen playground awaits! Here are a few of my favorite ways to mix things up:
- Spice It Up: Add ½ teaspoon of garlic powder, onion powder, and a pinch of cayenne or smoked paprika right into the mix. It deepens the flavor profile beautifully.
- Herbaceous Glow: Stir in 2 tablespoons of freshly chopped herbs like chives, parsley, or even rosemary for a fresh, fragrant twist.
- Cheese Swap: Try swapping half the cheddar for Pepper Jack cheese for a kick, or use a smoked Gouda for a wonderfully smoky flavor.
- Gluten-Free Friendly: You can absolutely make these with a gluten-free Bisquick or pancake mix! The texture is nearly identical.
- Breakfast Bonus: Make them slightly larger, and you’ve got the most incredible, grab-and-go breakfast sandwich component. Split one open and add a fried egg!
Clara’s Kitchen Chronicles
This recipe has been my trusty sidekick for years, and it’s evolved in fun ways. I once, in a pre-coffee haze, accidentally used pancake mix instead of Bisquick. The result? Slightly sweeter, cake-ier sausage balls that my niece and nephew declared “the best ones ever.” So don’t be afraid of a happy accident!
My biggest tip? Make a double batch and freeze them. After baking, let them cool completely, then pop them in a freezer bag. When a snack emergency strikes (or surprise guests appear), you can reheat them straight from frozen in a 350°F oven for 10-15 minutes, and they taste just-made. It’s like having a secret weapon in your freezer at all times. This recipe is a testament to my core belief: cooking should be fun, flexible, and full of flavor, not fuss. It’s a little bite of pure, uncomplicated joy.
Your Questions, Answered!
Over the years, I’ve gotten so many great questions about this recipe. Here are the answers to the most common ones to ensure your sausage ball success!
Why is my mixture so dry and crumbly?
This usually happens for one of two reasons. First, your sausage might be leaner than the one I tested with. Different brands have different fat contents. Second, if you used pre-shredded cheese, it can absorb moisture differently. The fix is easy! Add a tablespoon or two of water or milk to the mixture and knead it in with your hands. It should come together nicely.
Can I make the dough ahead of time?
Absolutely! You can mix the dough, cover the bowl tightly with plastic wrap, and stash it in the fridge for up to 24 hours before you plan to bake. This can actually make rolling easier as the fat in the sausage firms up a bit. Just let it sit at room temperature for 10-15 minutes before rolling if it’s too hard to handle.
My sausage balls are greasy. What went wrong?
A little grease is normal and delicious, but if they’re swimming, your sausage might have been very high in fat. Next time, you can try a slightly leaner sausage. For this batch, simply transfer the baked balls to a plate lined with a paper towel to drain off any excess grease before serving.
Can I cook these in an air fryer?
You sure can! The air fryer makes them extra crispy. Arrange the rolled balls in a single layer in your air fryer basket (you’ll likely need to work in batches). Air fry at 370°F (190°C) for 10-12 minutes, shaking the basket halfway through, until golden brown and cooked through.
Quick Nutritional Snapshot
Please note: This is an estimated breakdown per sausage ball (based on a recipe yielding 24 balls). Actual values will vary based on the specific brands of ingredients you use.
Calories: ~110 | Fat: 8g | Carbohydrates: 4g | Protein: 6g