
Ditch the Dinner Drama & Say Hello to Taco Bliss!
Hey there, hungry adventurer! Clara here, your partner-in-crime for turning chaotic weeknights into delicious victories. Raise your hand if this sounds familiar: It’s 6 PM, your stomach’s rumbling like a thunderstorm, the fridge is giving you major side-eye, and the thought of a complicated recipe feels like climbing Everest in flip-flops. Yeah, been there, burned toast trying to get there! That’s exactly why I’m practically doing a happy dance to share these Easy Baked Chicken Tacos with you. Think of them as your edible superhero cape – ready in about 20 minutes flat, demanding only three humble ingredients, and delivering a knockout punch of crispy, cheesy, soul-satisfying goodness.
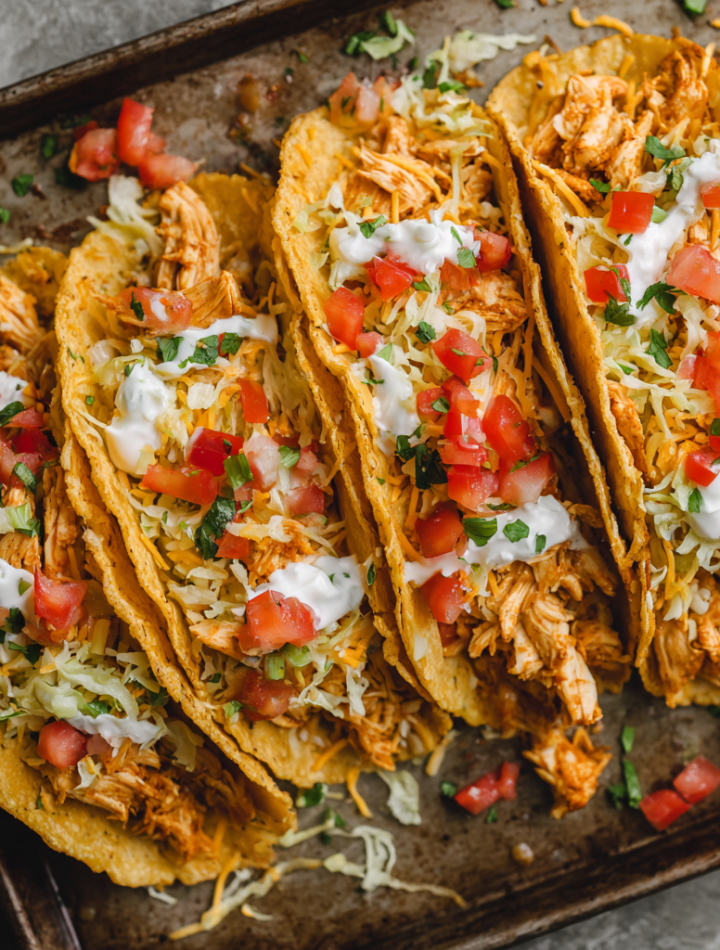
This isn’t just another taco recipe. This is your golden ticket out of dinner drudgery. Imagine: ultra-thin corn tortillas baked until they’re shatteringly crisp around the edges, hugging juicy, tender chicken and cradling a molten core of melty cheese. No messy frying splatters, no endless ingredient hunt, just pure, unadulterated taco joy landing straight on your baking sheet. It’s the kind of magic that makes everyone at the table instantly perk up – eyes wide, spoons poised for the inevitable salsa dive. Whether you’re wrangling homework, bouncing back from a killer workout, or just craving something gloriously simple and tasty, these tacos are your weeknight MVP. So, preheat that oven, grab your trusty baking sheet, and let’s transform pantry basics into pure crispy-cheesy bliss!
Print
Easy Baked Chicken Tacos
- Total Time: 20 minutes
- Yield: serves 6
Description
These baked chicken tacos are the ultimate weeknight win—crispy on the edges, gooey with melted cheese, and packed with flavorful chicken. With just three ingredients and minimal prep, they come together in minutes and disappear even faster. A must-have in your quick dinner rotation!
Ingredients
6 extra thin corn tortillas (e.g. Mission brand)
6 oz cooked chicken breast, chopped or shredded
½ cup (56g) shredded cheddar cheese (or your favorite variety)
Instructions
Preheat oven to 400°F (200°C). Lightly grease a baking sheet.
Warm tortillas briefly (microwave or pan) to make them pliable.
Fill each tortilla with chicken and cheese, then fold gently in half.
Place tacos on the baking sheet, slightly leaning on each other if needed to stay closed.
Bake for 10–12 minutes or until the edges are crispy and cheese is melted.
Serve hot with salsa, sour cream, or guacamole if desired.
- Prep Time: 20 mins
- Category: Dinner
Nutrition
- Calories: 165
- Fat: 7g
- Carbohydrates: 12g
- Fiber: 2g
- Protein: 14g
My “Aha!” Moment: Burnt Fingers & Taco Triumph
Okay, confession time! The genius (if I do say so myself!) behind these baked beauties wasn’t born from meticulous planning, but from a classic “kitchen scramble” moment. Picture it: A few years back, deep into my “healthy-ish but seriously time-crunched” phase, I had leftover roasted chicken and a near-empty fridge. My grand plan? Quick stovetop tacos. Epic fail alert! Trying to fry corn tortillas while simultaneously heating chicken and melting cheese felt like juggling flaming torches. Tortillas ripped, cheese escaped into the pan like tiny molten fugitives, and my fingers… well, let’s just say I learned some new words that night!
Frustrated but stubborn (a chef’s superpower!), I glared at my sad ingredients. Then, inspiration struck like a rogue sprinkle of chili powder: What if I just… baked them? I shoved some chicken and cheese into a tortilla, folded it haphazardly, and tossed it onto a baking sheet, fully expecting a crumbly disaster. Ten minutes later? Pure. Taco. Magic. The edges were golden and crisp, the cheese was perfectly oozy, and the chicken stayed juicy. No fuss, no burns, just pure, delicious efficiency. It was a revelation! That messy little experiment became an instant household staple – the ultimate proof that sometimes the best recipes are born from happy accidents (and a slight aversion to washing extra pans!).
Gather Your Tiny Taco Army (It’s Only 3 Strong!)
See? Told you it was simple! Here’s your lightning-fast shopping list (or pantry raid!). Remember, quality matters, even with minimal ingredients:
- 6 extra thin corn tortillas (like Mission brand): These are the MVP! Their thinness is key for getting super crispy in the oven. Thicker tortillas stay soft and bendy – not what we want! Chef’s Tip: Warm them slightly (5-10 seconds in the microwave or a quick flip in a dry pan) before filling. Cold tortillas crack like nobody’s business! Swap It: If corn isn’t your jam, use the thinnest flour tortillas you can find (baking time might need a tiny bump).
- 6 oz cooked chicken breast, chopped or shredded: The hearty, protein-packed star! Leftover rotisserie chicken is your BEST friend here – talk about a time-saver! Chef’s Insight: Make sure your chicken is well-seasoned! If it’s bland, your tacos will be too. A quick toss with a pinch of cumin, chili powder, or garlic powder works wonders. Swap It: Shredded turkey, leftover carnitas, or even rinsed black beans (for a veggie twist!) work beautifully.
- ½ cup (56g) shredded cheddar cheese: The glorious, melty glue! Cheddar is classic, but don’t be shy! Chef’s Love Note: Pre-shredded cheese works in a pinch, but shredding your own block melts SO much smoother and creamier (no anti-caking agents!). Swap It: Pepper jack for a kick, Monterey Jack for ultimate meltiness, Oaxaca for stretchy fun, or a Mexican blend for flavor fireworks!
See? Just three humble heroes, ready to become legendary. Now, let’s get baking!
Let’s Build Your Crispy Masterpieces (Step-by-Step!)
Get ready for the easiest taco assembly line ever! Follow these steps, lean in for my sneaky chef hacks, and you’ll be crunching in no time:
- Preheat & Prep: Crank that oven to 400°F (200°C). This high heat is CRUCIAL for achieving crispy perfection, not soggy sadness. While it heats, lightly grease your baking sheet with a quick swipe of olive oil, avocado oil, or even cooking spray. Chef’s Hack: Lining the sheet with parchment paper makes cleanup even easier, but greasing directly gives the bottoms extra crisp potential! Your call, lazy cleaner or ultimate crisp seeker!
- Tortilla TLC: Grab your extra thin corn tortillas. Here’s the non-negotiable step: WARM THEM UP! Stack them on a plate, cover with a damp paper towel, and microwave for about 15-20 seconds. Or, heat them one by one for 10-15 seconds per side in a dry skillet over medium heat. Why bother? Cold corn tortillas are brittle divas. Warming makes them pliable and prevents them from cracking when you fold them, saving you major taco heartbreak. Chef’s Whisper: Don’t skip this! Seriously, it’s the difference between “taco perfection” and “taco tragedy.”
- Fill & Fold: Now the fun part! Lay a warmed tortilla flat. Spoon about 1 oz of your chopped/shredded chicken onto one half. Top generously with a sprinkle of that glorious shredded cheese (about 1 heaping tablespoon per taco). Chef’s Flavor Boost: Now’s the time to add a sneaky sprinkle of spices to the chicken if it needs a pep talk! Gently fold the tortilla in half over the filling, pressing lightly. Don’t worry if it doesn’t seal perfectly – we have a plan!
- Bake Buddies: Place your folded tacos on the prepared baking sheet. Here’s the trick to help them stay closed and cook evenly: lean them slightly against each other! Nestle them close, like cozy taco friends. This gentle pressure helps them hold their shape while baking. Chef’s Observation: They might still pop open a bit – that’s totally okay! It just means more crispy edge surface area. Win-win!
- Bake to Golden Glory: Slide that sheet into your preheated oven. Bake for 10-12 minutes. You’re waiting for two beautiful things: the edges of the tortillas to turn deep golden brown and beautifully crisp, and the cheese inside to be fully melted and possibly bubbling out enticingly. Chef’s Watchful Eye: Ovens vary! Start checking at 9 minutes. If the edges aren’t crisp enough for you at 12 minutes, give them 1-2 more, but watch closely – they can go from golden to dark brown quickly! That cheese smell? Pure heaven.
- The Grand Finale – Serve Hot! Carefully remove the baking sheet (it’s hot, hot, hot!). Use a spatula to transfer your crispy masterpieces to a plate. Serve immediately! Baked tacos are best enjoyed piping hot when the cheese is at its ooey-gooey peak and the shells are at their maximum crispness. Chef’s Urgent Plea: Do not delay! These beauties are fleeting wonders of crunch.
See? Simple, satisfying, and seriously smart cooking. Now, let’s talk about dressing them up!

Dress to Impress (Minimal Effort, Max Flavor!)
These tacos are absolute rockstars naked (the crispy-cheesy kind, of course!), but a few simple sides turn them into a full fiesta! Serve them straight off the baking sheet family-style for that casual, “dig in!” vibe. Pile them high on a vibrant platter. Now, bring on the fun stuff! Offer bowls of:
- Bright & Zesty: Your favorite salsa (pico de gallo for freshness, roasted salsa for depth, fruity mango salsa for a twist!).
- Cool & Creamy: Dollops of sour cream, tangy Greek yogurt, or lush avocado crema or guacamole.
- Crunchy Contrast: A quick cabbage slaw (just shredded cabbage, lime juice, salt!) or pickled red onions adds fantastic texture.
- Herb Power: A generous scattering of fresh cilantro leaves.
Let everyone customize their perfect bite – half the fun is in the DIY assembly!
Mix It Up! Your Taco Canvas Awaits
The beauty of this recipe is its incredible flexibility! Once you’ve mastered the basic crispy-cheesy-chicken magic, play around:
- Protein Power Swap: Use leftover shredded pork carnitas, ground beef or turkey (cooked and seasoned!), or for a vegetarian win, seasoned black beans, pinto beans, or sautéed mushrooms.
- Cheese Please!: Swap the cheddar for melty Monterey Jack, spicy Pepper Jack, creamy Oaxaca, tangy Cotija crumbles (sprinkled on *after* baking!), or a smoky Chipotle Gouda.
- Flavor Bomb Add-Ins: Toss a spoonful of corn kernels, diced green chiles, or black olives in with the chicken before filling. Add a thin smear of refried beans inside the tortilla before adding chicken/cheese for extra heartiness.
- Spice It Up (or Down!): Mix a dash of taco seasoning, chipotle powder, or smoked paprika into the chicken. For kids or milder palates, keep it simple with just cheese and chicken!
- Breakfast for Dinner: Fill with scrambled eggs, a bit of cheese, and maybe some crumbled cooked sausage or bacon! Bake as usual.
Your taco adventure starts now!
Clara’s Crunchy Chronicles & Pro-Tips
Oh, these tacos! They’ve seen me through more “I can’t even” evenings than I care to count. They’ve been my potluck savior (just double or triple the batch!), my post-yoga fuel, and my go-to when my fridge looks bleak. One time, in a fit of “clean-out-the-fridge” bravery, I used leftover Thanksgiving turkey and cranberry sauce *inside* with brie cheese. Weird? Maybe. Delicious? Surprisingly yes! (Though maybe stick to salsa for now!).
Over time, I’ve learned a few things: Warming the tortillas is non-negotiable. Seriously, it’s the bedrock of taco structural integrity! Don’t overfill them – a little chicken and cheese goes a long way, and too much stuffing prevents proper crisping and makes them harder to fold. Embrace the slight splay. They don’t need to be perfectly sealed burritos. That open edge gets the crispiest! And most importantly? EAT. THEM. IMMEDIATELY. The crisp-to-soggy transition is swift and merciless. Gather your crew around the oven – it’s taco time the second they emerge!
Your Taco Questions, Answered!
Let’s tackle those common kitchen conundrums:
- Q: Can I use flour tortillas instead of corn?
A: You can, but the result is different! Flour tortillas won’t get as shatteringly crisp; they’ll be more soft and foldable (like a quesadilla taco hybrid). If using flour, opt for the thinnest “street taco” size you can find. Baking time might be slightly less (check at 8 mins). Corn is best for that signature CRUNCH! - Q: Why did my tacos turn out soggy?
A: Sogginess is usually the enemy! Common culprits: Not preheating the oven hot enough (400°F is key!), overcrowding the pan (give them a little breathing room), using cold tortillas that cracked (allowing filling moisture out), or adding super wet fillings (like saucy chicken – drain it well!). Also, letting them sit after baking traps steam – serve right away! - Q: Can I prep these ahead of time?
A: You can prep the filling (cook/shred chicken, shred cheese) ahead, but assemble just before baking. Pre-assembled tacos will make the tortillas soggy as they sit. If you *must* pre-assemble, keep them uncovered in the fridge for no more than an hour before baking. Fresh is always best for maximum crisp!
These Easy Baked Chicken Tacos are a game-changer for any busy weeknight or spontaneous taco craving. With just three ingredients, minimal prep, and a quick bake, you can enjoy crispy, cheesy taco bliss in about 20 minutes. No mess, no hassle—just pure, delicious efficiency. Plus, with endless customization options, they’re the perfect base for whatever flavor adventure you’re in the mood for. So say goodbye to dinner drama and hello to taco perfection—crispy edges, melty cheese, and all the taco joy you can handle.