Super Easy Caramel Apples: Your New Go-To for Gooey, Glorious Fun!
Hey there, my fellow flavor adventurer! Clara here, and I am just buzzing with excitement to share this recipe with you today. If you’ve ever found yourself scrolling through pictures of picture-perfect caramel apples, feeling a mix of nostalgia and intimidation, I’m here to tell you: you can absolutely do this. And you’re going to have a blast doing it.
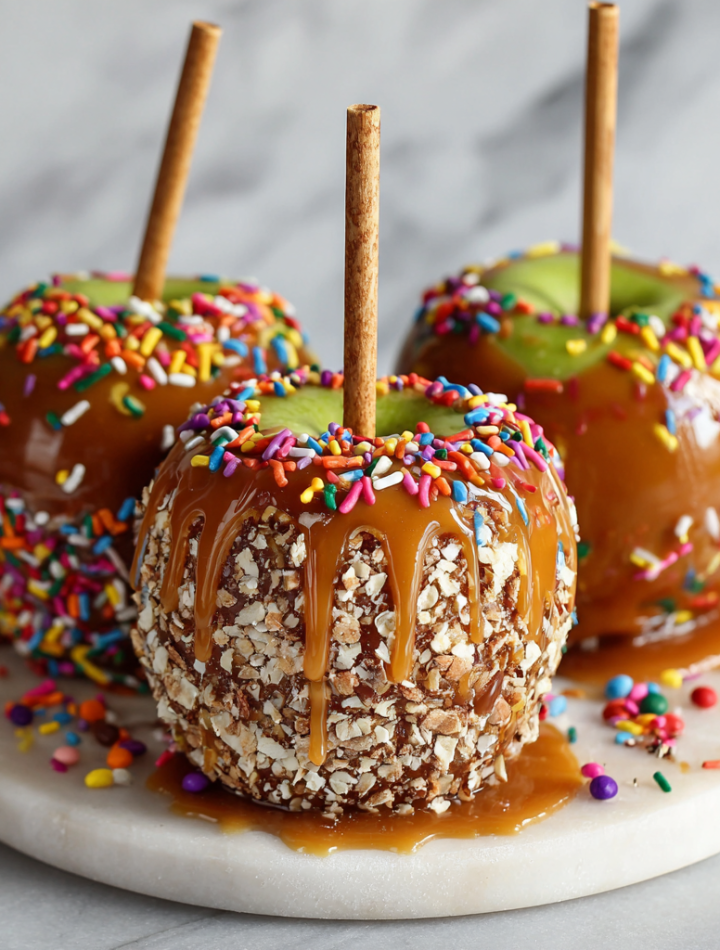
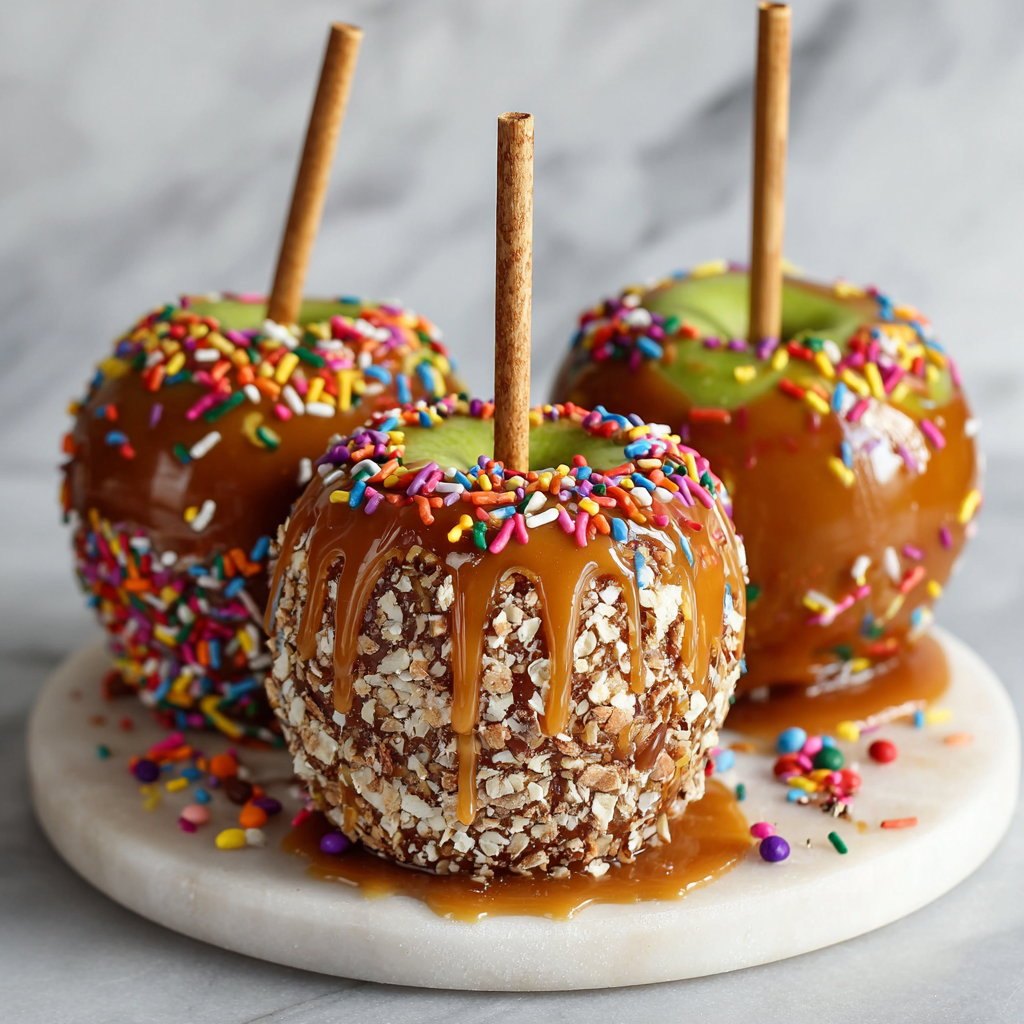
We’re not just making any caramel apples. We’re creating a whole experience. Imagine the crisp snap of a fresh apple giving way to a layer of rich, creamy, impossibly smooth caramel. Now, picture that same apple rolled in a carnival of toppings—crunchy Oreos, salty pretzels, melty peanut butter cups, or a shower of colorful sprinkles. This is the kind of treat that turns an ordinary afternoon into a memory and makes any gathering feel like a celebration.
My philosophy at Unknown has always been that feel-good food should be a joy to make and an even bigger joy to eat. This recipe is the epitome of that. It’s incredibly approachable, thanks to a little shortcut I adore (hello, La Lechera!), and it’s designed for maximum creativity. So, grab your favorite apron, call the kids or your bestie into the kitchen, and let’s make a glorious, delicious mess together. This is one spoon you’ll definitely want to lick.
A Sticky, Sweet Memory
This recipe always takes me right back to my grandma’s kitchen on a brisk October afternoon. The air would be filled with the scent of cinnamon and melting sugar, and my brother and I would be stationed at the table, our job to vigorously stir the pot of molten caramel while she expertly skewered the apples. It was a serious operation.
One year, I got a little too enthusiastic with my stirring and sent a glorious splatter of hot caramel right onto the family dog’s head. Poor old Buster spent the rest of the day with a very stylish, albeit confused, caramel cowlick. We laughed until we cried, and even though the caramel was a bit grainy that year from my distracted stirring, those apples tasted like pure, unadulterated joy. It taught me that the best recipes aren’t about perfection; they’re about the laughter, the little mishaps, and the sweet memories you create along the way. That’s the spirit I want to bring to your kitchen today.
Print
Super Easy Caramel Apples
- Total Time: 35 minutes
Description
These caramel apples are a gooey, nostalgic treat with a modern twist! Using creamy La Lechera caramel and endless toppings, they’re perfect for parties, holidays, or a fun weekend activity with kids. With double the batch and extra flair, there’s enough to go around—and then some!
Ingredients
3 cups heavy whipping cream
8 cans La Lechera Dulce de Leche (Nestlé’s milk-based caramel)
4 bags of apples (choose crisp varieties like Granny Smith or Honeycrisp)
20 wooden skewers
Toppings (Mix & Match!):
Crushed Thin Oreos
Ice cream-style peanut topping
Mini Reese’s Pieces
Mini M&Ms
Festive sprinkles
Crushed pretzels
Shredded coconut
Melted dark or white chocolate drizzle (optional twist!)
Instructions
Prep Apples: Wash and dry apples thoroughly. Remove stems and insert wooden skewers firmly into the tops.
Warm the Caramel: In a saucepan, combine heavy cream and dulce de leche. Stir over low heat until smooth, thick, and glossy (about 8–10 minutes).
Dip Apples: Tilt the saucepan and roll each apple in the warm caramel, coating evenly. Let excess drip off.
Add Toppings: Roll or sprinkle your toppings onto the wet caramel right away. Get creative with combos like Oreo + M&Ms or coconut + dark chocolate drizzle!
Set & Serve: Place apples on a parchment-lined tray. Chill for 15–20 minutes to set.
- Prep Time: 15 minutes
- Cook Time: 15 minutes
Nutrition
- Calories: 340
- Sugar: 42g
- Fat: 15g
- Carbohydrates: 50g
Gather Your Carnival of Ingredients
Here’s everything you’ll need to create about 20 show-stopping caramel apples. The beauty of this list is its flexibility—think of these as your building blocks for creativity!
- 3 cups heavy whipping cream: This is our secret weapon for a luxuriously smooth, creamy caramel that sets beautifully without getting tooth-achingly hard. It creates a perfect dipping consistency. For a dairy-free version, a full-fat canned coconut cream works wonders.
- 8 cans (13.4 oz each) La Lechera Dulce de Leche: Our superstar shortcut! This canned caramel is a dream—it’s already perfectly cooked and has that deep, milky, sweet flavor we’re after. Using this instead of wrestling with a candy thermometer is my biggest chef hack for stress-free success. If you can’t find La Lechera, any good-quality dulce de leche or even a thick caramel sauce will work, but the consistency and flavor might vary slightly.
- 4 bags of apples (choose crisp varieties like Granny Smith or Honeycrisp): The foundation of it all! A crisp, tart apple is the perfect contrast to the sweet caramel. Granny Smith is my absolute favorite for its punchy flavor, but Honeycrisp, Fuji, or Pink Lady are also fantastic choices. Pro Chef Insight: Give them a good scrub and make sure they are BONE DRY—any water will cause the caramel to slide right off.
- 20 wooden skewers or popsicle sticks: Your apple handles! Make sure they’re sturdy. I sometimes use craft sticks for a broader base, which helps prevent spinning when you’re dipping.
Toppings (The Fun Part! Mix & Match!):
- Crushed Thin Oreos: Adds a fantastic chocolatey crunch.
- Ice cream-style peanut topping (or crushed peanuts): For that classic sweet-and-salty vibe.
- Mini Reese’s Pieces & Mini M&Ms: Little bursts of candy-coated joy and peanut butter goodness.
- Festive sprinkles: Instant party on an apple! Perfect for holidays.
- Crushed pretzels: My personal favorite for an irresistible salty-sweet crunch.
- Shredded coconut: Toasted or not, it adds a lovely tropical, chewy texture.
- Melted dark or white chocolate drizzle (optional twist!): For the ultimate gourmet finish. A little drizzle over your set toppings makes them look professionally decorated.
Let’s Get Dipping: Your Foolproof Guide
Ready to create some magic? Follow these steps, and you’ll be a caramel apple pro in no time. I’ve packed this section with all my best tips and hacks to ensure your success.
- Prep Your Station: This is a crucial first step! Line two large baking sheets with parchment paper and give them a very light coating of non-stick spray. Trust me, this will prevent any tragic sticking later. Have all your toppings laid out in shallow bowls or plates. Once the caramel is ready, things move quickly, so having your mise en place (everything in its place) is key.
- Prep the Apples: Wash and dry your apples incredibly thoroughly. Any hint of moisture is the enemy of caramel adhesion. I even give mine an extra rub with a paper towel to be sure. Remove the stems and firmly push a wooden skewer into the top of each apple, about halfway to two-thirds through the core. You want it to be secure enough to hold the apple’s weight when dipping.
- Warm the Caramel: In a large, heavy-bottomed saucepan, combine the heavy whipping cream and all eight cans of La Lechera. Place it over low heat. This is important—we want to gently melt and combine everything without scorching the bottom. Stir constantly with a whisk or a wooden spoon. You’ll watch the glorious transformation from separated globs into a smooth, unified, glossy river of caramel. This should take about 8-10 minutes. Once it’s completely smooth and just starts to simmer (little bubbles around the edge), you’re done! Take it off the heat. Chef’s Hack: If you have a few stubborn lumps, don’t panic! A quick blitz with an immersion blender will make it perfectly silky.
- Dip Those Apples! Now for the main event! Carefully tilt your saucepan to pool the caramel on one side. Holding an apple by the stick, slowly lower it into the caramel and gently swirl it to coat evenly. Lift it up and let the excess caramel drip back into the pan for a good 10-15 seconds. This prevents a huge puddle (called a “caramel foot”) from forming at the base. If the caramel in the pot gets too thick to dip easily, just put it back on the stove for a minute on low heat to loosen it up.
- Add Your Toppings Immediately: The clock is ticking! While the caramel is still wet and sticky, roll your apple in your chosen topping(s). For drizzles, let the initial caramel layer set in the fridge for about 10 minutes before adding melted chocolate on top. Get creative with combinations—maybe one side with pretzels and another with M&Ms!
- Set & Chill: Place your finished masterpiece on the prepared parchment-lined tray. Repeat with all apples. Once the tray is full, pop it into the refrigerator for at least 15-20 minutes to allow the caramel to set completely. This chilling time is non-negotiable for that perfect bite.
How to Serve Your Masterpieces
Presentation is part of the fun! Once set, these apples are gorgeous all on their own. For a party, I love to arrange them standing upright in a tall vase or a block of food-safe floral foam covered in festive paper. You can also lay them flat on a beautiful platter. For easier eating, especially for kids, give them a quick whack with a knife to break the caramel shell, then slice the apple into wedges around the core. It’s less messy and perfect for sharing!
Get Creative! Endless Flavor Twists
The basic recipe is just the beginning. Here are a few of my favorite riffs to keep things exciting:
- Salty Sweet Supreme: Roll in crushed pretzels, then drizzle with melted dark chocolate and a tiny sprinkle of flaky sea salt.
- Tropical Escape: Coat in shredded coconut and macadamia nuts, then drizzle with white chocolate.
- Cookies & Cream Dream: A full coating of crushed Oreos is a chocolate lover’s paradise.
- Maple Bacon Bliss: For the adventurous! Mix a tablespoon of maple syrup into the caramel, then roll in finely chopped cooked bacon. It’s a wild crowd-pleaser.
- “Unicorn” Apples: Perfect for a birthday party! After the caramel sets, drizzle with vibrant melted white chocolate (use food coloring) and cover in every color of sprinkle you own.
Clara’s Kitchen Notes & Stories
This recipe has evolved so much from my grandma’s original! Her version involved cooking sugar for what felt like hours and the constant fear of the dreaded “soft ball stage.” My discovery of using La Lechera was a total game-changer. It was one of those happy accidents—I was out of traditional caramel ingredients but had a can of dulce de leche left over from another baking project. I decided to experiment by thinning it with cream, and the result was even better than the original! It was smoother, creamier, and foolproof.
A funny story from my early testing: I once was so eager to get started that I didn’t let my apples dry completely. I ended up with beautifully decorated apples… and a tray full of naked, caramel-less apples an hour later as the coating slowly slid off and pooled around them. It was a delicious, gooey puddle of failure—and a powerful lesson I’m happy to pass on to you so you can avoid the same fate! Dry apples are non-negotiable.
FAQs & Troubleshooting: Your Questions, Answered!
Q: My caramel is sliding off the apples! What did I do wrong?
A: Almost always, this is due to moisture on the apple skin. Make sure those apples are scrubbed, rinsed, and then dried COMPLETELY with a towel. Another culprit could be if the caramel wasn’t warm enough during dipping, preventing a good seal. Ensure your caramel is smooth and hot when you dip.
Q: Can I make these ahead of time?
A: Absolutely! You can make them 1-2 days ahead. Store them in the refrigerator in a single layer in an airtight container, separated by layers of parchment paper. The toppings might lose a little of their crunch over time, but they’ll still be delicious.
Q: Why is my caramel grainy or lumpy?
A: This usually happens if the heat was too high, causing the sugar in the dulce de leche to crystallize. Always use low heat and stir constantly. If you end up with a few lumps, an immersion blender is your best friend to bring it back to a silky smooth state.
Q: The caramel is too thick to dip. How can I fix it?
A: No worries! Simply place the saucepan back over very low heat and stir in another tablespoon or two of heavy cream until it loosens up to your desired dipping consistency.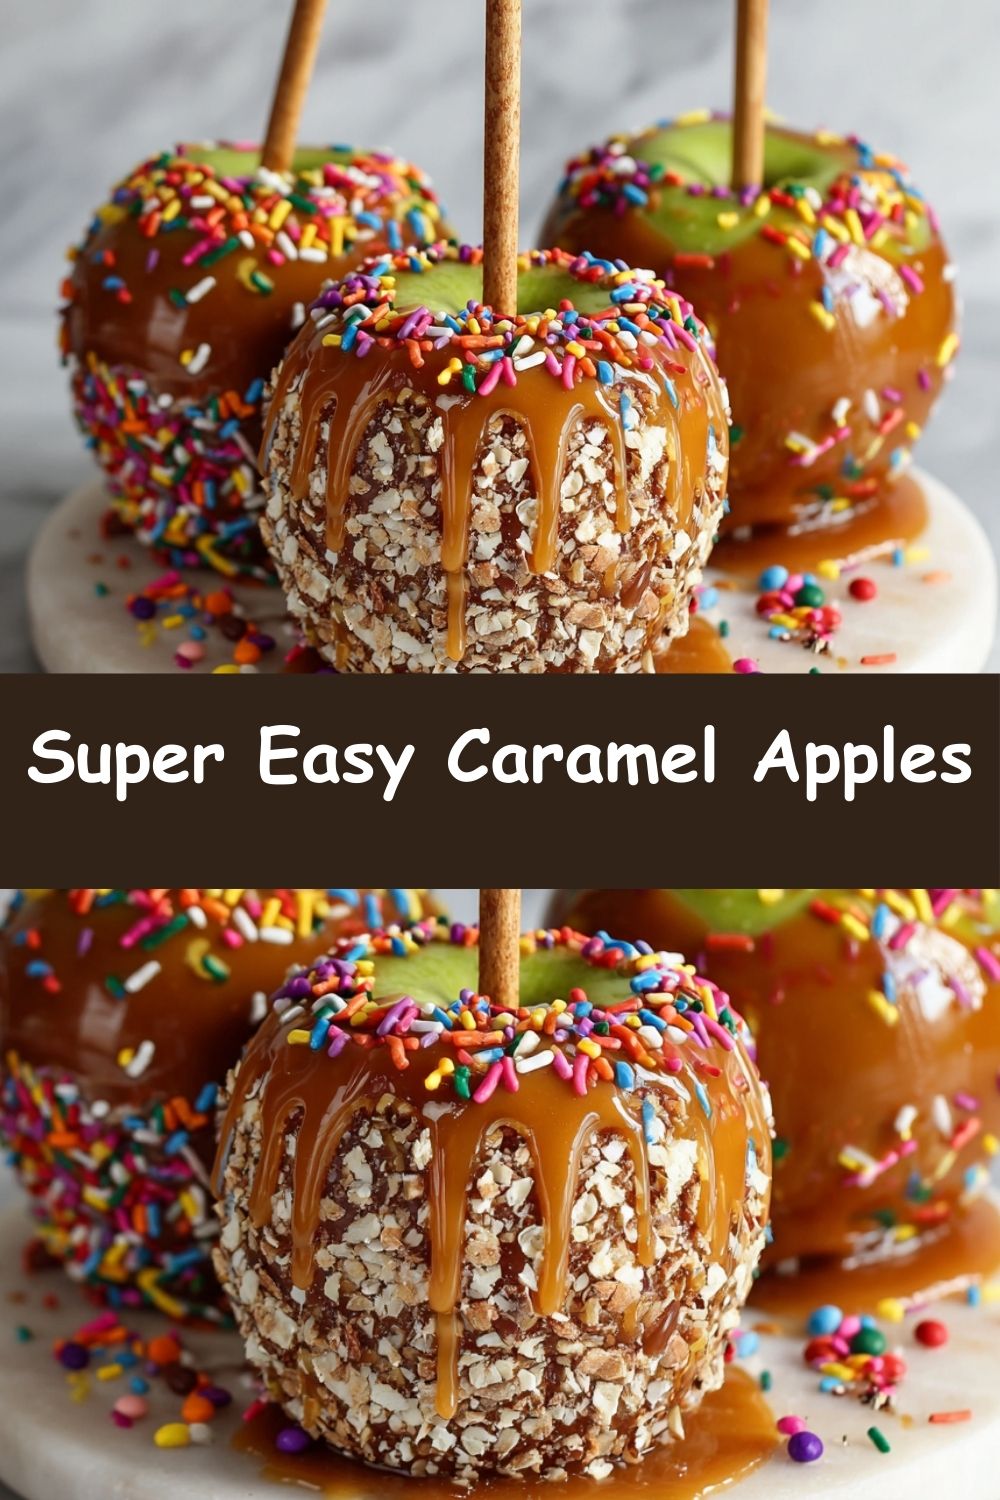
Nutritional Info (Per Apple – Approx.)
- Calories: 340
- Fat: 15g
- Carbs: 50g
- Sugars: 42g
- Protein: 3g
Prep Time: 15 mins | Chill Time: 15–20 mins | Total Time: 30–35 mins
Storage: Best enjoyed within 2–3 days. Keep refrigerated in an airtight container.
There you have it! My ultimate guide to incredibly fun, easy, and delicious caramel apples. I hope you have as much fun making them as I do.
With love and a sticky spoon,
Clara