Your Cozy Cup of Cocoa, Reimagined as a Dessert Dream
Hey, my fellow flavor adventurer! Pull up a chair, grab your favorite mug of something warm, and let’s get ready to create some serious kitchen magic. Have you ever been curled up on the couch, wrapped in your comfiest blanket, hands wrapped around a steaming mug of hot chocolate, and thought… “I wish I could eat this feeling”? Well, my friend, today is your day. We’re transforming that quintessential cozy moment into the most whimsical, show-stopping, and utterly delicious dessert: Hot Chocolate Mini Cakes with Golden Marshmallows!
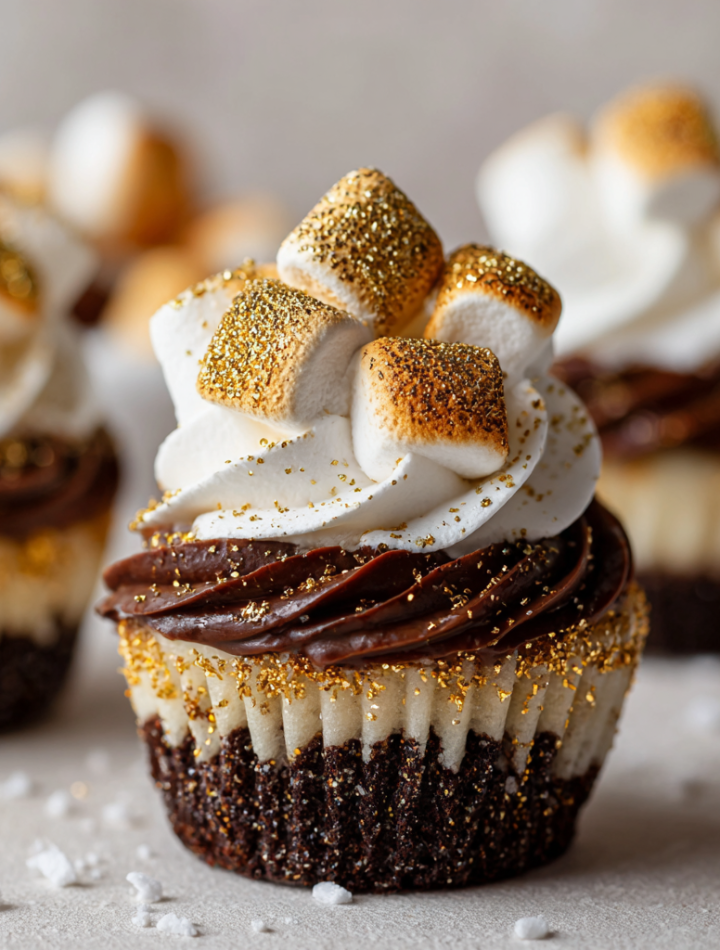
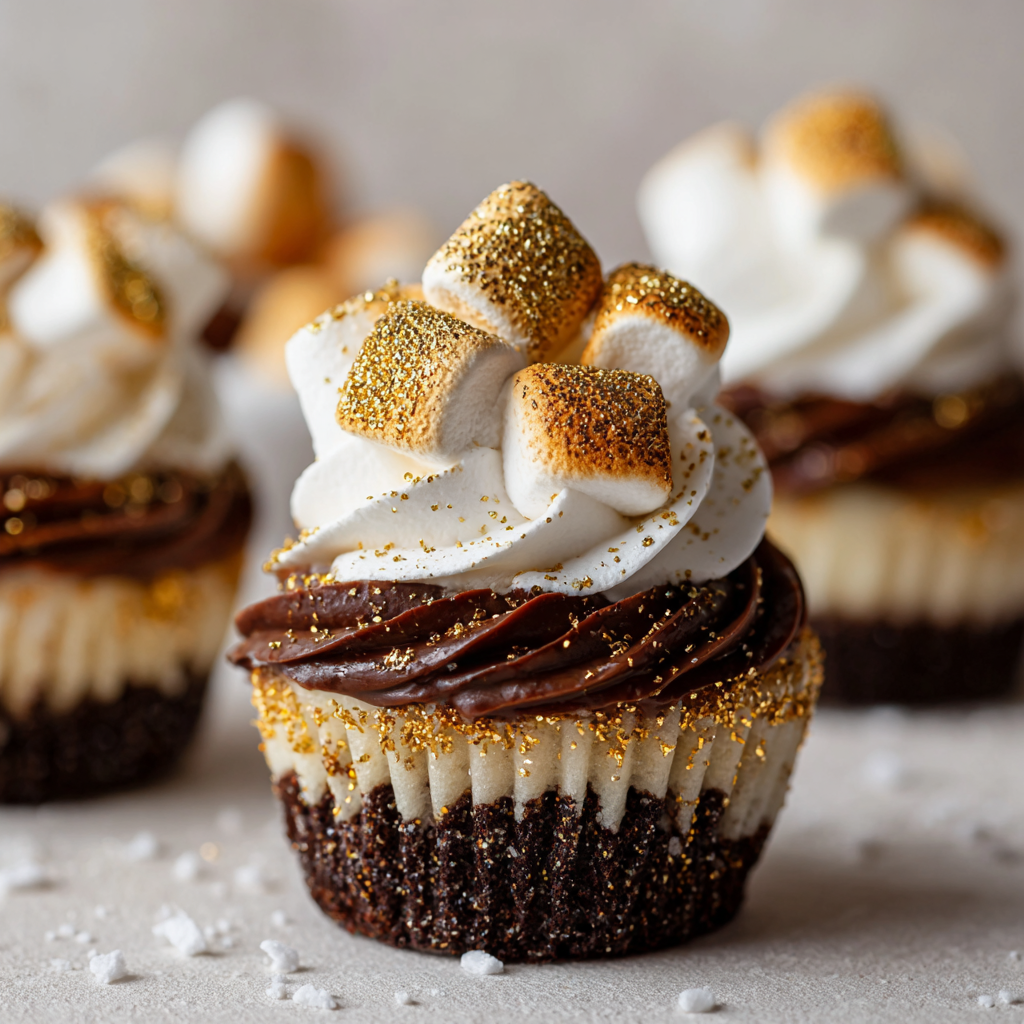
Imagine this: a soft, fluffy vanilla bean cupcake that melts in your mouth. On top, a cloud of marshmallow Swiss meringue buttercream so silky and light it’s like a sweet whisper. Then, a dollop of rich, decadent chocolate mousse that delivers that deep, cocoa-rich punch we all crave. And the grand finale? A crown of two mini marshmallows, toasted to perfection and kissed with a shimmer of edible gold. It’s a bite-sized celebration of everything we love about the holiday season—warmth, joy, and a little bit of sparkle. These mini cakes aren’t just dessert; they’re an experience. They’re the perfect treat to fuel your festive gatherings, to gift to neighbors, or to simply make a regular Tuesday feel a whole lot more special. So, preheat your oven (and your sense of fun!), because we’re about to cook up some nourishing joy that is totally worth licking every spoon, bowl, and beater along the way.
The Night That Inspired It All
This recipe was born from one of my all-time favorite holiday traditions. Years ago, when my niece was just little, we started a thing called “Midnight Hot Cocoa and Carols.” After the chaos of Christmas Eve dinner had settled, we’d sneak into the kitchen in our pajamas, make an overly extravagant pot of hot chocolate with about a thousand toppings, and belt out terribly off-key Christmas songs until we were breathless from laughing and singing.
I’ll never forget one year, we got so carried away with our “performance” that we completely forgot the marshmallows roasting under the broiler. A faint smoky smell snapped us out of our musical trance, and we rushed to the oven to find our marshmallows not burnt, but transformed into these beautifully golden, crispy-topped puffs. They were perfect! We plopped them on our cocoa and that first sip—smoky, sweet, creamy, and chocolatey—was pure magic. I knew right then I had to capture that exact feeling in a dessert. These Hot Chocolate Mini Cakes are my edible love letter to those messy, imperfect, and utterly perfect moments of connection. They taste like joy, nostalgia, and a little bit of toasted marshmallow smoke.
Print
Hot Chocolate Mini Cakes with Golden Marshmallows
- Total Time: 30 minutes
- Yield: 24 mini marshmallows 1x
Description
These whimsical holiday treats are like a cup of hot cocoa in dessert form! Soft vanilla bean cupcakes topped with marshmallow Swiss meringue buttercream, chocolate mousse, and golden toasted marshmallows—each bite is a cozy, sparkling celebration.
Ingredients
12 vanilla bean cupcakes (homemade or store-bought)
Marshmallow-flavored Swiss meringue buttercream (~2 cups)
Chocolate mousse (~1½ cups)
24 mini marshmallows, toasted and sprayed with edible gold
Optional: Edible glitter or gold leaf for garnish
Instructions
How to Assemble
Let cupcakes cool.
Pipe a swirl of marshmallow buttercream on each.
Add a spoonful of chocolate mousse on top.
Finish with 2 toasted golden marshmallows and a sprinkle of glitter.
- Prep Time: 30 minutes
- Category: Dessert
Nutrition
- Calories: 290
- Sugar: 28g
- Fat: 16g
- Carbohydrates: 35g
- Protein: 3g
Gathering Your Magical Ingredients
Here’s everything you’ll need to create these miniature masterpieces. I’ve included some of my favorite chef insights and swaps to make this recipe your own!
- 12 Vanilla Bean Cupcakes (homemade or store-bought): The sturdy, flavorful base of our creation. I highly recommend using a homemade vanilla bean cupcake if you have the time—scraping the seeds from a real vanilla bean pod makes all the difference, giving it that beautiful speckled look and incredible aroma. Chef’s Hack: No time? No shame! A high-quality store-bought vanilla cupcake works beautifully in a pinch. Just give them a quick trim on top to create a flat surface for stacking.
- Marshmallow-Flavored Swiss Meringue Buttercream (~2 cups): This is the silky, not-too-sweet cloud that mimics the melted marshmallow in your cup. Swiss meringue buttercream can sound intimidating, but it’s worth it! It’s less cloyingly sweet than American buttercream and has an incredible texture. The “marshmallow” flavor comes from a good splash of pure vanilla extract and a touch of marshmallow fluff folded in at the end.
- Chocolate Mousse (~1½ cups): This is our rich, chocolatey “hot cocoa” layer. For ease and stability, I use a simple two-ingredient mousse made by folding whipped cream into melted dark chocolate. It’s luxurious, decadent, and sets up perfectly. Substitution Tip: For a quicker version, you can use a store-bought chocolate mousse or even a very thick chocolate pudding. For a dairy-free twist, use coconut cream!
- 24 Mini Marshmallows, toasted and sprayed with edible gold: The star of the show! Toasting them brings out that classic campfire flavor, and the edible gold spray makes them look utterly festive and magical. Chef’s Insight: If you can’t find edible gold spray, a light dusting of gold luster dust mixed with a drop of vodka (to make a paint) works wonderfully.
- Optional: Edible Glitter or Gold Leaf for garnish: Because more is more when it comes to holiday sparkle! A tiny sprinkle of edible glitter over the top adds a beautiful frosty effect.
Let’s Build Some Edible Magic: A Step-by-Step Guide
Don’t be fooled by the fancy look—assembling these is a total blast. Here’s how we do it, with all my best kitchen hacks to make the process smooth and fun.
Step 1: The Foundation – Cupcake Prep
First, ensure your vanilla bean cupcakes are completely cool to the touch. If they have a domed top, use a serrated knife to gently slice it off to create a flat, stable surface. This is a CRUCIAL step—it prevents your beautiful buttercream swirl from sliding off! Place your cupcakes on your serving platter or a wire rack set over a baking sheet (to catch any mess).
Step 2: The Cloud – Piping the Buttercream
Fit a large piping bag with a large open star tip (like a Wilton 1M or 2D). Fill the bag with your marshmallow Swiss meringue buttercream. Now, channel your inner artist! Starting at the outer edge of a cupcake, pipe a continuous swirl, moving inward and upwards to create a tall, beautiful peak. Don’t stress about perfection here—the rustic, swirly look is part of the charm! Pro Tip: If your kitchen is warm and the buttercream feels soft, pop the piped cupcakes into the fridge for 10-15 minutes to firm up before adding the mousse.
Step 3: The Heart – Adding the Chocolate Mousse
Give your chocolate mousse a quick stir to make sure it’s smooth. Using a small spoon or a second piping bag with the tip snipped off, carefully place a generous dollop of chocolate mousse right into the center of the buttercream swirl. You want to create a little “well” for the chocolate, so it looks like it’s nestled within the marshmallow cloud. Think of it like you’re filling a cup!
Step 4: The Grand Finale – Toasting & Garnishing
This is the most fun part! Turn on your oven’s broiler (or grab a kitchen torch). Place your mini marshmallows on a baking sheet lined with parchment paper. Broil for just 30-60 seconds, WATCHING CONSTANTLY, until they are puffed and golden brown. They go from perfect to burnt in a flash, so don’t look away! Let them cool for just a minute until they are stable enough to handle. Carefully spray them with your edible gold spray (do this in a well-ventilated area!). Once they’re dazzling, place two golden marshmallows on top of each mini cake. Finish with a delicate sprinkle of edible glitter or a tiny piece of gold leaf for that final touch of holiday glam.
How to Serve These Shimmering Beauties
Presentation is key to making these mini cakes feel extra special! I love serving them on a simple white cake stand or a rustic wooden board to let their golden sparkle really pop. For a individual touch, place each one on a small gold-rimmed dessert plate with a tiny vintage spoon on the side. These are rich, so they’re perfect alongside a cup of strong coffee, a black tea, or a glass of cold milk to balance the sweetness. Serve them immediately after assembling for the best texture, and get ready for the “oohs” and “aahs”!
Mix It Up! Delicious Variations to Try
The beauty of this recipe is its versatility! Don’t be afraid to play and make it your own.
- Peppermint Twist: Add a drop or two of peppermint extract to the chocolate mousse and crush some candy canes to sprinkle over the top for a refreshing, festive vibe.
- Salted Caramel Drizzle: Drizzle a little warm salted caramel sauce over the chocolate mousse layer before adding the marshmallows. The sweet-salty combo is unbelievable.
- Orange Zest Infusion: Add the zest of one orange to your cupcake batter and a tablespoon of orange liqueur (like Cointreau) to the chocolate mousse for a sophisticated chocolate-orange flavor.
- Gluten-Free & Vegan Friendly: Use your favorite gluten-free vanilla cupcake recipe. For a vegan version, use vegan cupcakes, a vegan Swiss meringue buttercream (aquafaba is a great egg white substitute!), and whip coconut cream with dairy-free chocolate for the mousse.
Clara’s Chef Notes & Kitchen Confessions
I can’t tell you how many times I’ve tested this recipe. The first time, I tried to pipe the mousse under the buttercream and it was a delicious, but structurally unsound, disaster. We’re talking Leaning Tower of Pisa situations. Lesson learned: the sturdy buttercream swirl is the necessary support beam for the creamy mousse!
Another funny story: the first time I used the edible gold spray, I got a little too excited and sprayed it… all over my kitchen wall. My partner walked in and found me and the entire backsplash shimmering. So, a word to the wise: always spray your marshmallows over a big cardboard box or newspaper! This recipe has evolved from a messy idea into my go-to holiday party trick. It’s a reminder that the best recipes often come from a place of joy and a few happy accidents. Don’t aim for perfection—aim for delicious, fun, and full of love.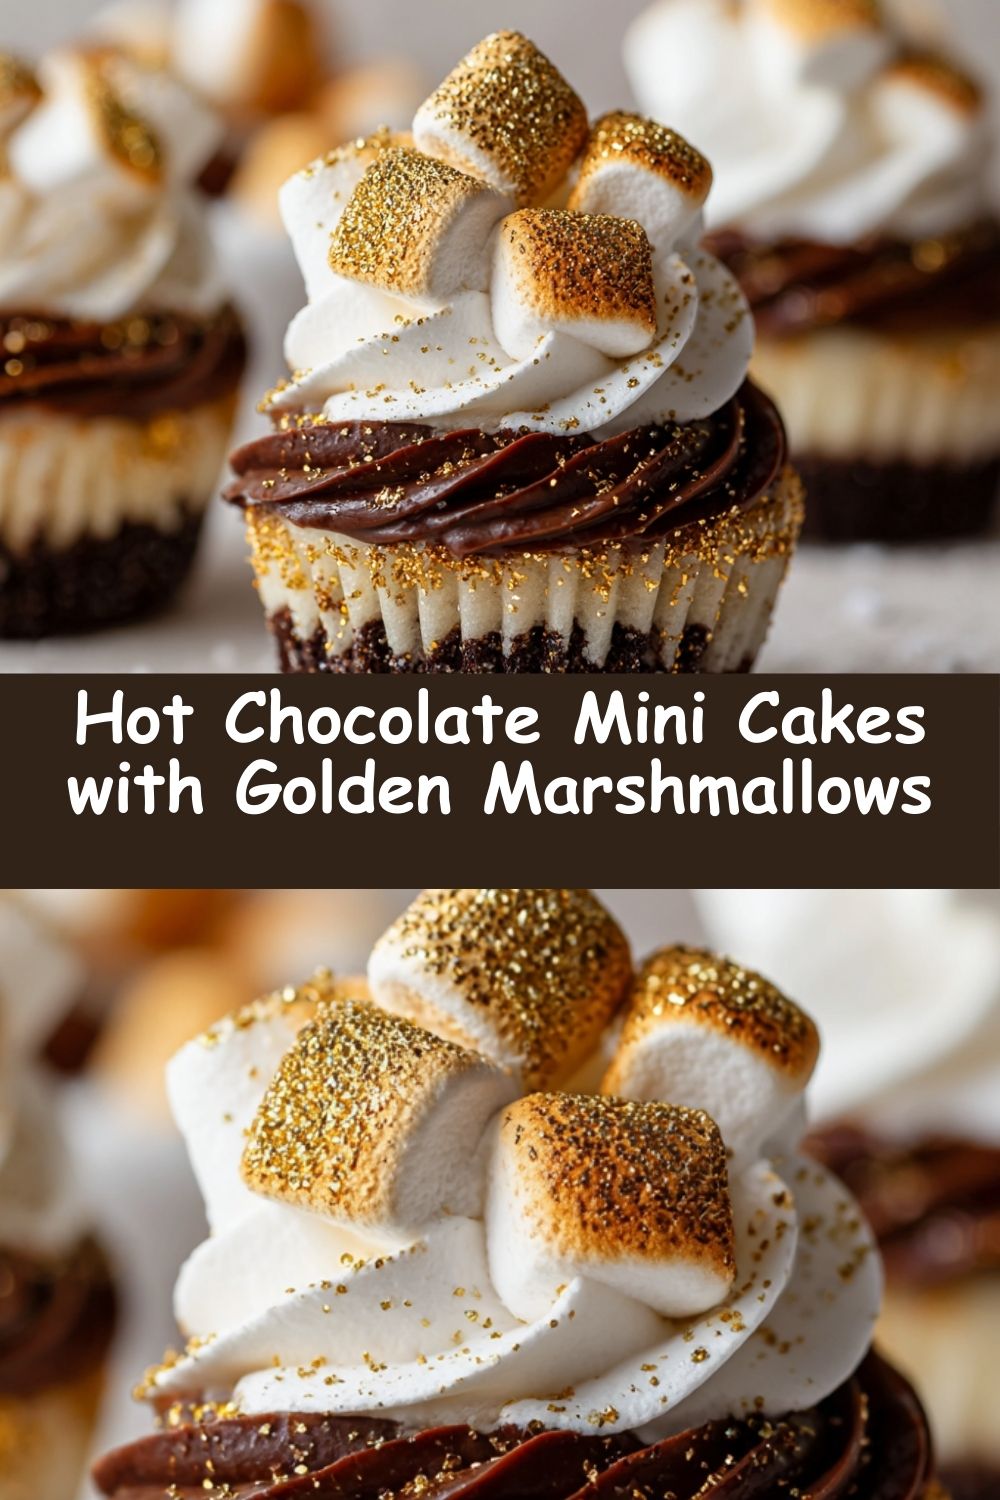
Your Questions, Answered!
Q: My Swiss meringue buttercream turned out runny or curdled! What do I do?
A: Don’t panic! This is usually a temperature issue. If it’s runny, your butter was likely too soft. Just pop the entire bowl into the refrigerator for 15-20 minutes, then re-whip. If it looks curdled, your butter was probably too cold. Keep whipping! It might look scary for a minute, but it will eventually come together into a smooth, silky masterpiece. I promise.
Q: Can I make any parts of this ahead of time?
A: Absolutely! This is a great make-ahead strategy: Bake and cool the cupcakes up to 2 days in advance, store them in an airtight container at room temp. Make the chocolate mousse 1 day ahead and keep it covered in the fridge. Make the buttercream 1-2 days ahead and keep it in the fridge; just let it come to room temp and re-whip before piping. Assemble the mini cakes the day you plan to serve them for the best texture.
Q: I don’t have a piping bag or tips. How can I assemble these?
A: No problem! You can use a zip-top bag with a corner snipped off for both the buttercream and the mousse. For the buttercream, just snip a larger opening and pipe simple dollops or swirls. For a more rustic look, you can even just use a spoon to dollop and swirl the buttercream on top.
Q: How do I store leftovers?
A: These are best enjoyed the day they are made, as the toasted marshmallows will start to soften and weep. If you have leftovers, store them in a single layer in an airtight container in the refrigerator for up to 2 days. The texture will be different, but they’ll still taste delicious!
Nutritional Information*
*Please note: This is an approximate calculation based on the specific ingredients I used and is intended to be a rough guide. Your results may vary based on brands and specific substitutions.
Per Mini Cake (Approx.): Calories: 290 | Fat: 16g | Saturated Fat: 10g | Carbohydrates: 35g | Fiber: 1g | Sugars: 28g | Protein: 3g
There you have it! My ultimate festive treat that’s guaranteed to make your taste buds dance. I hope you have as much fun making these as I do. Remember, cooking is an adventure—so don’t be afraid to get a little glitter on your nose and a lot of love in your food.
With warmth and a sweet tooth,
Clara