
Let’s Make Some Snowman Magic: No-Bake Vegan Oreo Pops!
Hey, my festive friend! Clara here, from my kitchen to yours. Is there anything better than that first true bite of winter in the air? The kind that makes you want to pull on your coziest sweater, put on a classic holiday movie, and create something utterly delightful that fills your home with laughter instead of oven heat? I think not. And that’s exactly why I’m so ridiculously excited to share this recipe with you today.
We’re ditching the complicated baking and embracing the pure, unadulterated joy of no-bake creating. We’re talking about transforming a few simple, vegan-friendly ingredients into an army of the most adorable, whimsical, and downright delicious No-Bake Snowman Oreo Pops. These little guys are more than just a treat; they’re a memory in the making. They’re perfect for holiday parties where you want to be the person who brought *the* show-stopping dessert. They’re ideal for edible gifts that scream “I made this with love!” instead of “I fought a mall crowd for this.” And honestly? They are the absolute best excuse for a cozy afternoon craft session, whether you’re flying solo, with a partner, or with some very eager little helpers.
So, if you’ve ever looked at a fancy dessert and thought, “I could never make that,” I’m here to tell you—you totally can. This is our kind of kitchen adventure: low stress, high reward, and guaranteed to make your eyes light up. Let’s gather our supplies and cook up some holiday cheer that’s completely cruelty-free and 100% fun.
The Winter I Discovered Edible Joy
This recipe takes me right back to my first winter in my own apartment. The budget was… let’s call it ‘creative’. I wanted to give my friends and family something personal, something that felt like me, but store-bought gifts were out of the question. All I had was a packet of Oreos (the vegan kind, of course!), some chocolate from a failed baking attempt, and a serious dose of holiday spirit.
I remember sitting on my kitchen floor, surrounded by a chaotic mess of melted chocolate and sprinkles, trying to stick pretzel arms into cookies. They were lopsided, a little messy, and the “snow” was more of a blizzard on the parchment paper. But when I handed them out, the reaction was everything. My friends didn’t see the imperfections; they saw the love and the hilarious personality in each unique little snowman. That was the moment I truly understood that the best food isn’t about perfection. It’s about the connection, the laughter, and the shared joy of creating something together. These snowman pops are my edible hug to you—a reminder that the most magical holiday moments are often the simplest, and slightly messy, ones.
Print
No-Bake Snowman Oreo Pops
- Total Time: 11 minute
Description
These adorable no-bake Oreo pops are a creative, cruelty-free treat that’s as fun to make as they are to gift! Dipped in dairy-free chocolate and decorated with sweet little details, these snowmen are perfect for holiday parties, edible gifts, or cozy crafts with kids.
Ingredients
2 packs Oreo cookies (double-stuffed works best)
250g dairy-free white chocolate (for coating)
20g dairy-free dark chocolate (for details)
Pretzel sticks (for arms)
Vegan mini peanut butter cups (for hats)
Orange food gel (for noses – like Rainbow Dust Pro Gel)
Instructions
Melt White Chocolate: Gently melt dairy-free white chocolate until smooth.
Assemble Pops: Insert lollipop sticks into Oreos carefully. Dip each cookie into the white chocolate to coat fully. Place on parchment to set.
Add Features:
Use melted dark chocolate to pipe eyes, smile, and buttons.
Dab orange food gel to create carrot noses.
Press pretzel sticks into the sides for arms.
Top each pop with a mini peanut butter cup as the hat.
Set & Serve: Chill until chocolate hardens. Wrap individually for gifts or display for dessert.
- Prep Time: 30 minutes
- Cook Time: None
- Category: Dessert
Nutrition
- Calories: 240
- Sugar: 18g
- Carbohydrates: 28g
- Protein: 3g
Gathering Your Snowman Squad: The Ingredients
Here’s the beautiful part: you only need a handful of simple ingredients to create these edible masterpieces. I’ve included my favorite brand recommendations and swaps to make this recipe work for you!
- 2 packs Oreo cookies: I strongly recommend the Double-Stuffed variety here. The extra cream filling gives the lollipop stick a sturdier anchor, making your snowmen much less likely to take a nosedive. Chef’s Insight: Most standard Oreos are accidentally vegan, but always double-check the label to be sure!
- 250g dairy-free white chocolate: This is your snow suit! I’m a huge fan of the brands Enjoy Life or Pascha for melting because they’re formulated to be dairy-free and melt smoothly. Substitution Tip: You can use vegan chocolate chips, but you may need to add a teaspoon of coconut oil to help them achieve a dip-able consistency.
- 20g dairy-free dark chocolate: This is for the cute little faces and buttons! Melting it and putting it in a piping bag (or a Ziploc with a tiny corner snipped off) gives you total control. Chef’s Insight: Using a higher cocoa percentage (like 70%) creates a nice contrast against the sweet white chocolate.
- Pretzel sticks: These are the perfect arms! I use the thin “stick” pretzels, not the big knotted ones. Break them in half for the ideal arm length.
- Vegan mini peanut butter cups: The hat! Justin’s makes a great dark chocolate peanut butter cup that’s dairy-free. Substitution Tip: If you can’t find these, a vegan chocolate button or even the flat bottom of a small strawberry would make a cute hat alternative.
- Orange food gel (like Rainbow Dust Pro Gel): For the classic carrot nose! I prefer a gel-based food color over liquid because it’s more vibrant and won’t change the consistency of your chocolate if you’re using it for piping. A tiny dot is all you need!
- Lollipop sticks: You can find these at any craft store or in the baking aisle of most major supermarkets. They’re essential for the “pop” part!
Building Your Frosty Friends: A Step-by-Step Guide
Okay, let’s get our hands dirty (or chocolaty)! This process is all about embracing the fun. Put on some holiday tunes, and let’s assemble our snowy squad.
- Prep Your Station: Before you even think about melting chocolate, line a large baking sheet with parchment paper. This is your snowman drying rack. Have all your ingredients measured, unwrapped, and within arm’s reach. Trust me, once the chocolate is melted, you’ll want to move quickly. This “mise en place” (everything in its place) is my number one chef hack for a stress-free kitchen.
- Melt the White Chocolate: This is the most crucial step! You can melt your dairy-free white chocolate using a double boiler (a heatproof bowl set over a pot of simmering water, making sure the bottom of the bowl doesn’t touch the water) or in the microwave in 20-second bursts, stirring vigorously between each burst. Why we stir: White chocolate holds its shape even when melted, so stirring is non-negotiable to avoid scorching. Heat it just until it’s smooth and liquid. If it seems too thick, stir in a ½ teaspoon of coconut oil to loosen it up.
- Assemble the Pops: Carefully twist apart an Oreo. You’ll see the beautiful cream filling. Gently but firmly push the end of a lollipop stick into the center of the cream filling, then sandwich the cookie back together. The cream acts as a glue and an anchor. Repeat with all your Oreos. Now, holding the stick, dip one Oreo pop completely into the melted white chocolate. Use a spoon to help scoop and drizzle the chocolate over the top to ensure it’s fully coated. Let the excess drip off, then place it flat-side down on your parchment paper. Repeat! Little Chef Hack: If your chocolate starts to thicken as it cools, just pop it back on the heat for a few seconds.
- Add the Features – Let’s Get Creative!
- The Hat: Immediately after placing your chocolate-dipped pop on the parchment, gently press a mini peanut butter cup onto the top of the Oreo to form the snowman’s hat. The wet chocolate will act as glue.
- The Arms: Quickly, before the chocolate sets, press two broken halves of a pretzel stick into the sides of the Oreo for the arms.
- The Face & Buttons: Now, melt your dark chocolate using the same method. Transfer it to a piping bag or a small Ziploc bag and snel off a TINY tip. Once the white chocolate on your pops has set slightly (about 5-10 minutes), pipe on two little eyes, a sweet smile, and three buttons down the front. Don’t worry about perfection—quirky smiles have more character!
- The Nose: Using a toothpick or the tip of your food gel bottle, dab a small orange dot between the eyes and above the smile for the perfect carrot nose.
- The Final Chill: Once all your snowmen are decorated, carefully transfer the entire baking sheet to the refrigerator for at least 30 minutes, or until the chocolate is completely firm and set. This patience-testing step is worth it for that satisfying snap when you bite into it!
How to Serve Your Snowman Crew
Presentation is part of the fun! You can stand them up in a mug or a vase filled with sugar or more Oreo crumbs to look like snow. For a party, lay them flat on a beautiful platter surrounded by rosemary sprigs to mimic evergreen trees. If you’re gifting them, once they’re fully set, individually wrap each pop in clear cellophane treat bags and tie them off with a festive ribbon. They make the most heartfelt and impressive edible gift!
Mix It Up! Creative Snowman Twists
Feel like putting your own spin on these frosty friends? Go for it!
- Peppermint Party: Add a drop of peppermint extract to your white chocolate before dipping, and crush some vegan candy canes to sprinkle on as “snow” right after dipping.
- The Scarfed Snowman: Use a red fruit leather or a strip of a vegan fruit roll-up to tie a tiny scarf around your snowman’s neck before adding the arms.
- Snowwoman Style: Use a dot of pink gel for cheeks and pipe some “hair” with curly cues of dark chocolate.
- Gluten-Free Frosty: Use gluten-free sandwich cookies (like Glutino) and ensure your pretzels are gluten-free. The rest of the ingredients are naturally GF!
Clara’s Kitchen Confidential
This recipe has evolved so much since that first messy winter! My biggest lesson learned? Don’t try to pipe the dark chocolate details onto wet white chocolate. It bleeds and creates a blurry, ghost-of-Christmas-past look. Letting the base set for a few minutes first is the game-changer for crisp features.
I also have a hilarious memory of trying to use shredded coconut as “snow” on the plate. Let’s just say it looked less like a winter wonderland and more like my snowmen were in a very unfortunate blizzard. We scrapped that idea and never looked back! The beauty of these is in their simplicity. Embrace the imperfections—the snowman with one eye slightly higher than the other has the most personality, I promise.
Your Snowman Questions, Answered!
Q: My chocolate seized up and got clumpy! What did I do wrong?
A: Ah, the classic chocolate seize! This usually happens if a tiny drop of water or steam gets into your melting chocolate. Chocolate and water are arch-nemeses. To fix it, try stirring in a small amount of neutral oil (like coconut or vegetable oil) one teaspoon at a time until it smooths back out. Prevention is key: make sure all your bowls and tools are completely dry.
Q: My lollipop stick won’t stay in the Oreo! Help!
A: This is why double-stuffed Oreos are the MVP. If you’re using regular ones and having trouble, you can add a tiny dab of your melted white chocolate to the stick before inserting it—it acts as edible glue. Also, be sure you’re pushing it firmly into the cream center, not just the cookie.
Q: Can I make these ahead of time?
A: Absolutely! They are perfect for making ahead. Once fully set, store them in a single layer in an airtight container in the refrigerator for up to 5 days. If you stack them, they might stick together and break their delicate chocolate shells.
Q: My dark chocolate is too thick to pipe. What can I do?
A: Easy fix! Just pop it back in the microwave for 5 seconds or stir in a tiny, tiny amount of coconut oil to thin it out to a piping consistency. You want it to be fluid but not runny.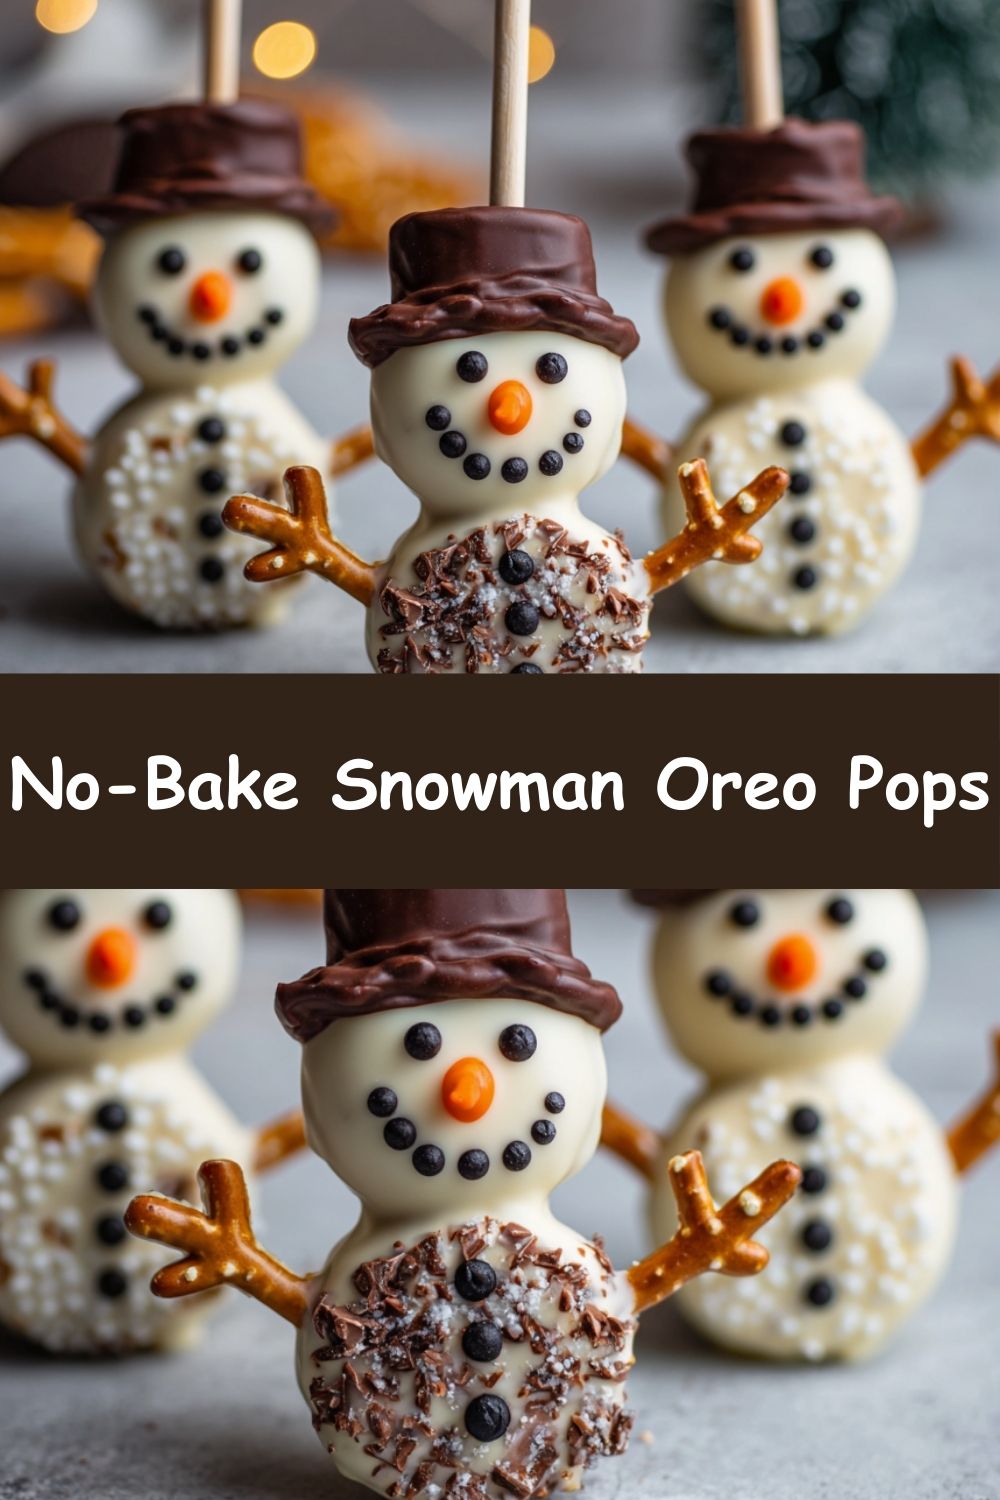
Nutritional Information*
*Please note: This is an approximate estimate calculated using an online nutrition calculator. Actual values will vary based on specific brands and ingredients used.
Per Pop (Approx.): Calories: 240 | Fat: 13g | Carbohydrates: 28g | Sugars: 18g | Protein: 3g
Prep Time: 30 minutes (plus chilling) | Cook Time: 0 minutes | Storage: Airtight container in the fridge for up to 5 days.
There you have it! A recipe that’s all about joy, creativity, and sharing something wonderfully delicious. I hope you have the best time making these.
With love and a sprinkle of snow,
Clara