The Dip That Started It All: My Legendary Buffalo Chicken Dip
Hey there, my fellow flavor adventurer! Clara here, and I have to ask: have you ever been to a party, taken one bite of something, and immediately needed to find the person who made it so you could demand the recipe? That’s the power of a truly epic dish. And friends, if there’s one recipe in my arsenal that has caused more recipe-demanding, spoon-licking, and happy-dancing than any other, it’s this one. This isn’t just any buffalo chicken dip. This is the buffalo chicken dip—the one that disappears from the plate faster than I can refill it.
We’re talking creamy, dreamy, cheesy perfection with that signature spicy kick we all crave. It’s the ultimate crowd-pleaser, the MVP of game day spreads, and my personal favorite “I-deserve-something-awesome-today” treat. But here’s the best part: it’s incredibly simple to make. We’re using wholesome, real ingredients to create a dip that feels indulgent but is totally approachable. No weird processed stuff, just good, honest food that brings people together. So, preheat that oven, grab your favorite bowl, and let’s create some magic. This is the kind of recipe that turns a regular Tuesday into a celebration.
The Dip That Won Over My Family
I’ll let you in on a little secret: this dip is my not-so-secret weapon. I vividly remember the first time I brought it to a big, chaotic family gathering. My family, God love ’em, can be a tough crowd of self-proclaimed “food critics.” There’s always a debate—too spicy, not spicy enough, needs more cheese, needs less salt. You get the picture. I was nervous, but I slid this bubbling, gorgeous dish onto the table next to the usual suspects of chips and store-bought salsa.
Within minutes, the dynamic in the room shifted. The loud debates turned into happy murmurs of “Oh my goodness, what IS this?” and “Clara, you have to give me this recipe.” My uncle, the king of culinary criticism, was quietly going back for his fourth scoop with a celery stick. That’s when I knew. This dip had done the impossible: it had united my family in delicious, cheesy harmony. It wasn’t just food; it was a memory in the making. Now, it’s not a Whitmore family function unless this dip is on the table. It’s my little edible legacy, and I’m so excited to share it with you.
Print
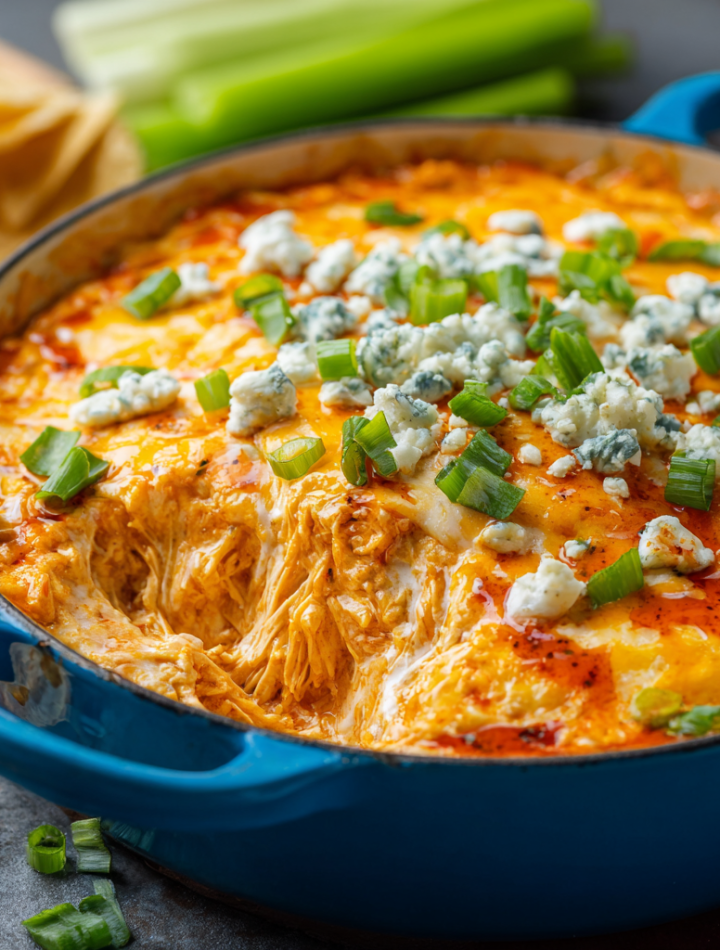
The Best Buffalo Chicken Dip
- Total Time: 30 minutes
Description
Creamy, cheesy, spicy, and totally addictive—this buffalo chicken dip is everything a crowd-pleasing appetizer should be. Whether you’re hosting game day or just want something indulgent and easy, this is the dip you’ll come back to again and again.
Ingredients
Makes about 6–8 servings
2 cups shredded cooked chicken (rotisserie works great)
8 oz cream cheese, softened
½ cup buffalo wing sauce (like Frank’s RedHot)
½ cup ranch dressing (or blue cheese dressing if preferred)
1 cup shredded mozzarella
½ cup shredded cheddar cheese
Optional toppings: sliced green onions, crumbled blue cheese, extra buffalo drizzle
Instructions
Preheat oven to 375°F (190°C).
In a large bowl, mix cream cheese, buffalo sauce, and ranch until smooth.
Fold in shredded chicken, mozzarella, and cheddar.
Spread mixture into an 8×8 baking dish or cast iron skillet.
Bake for 20–25 minutes, until hot and bubbly.
Top with green onions or blue cheese, if desired.
Serve warm with celery sticks, tortilla chips, or low-carb dippers.
- Prep Time: 10 minutes
- Cook Time: 20 minutes
- Category: Appetizer / Snack / Main
Nutrition
- Calories: 250
- Fat: 20g
- Carbohydrates: 3g
Gathering Your Dream Team: The Ingredients
This recipe is all about the beautiful synergy of a few simple ingredients. Each one plays a crucial role in building that iconic flavor and texture. Here’s what you’ll need:
- 2 cups shredded cooked chicken: This is your protein powerhouse! Using a pre-cooked rotisserie chicken is my ultimate chef hack—it’s juicy, flavorful, and saves you so much time. Feel free to use leftover baked or grilled chicken breast, or even poach and shred your own. For a super easy shortcut, canned chicken (drained well) works in a pinch!
- 8 oz cream cheese, softened: The creamy, luxurious base of our dip. Pro Tip: Let it sit on the counter for at least 30 minutes before you start. Softened cream cheese blends into a silky-smooth mixture, while cold cream cheese will leave pesky little lumps. If you’re dairy-free, a high-quality plant-based cream cheese works wonderfully here.
- ½ cup buffalo wing sauce (like Frank’s RedHot): The star of the show! This gives the dip its signature tangy, spicy kick. Frank’s is the classic for a reason—it has the perfect balance of heat and vinegar. Feel free to adjust the amount based on your heat tolerance. For a milder dip, start with ⅓ cup. For extra fire, go for ¾ cup!
- ½ cup ranch dressing (or blue cheese dressing): This is the cool, creamy counterpart to the spicy buffalo sauce. I’m a ranch girl at heart, but if you’re a blue cheese purist, go for it! The tangy funk of blue cheese is a classic pairing with buffalo wings. Use your favorite store-bought brand or whip up your own homemade version for an extra-special touch.
- 1 cup shredded mozzarella cheese: Hello, gorgeous stretchy, gooey cheese pulls! Mozzarella melts beautifully and provides that iconic stringy cheese effect we all love.
- ½ cup shredded cheddar cheese: The sharp, bold flavor of cheddar adds a deeper cheesy note and a beautiful golden color to the top of the dip when baked. I like to use a medium or sharp cheddar for the best flavor.
- Optional toppings: This is where you make it your own! A sprinkle of sliced green onions adds a fresh, crisp bite. A handful of crumbled blue cheese right at the end leans into the wing joint vibe. And an extra drizzle of buffalo sauce makes for a gorgeous presentation and a burst of extra heat.
Let’s Get Cooking: Building Your Masterpiece
Ready to see how this all comes together? It’s so easy, you’ll have it memorized after one try. Let’s walk through it, step by step, with all my favorite chef hacks along the way.
Step 1: Preheat & Prep
Preheat your oven to 375°F (190°C). This is the perfect temperature to get everything hot, bubbly, and beautifully golden without burning the cheese. While it’s heating, grab an 8×8 baking dish, a 9-inch pie plate, or even a small (10-inch) cast-iron skillet. I love using a cast-iron skillet for this—it retains heat incredibly well, so your dip stays warm for ages on the table. Give it a quick light greasing with a bit of butter or cooking spray for easy cleanup later.
Step 2: Create the Creamy Base
In a large mixing bowl, combine your softened cream cheese, buffalo sauce, and ranch dressing. Now, here’s a little chef insight: use a sturdy rubber spatula or a hand mixer for this. If your cream cheese is truly softened, a spatula will work just fine and you’ll get a little arm workout! If you’re short on time or want it ultra-smooth, a hand mixer on low speed will blend it into a perfectly luscious and homogeneous base in about 30 seconds. You shouldn’t see any streaks of white cream cheese.
Step 3: The Big Fold-In
Now, add your star players: the shredded chicken, mozzarella, and cheddar cheese. The key verb here is fold. Use your spatula to gently turn the mixture over from the bottom until the chicken and cheeses are evenly distributed throughout the creamy base. Why fold? We want to keep some of that air we just incorporated and avoid over-mixing, which can make the cheese a bit greasy. You want every single bite to have a perfect balance of creamy, cheesy, and chicken-y goodness.
Step 4: Bake to Perfection
Transfer your beautifully mixed dip into your prepared baking dish and spread it out into an even layer. Pop it into your preheated oven and set your timer for 20 minutes. We’re looking for a few key signs of doneness: the edges should be actively bubbling like a little cheesy volcano, and the top should be lightly golden brown. If you want a more dramatic, browned top, you can switch the oven to broil for the last 1-2 minutes—but WATCH IT CLOSELY! It can go from golden to burnt in a flash.
Step 5: The Grand Finale (Toppings!)
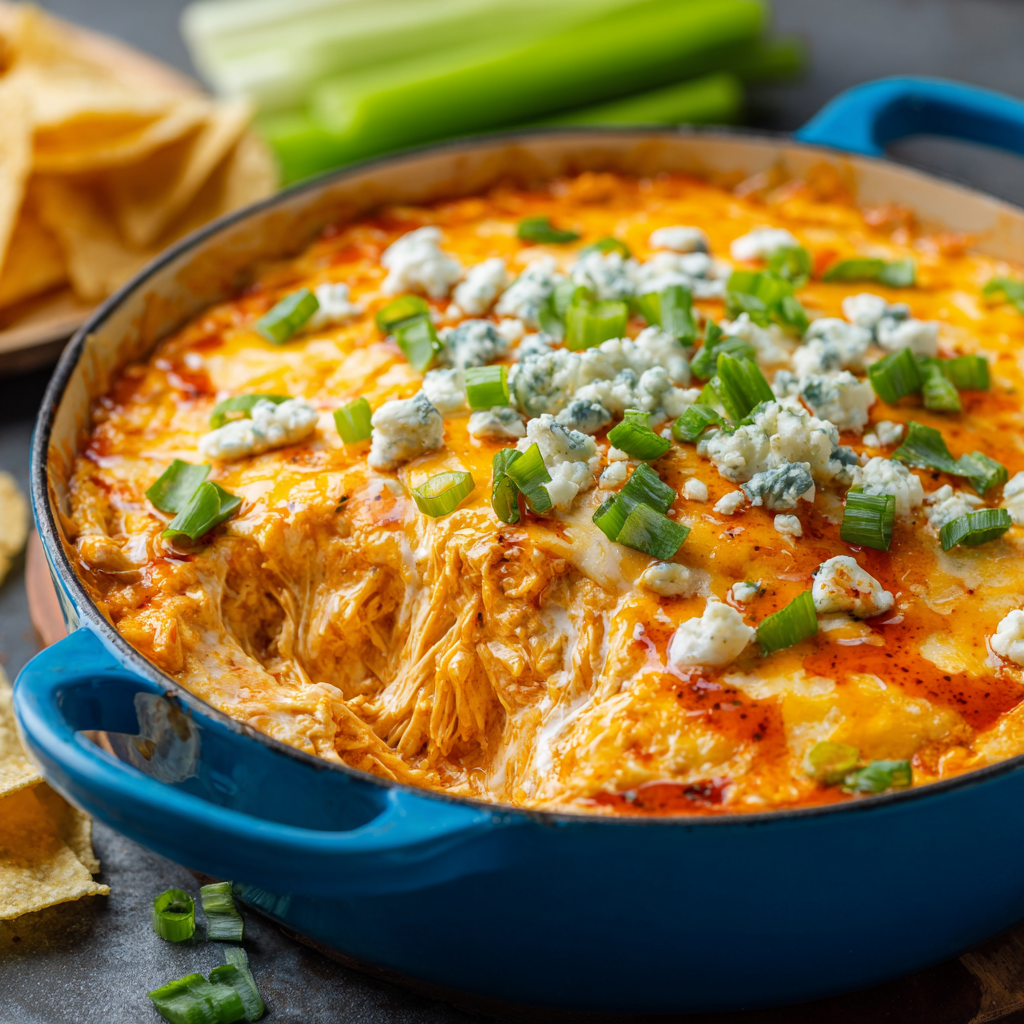
Carefully remove your masterpiece from the oven—remember, the dish is crazy hot! Let it sit for just 2-3 minutes. This little rest allows the dip to set slightly, making it easier to scoop without being a molten lava mess. This is the time to get fancy with your toppings. Scatter over those vibrant green onions, sprinkle on some crumbled blue cheese for that authentic wing-shop flair, or artfully drizzle a little more buffalo sauce over the top. Not only does it add flavor, but it makes the dip look absolutely irresistible.
How to Serve This Legendary Dip
Presentation is part of the fun! I love serving this dip right in the warm cast-iron skillet I baked it in—it keeps it hot and looks so rustic and inviting. Place it in the center of a large platter and surround it with an array of dippers. The classic choice is a big pile of sturdy tortilla chips and a bundle of fresh, cold celery sticks (the cool crunch is the perfect contrast to the spicy dip). For a lower-carb option, try bell pepper strips, cucumber rounds, baked pita chips, or even sturdy endive leaves. Don’t forget a few spoons for scooping!
Make It Your Own: Delicious Variations
The beauty of this recipe is its versatility. Here are a few ways to twist it up:
- Buffalo Chicken Dip Sliders: Spread a generous layer of cooled dip onto Hawaiian roll sliders, add a piece of crisp lettuce, and pop the top on for the ultimate game-day sandwich.
- Loaded Baked Potato Topper: Spoon this warm dip over a baked potato for the most decadent, meal-worthy spud of your life.
- Spicy Pulled Pork Swap: Out of chicken? Use pulled pork instead for a whole new flavor profile! It’s incredible.
- Extra Veggie Power: Sneak in ½ cup of finely chopped cauliflower rice or shredded carrots into the mix for an extra boost of veggies—they blend right in!
- Smoky & Spicy: Add a teaspoon of smoked paprika or chipotle powder to the mix for a deep, smoky heat.

Clara’s Kitchen Notes & Stories
This recipe has been on quite a journey with me. It started as a scribbled note on the back of a grocery receipt after I had a version of it at a friend’s potluck. I’ve tweaked the ratios more times than I can count—a little more sauce, a little less dressing, testing every cheese under the sun. I once tried to get fancy and use a fancy, artisanal blue cheese. Lesson learned: sometimes, the classic, simple ingredients are the best. The dip turned out so funky and strong it cleared the room! We still laugh about “The Great Blue Cheese Incident of 2018.” Stick with what you know and love.
Over time, it’s evolved into this perfect, no-fail formula. The biggest game-changer was realizing the power of the rotisserie chicken. It adds so much more flavor than plain boiled chicken ever could. This dip is a testament to my philosophy: cooking shouldn’t be stressful. It should be fun, flexible, and ultimately, deeply satisfying. This recipe is all of that.
Your Questions, Answered!
Q: Can I make this buffalo chicken dip ahead of time?
A: Absolutely! You are my kind of planner. Assemble the dip completely, cover it tightly with plastic wrap, and store it in the refrigerator for up to 24 hours before you need to bake it. When you’re ready, just pop it in the oven. You might need to add 5-10 minutes to the baking time since it’s going in cold.
Q: My dip turned out a bit oily. What happened?
A: This usually happens if the cheese is over-mixed. When you’re combining everything, just fold until it’s incorporated. Also, using pre-shredded bagged cheese can sometimes be the culprit, as they are often coated in anti-caking agents that don’t melt as smoothly. If you have the time, shredding your own cheese from a block can help create a smoother, less greasy melt.
Q: Can I make this in a slow cooker?
A: Yes, and it’s a fantastic hands-off method for keeping it warm at a party! Combine all ingredients in your slow cooker. Cook on LOW for 2-3 hours, stirring occasionally, until everything is melted and hot. Then, just switch it to the WARM setting.
Q: How long do leftovers last?
A: Leftovers (if you’re lucky enough to have any!) will keep in an airtight container in the refrigerator for 3-4 days. Reheat it in the microwave in 30-second intervals, stirring in between, until warm. It also reheats well in a small saucepan over low heat, with a tiny splash of milk or ranch to bring back the creaminess.
Nutritional Information*
*Please note: This is an estimated nutritional breakdown based on the specific ingredients I used. Your exact values may vary depending on brands and substitutions.
Per serving (approximately ¼ cup):
Calories: ~250 | Protein: 15g | Carbohydrates: 3g | Fat: 20g
While this is certainly an indulgent treat, it’s packed with protein! Balancing it with fresh veggie dippers like celery and bell peppers is a great way to enjoy it.
Prep Time: 10 mins | Cook Time: 20-25 mins | Total Time: 30-35 mins
There you have it! My all-time, number one, most-requested party recipe. I hope it brings as much joy and togetherness to your table as it has to mine. Now go forth and dip fearlessly!
With love and a full spoon,
Clara