The Ultimate Comfort: Cheddar Dinner Rolls That Steal the Show
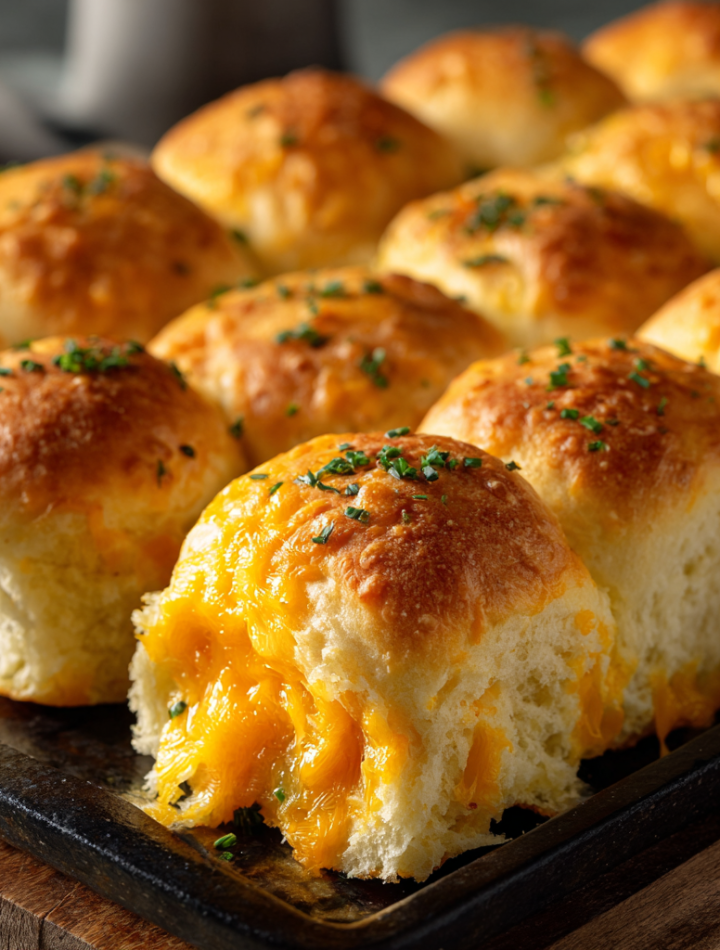
Is there anything more universally comforting than the promise of a warm, fluffy dinner roll? I’m talking about the kind that’s soft enough to pull apart with your fingers, releasing a puff of steam that smells like pure, unadulterated joy. Now, imagine that same roll, but better. Imagine it packed with pockets of melty, sharp cheddar cheese, with a golden-brown crust that gives way to an impossibly tender, cloud-like interior. That, my friends, is the magic we’re making today.
I’ve always believed that the side dishes are the unsung heroes of any great meal. They’re the supporting cast that can—and should—absolutely steal the show. These Cheddar Dinner Rolls are the epitome of that philosophy. They’re not just an afterthought next to a roast chicken or a bowl of steaming soup; they’re a destination. They’re the reason people linger at the table, sneaking just one more before the plate is officially out of reach.
I know the word “yeast” can send a shiver down the spine of even the most confident home cook. But trust me, this recipe is your new best friend. We’re using a simple, forgiving method that’s perfect for beginners and rewarding for seasoned bakers. This isn’t about perfection; it’s about the fun of getting your hands a little dusty with flour and creating something truly special from a handful of simple ingredients. So, tie on your favourite apron, and let’s bake up a batch of these cheesy, glorious bundles of happiness. Your kitchen is about to smell incredible.
A Cheese-Stained Memory: Where My Love for These Rolls Began
My obsession with these rolls started not in a fancy culinary school, but in my Nana’s wonderfully chaotic kitchen. Every Thanksgiving, without fail, the air would be thick with the scent of roasting turkey and pies, but the true trophy, the thing my cousins and I would plot to snag, was Nana’s “cheesy bread.” She never called them dinner rolls; they were just her cheesy bread, and they were legendary.
I remember standing on a wobbly stool next to her, watching her strong hands work the dough. She’d let me sprinkle in the big handfuls of bright orange cheddar (it was the 90s, forgive the color!), and I’d be tasked with carefully brushing the melted butter on top before they went into the oven. The wait felt like an eternity. When they finally emerged, puffed and golden, we weren’t allowed to touch them until grace was said. The rule was one per person to start, but Nana always, always looked the other way when I snuck back for a second. That first bite—the slight resistance of the crust giving way to the soft, steaming, cheesy interior—is a core memory for me. It tasted like love, like family, like home. This recipe is my homage to her, with a few of my own tweaks to make it uniquely ”
Print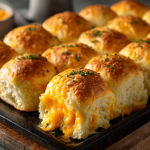
Cheddar Dinner Rolls
- Total Time: 1 hour 55 minutes
- Yield: serves 6
Description
Soft, fluffy, and loaded with melty cheddar goodness — these dinner rolls are a crowd-pleaser from the first bite. With a golden crust and gooey cheese inside, they’re the perfect sidekick for soups, roasts, or holiday feasts. This version makes 24 rolls and adds just enough flair to turn classic rolls into something unforgettable.
Ingredients
4 to 4½ cups all-purpose flour, divided as needed
4 tablespoons granulated sugar
1 teaspoon salt
2 (¼ oz) packets rapid rise instant yeast
2 tablespoons unsalted butter
2 cups whole or 2% milk
2 cups shredded sharp cheddar cheese
2 large eggs, beaten
Optional twists:
2 teaspoons garlic powder
2 tablespoons chopped fresh chives or parsley
1 tablespoon melted butter + pinch of smoked paprika for brushing tops
Instructions
In a large bowl, mix 3½ cups flour, sugar, salt, and yeast.
In a saucepan, heat milk and butter until warm (not hot). Pour into dry ingredients and mix.
Stir in beaten eggs and shredded cheese (plus garlic powder and herbs if using). Mix until dough forms.
Add remaining flour a bit at a time until dough is soft but not sticky.
Knead on a floured surface for about 6 minutes.
Place in a greased bowl, cover, and let rise in a warm place for 1 hour or until doubled.
Punch down dough, divide into 24 equal balls, and place in two greased 9×13 pans.
Cover and let rise again for 15–20 minutes.
Preheat oven to 375°F (190°C). Brush tops with melted butter and a pinch of smoked paprika (optional).
Bake for 12–15 minutes or until golden brown. Serve warm.
- Prep Time: 25 minutes
- Cook Time: 15 mins
- Category: Dinner
Nutrition
- Calories: 160
- Carbohydrates: 20g
- Protein: 4g
Gathering Your Cast of Characters
Here’s everything you’ll need to make about 24 show-stopping rolls. The beauty of baking is in the simplicity of the ingredients, so let’s get to know them a little better!
- 4 to 4½ cups all-purpose flour, divided: We start with 3½ cups in the bowl and add the rest as needed. This variable amount is key! Flour humidity changes daily. We want a soft, slightly tacky dough, not a dry, tough one. The “windowpane test” (more on that later!) is your best guide.
- 4 tablespoons granulated sugar: This isn’t just for sweetness; it’s the favorite food for our yeast, giving it the energy it needs to make our rolls rise up light and fluffy.
- 1 teaspoon salt: The flavor enhancer! It balances the sweetness and cheese perfectly. Never add salt directly on top of the yeast in the bowl—mix it in with the flour first.
- 2 (¼ oz) packets rapid rise instant yeast: My little miracle workers. Instant yeast is a baker’s best friend because you can mix it right in with the dry ingredients—no proofing required. So easy!
- 2 tablespoons unsalted butter: For richness and a tender crumb. Using unsalted lets us control the sodium level, especially since we’re adding salty cheese.
- 2 cups whole or 2% milk: Whole milk will give you the richest, softest rolls, but 2% works beautifully too. The fat content adds to that luxurious texture.
- 2 cups shredded sharp cheddar cheese: The star! I’m a firm believer in using a block of cheese and shredding it yourself. Pre-shredded cheese is coated with anti-caking agents that can make it harder to melt smoothly. Sharp cheddar gives the best flavor punch.
- 2 large eggs, beaten: These are our binders and superstars for richness and color. Always beat them lightly before adding to make incorporation a breeze.
- Optional, but highly encouraged twists:
- 2 teaspoons garlic powder: For a savory, cozy depth. Onion powder works great too!
- 2 tablespoons chopped fresh chives or parsley: A pop of color and fresh flavor that cuts through the richness.
- 1 tablespoon melted butter + pinch of smoked paprika for brushing tops: This is my secret weapon! The butter gives a gorgeous sheen, and the smoked paprika adds a whisper of smoky complexity that pairs insanely well with cheddar.
Let’s Get Baking: The Step-by-Step Guide to Cheesy Bliss
Ready? Let’s transform these simple ingredients into golden perfection. Read through all the steps first—it’s like a roadmap to success!
Step 1: The Dry Team Assemble!
In the bowl of a stand mixer (or a very large mixing bowl if you’re kneading by hand), whisk together 3½ cups of the flour, sugar, salt, and the instant yeast. Giving them a good whisk ensures everything is evenly distributed, so every bite is perfectly seasoned.
Step 2: Warm Up the Wet Ingredients
In a small saucepan over medium-low heat, combine the milk and butter. We’re aiming for “warm,” not hot. Think baby-bottle temperature—around 110-115°F (43-46°C). If you don’t have a thermometer, dip your finger in. It should feel pleasantly warm, not scalding. Too hot, and you’ll harm the yeast! Chef’s Hack: I often just microwave the milk and butter in a microwave-safe jug for 60-90 seconds. Faster and easier!
Step 3: Bring It All Together
With your mixer fitted with a dough hook on low speed (or a wooden spoon if by hand), slowly pour the warm milk mixture into the dry ingredients. Let it come together into a shaggy, sticky mass. Now, add the beaten eggs and the shredded cheddar cheese (and your garlic powder/herbs if using). Mix until the cheese is fairly well incorporated. It might look a bit messy—that’s perfect!
Step 4: The Flour Dance & The Knead
Now, with the mixer running on low, gradually add the remaining ½ to 1 cup of flour, a few tablespoons at a time. Stop adding flour when the dough pulls away from the sides of the bowl but is still soft and slightly tacky to the touch. You may not need all the flour! Let the mixer knead the dough for about 5-6 minutes on medium speed until it’s smooth and elastic.
Chef’s Hack: The Windowpane Test! To know if it’s kneaded enough, take a small piece of dough and gently stretch it between your fingers. If you can stretch it thin enough to see light through it without it tearing immediately, you’ve got the perfect gluten development! If it tears right away, knead for another minute or two.
Step 5: The First Rise (Let it Nap!)
Shape the dough into a ball. Place it in a large bowl that you’ve greased with a bit of oil or cooking spray. Turn the dough over once to coat it lightly. Cover the bowl with a clean kitchen towel or plastic wrap. Now, find a warm, draft-free spot for it to rise. My favorite spot? An oven that’s turned off but with the interior light on. Let it rise for about 1 hour, or until it has doubled in size.
Step 6: Shape Your Rolls
Once the dough has doubled, it’s time to have some fun! Punch the dough down firmly to release the air—very satisfying. Turn it out onto a lightly floured surface. Using a sharp knife or a bench scraper, divide the dough into 24 equal pieces. I like to divide it in half, then each half into halves, and so on, for consistency. Roll each piece into a smooth ball. Pro Tip: Tuck the edges under to create a tight, smooth surface on top for a prettier roll.
Step 7: The Second Rise (The Final Puff!)
Grease two 9×13-inch baking pans. Arrange 12 dough balls in each pan, placing them close together but not squished. This is what will give you those classic pull-apart rolls with soft sides. Cover the pans again and let them rise for a shorter, second rise—just 15-20 minutes. They should look puffy and friendly.
Step 8: Bake to Golden Perfection
While the rolls are on their second rise, preheat your oven to 375°F (190°C). Just before baking, brush the tops gently with the melted butter and smoked paprika mixture. This is the final touch for that gorgeous color and flavor. Bake for 12-15 minutes, or until the tops are a beautiful golden brown and the rolls sound hollow when you tap them lightly. Your kitchen will smell like heaven.
Step 9: The (Almost) Impossible Wait
Remove the pans from the oven and let the rolls cool in the pan for just about 5 minutes. I know, it’s agony. But this allows them to set slightly. Then, transfer them to a wire rack—but let’s be real, you need to eat at least one immediately while the cheese is at its peak gooeyness.
How to Serve These Cheesy Wonders
The beauty of these rolls is their versatility. Of course, they are the ultimate sidekick for a holiday feast—think Thanksgiving turkey or Christmas ham. But don’t save them for a special occasion! They are phenomenal dunked into a big bowl of creamy tomato soup, broccoli cheddar soup, or a hearty stew. Serve them alongside a weekend roast chicken or a big, leafy salad for a simple yet spectacular dinner. For the ultimate indulgence, split one open while warm and slide in a pat of butter. You’ve earned it.
Mix It Up! Creative Twists on the Classic
Once you’ve mastered the base recipe, the world is your cheesy oyster! Here are a few of my favorite variations:
- Everything Bagel Rolls: Before the second rise, brush the tops with a bit of water or egg wash and sprinkle generously with everything bagel seasoning.
- Jalapeño Cheddar: Add 1-2 finely diced jalapeños (seeds removed for less heat) to the dough with the cheese. A little kick is amazing!
- Herb & Garlic Delight: Use 1 cup of cheddar and 1 cup of Gruyère or Monterey Jack. Add 2 tablespoons of mixed fresh herbs like rosemary, thyme, and parsley.
- Bacon Cheddar: Because bacon makes everything better. Fold in ½ cup of cooked, crumbled bacon along with the cheese.
- Whole Wheat Swap: For a heartier version, substitute up to half of the all-purpose flour with whole wheat flour. The result is a denser but wonderfully nutty roll.
Clara’s Kitchen Notes & Confessions
This recipe has evolved so much since my first attempt, which I remember involved a smoke alarm because I misread “tablespoons” of butter for “sticks” (a story for another day!). I’ve learned that baking is less about rigid rules and more about feeling the dough. Don’t stress if your first rise takes 90 minutes instead of 60—your kitchen might just be cooler. The real secret I’ve discovered is the smoked paprika butter brush. It adds such a subtle, smoky depth that elevates the rolls from “great” to “where have you been all my life?”. These rolls have become my signature dish for potlucks, and I love seeing the look on people’s faces when they pull one apart and see all that melty cheese. It’s a little bite of connection, and that’s what cooking is all about for me.
Your Cheddar Roll Questions, Answered!
Let’s tackle some common questions to make sure your baking experience is smooth sailing.
Q: Can I make these rolls ahead of time?
A: Absolutely! You have two great options. 1) Refrigerate after the first rise: After you’ve punched down the dough, place it in a greased bowl, cover tightly with plastic wrap, and refrigerate for up to 24 hours. When ready, let it sit at room temp for 30 minutes, then shape, do the second rise, and bake. 2) Freeze before baking: After shaping the rolls and placing them in the pan, instead of the second rise, cover the pan tightly with plastic wrap and foil and freeze. On baking day, thaw in the refrigerator overnight, then let them sit at room temp for 30-60 minutes until puffy, then bake as directed. You may need to add a minute or two to the baking time.
Q: My dough didn’t rise. What went wrong?
A: The most common culprit is old yeast. Yeast has a shelf life! To test it, stir a pinch of yeast into ¼ cup of warm water with a pinch of sugar. If it doesn’t get foamy within 10 minutes, it’s time for a new packet. The other possibility is that the milk was too hot and killed the yeast, or your rising spot was too cold.
Q: My rolls are dense and not fluffy. Why?
A: This usually points to one of two issues. First, you might have added too much flour, making the dough too heavy. Remember, we want a soft, slightly tacky dough. Second, you might have over-kneaded the dough or killed the yeast with overly hot liquid. It’s a balancing act, but you’ll get the hang of it!
Q: Can I use pre-shredded cheese?
A: You *can*, and the rolls will still be delicious. But I highly, highly recommend shredding your own from a block. Pre-shredded cheese is coated to prevent clumping, which also prevents it from melting as seamlessly into the dough. The texture and melt-factor are noticeably better with freshly shredded cheese.
Nutritional Information*
*This is an approximate estimate calculated using an online tool and will vary based on specific ingredients used.
Per Roll (1 of 24): Calories: ~160, Total Fat: 6g, Carbohydrates: 20g, Protein: 5g, Sodium: 160mg
