Let’s Make Some Mischief: Grinch Fudge That’ll Steal Your Heart
Is there anything better than the feeling of having a secret? That little thrill of knowing you’ve whipped up something utterly delightful that’s just waiting to be discovered? That’s exactly the magic I’m bringing you today, my friends. We’re diving headfirst into the holiday spirit with a treat that’s as fun to make as it is to eat: our irresistibly charming (and slightly mischievous) Grinch Fudge.
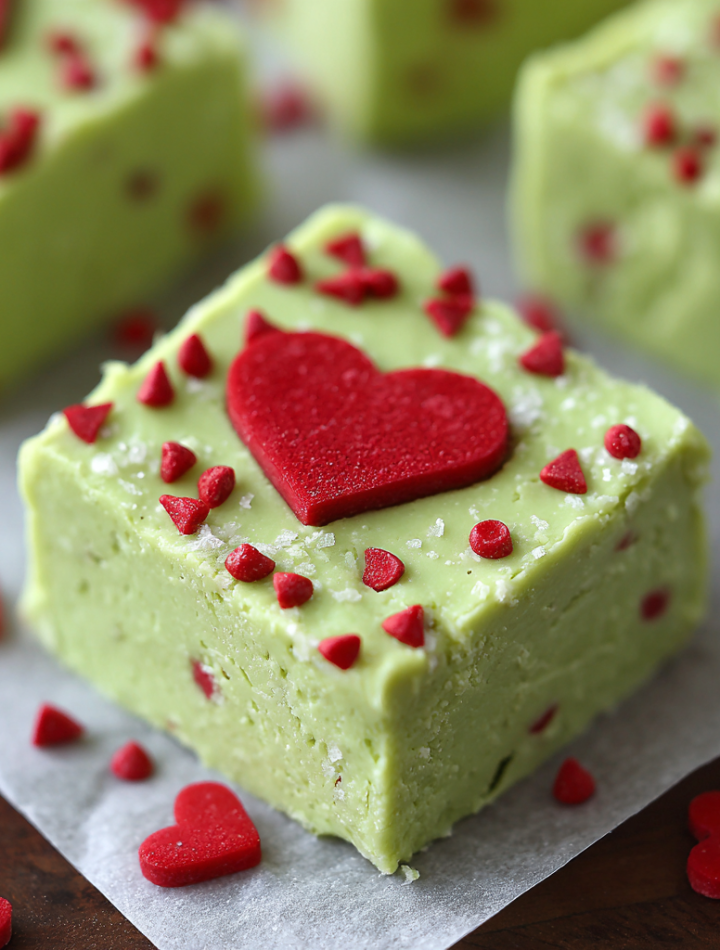
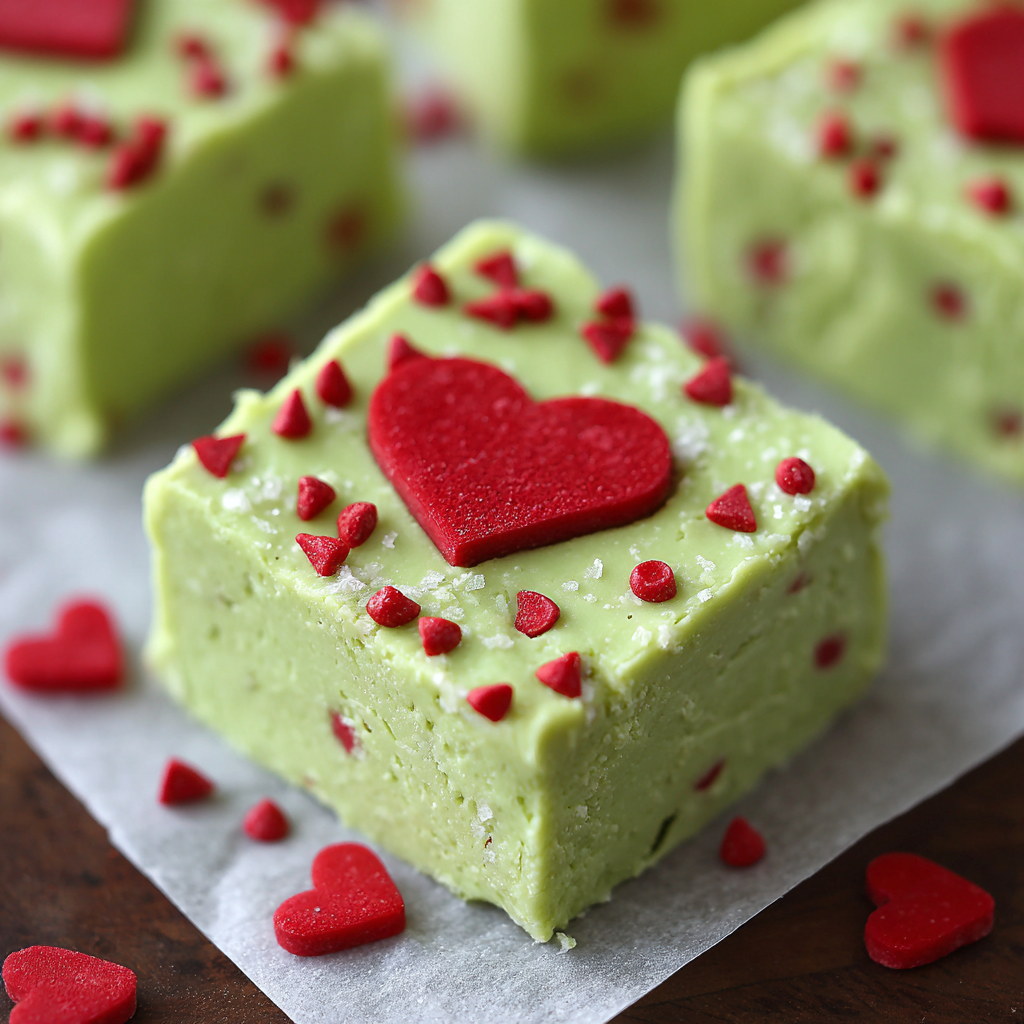
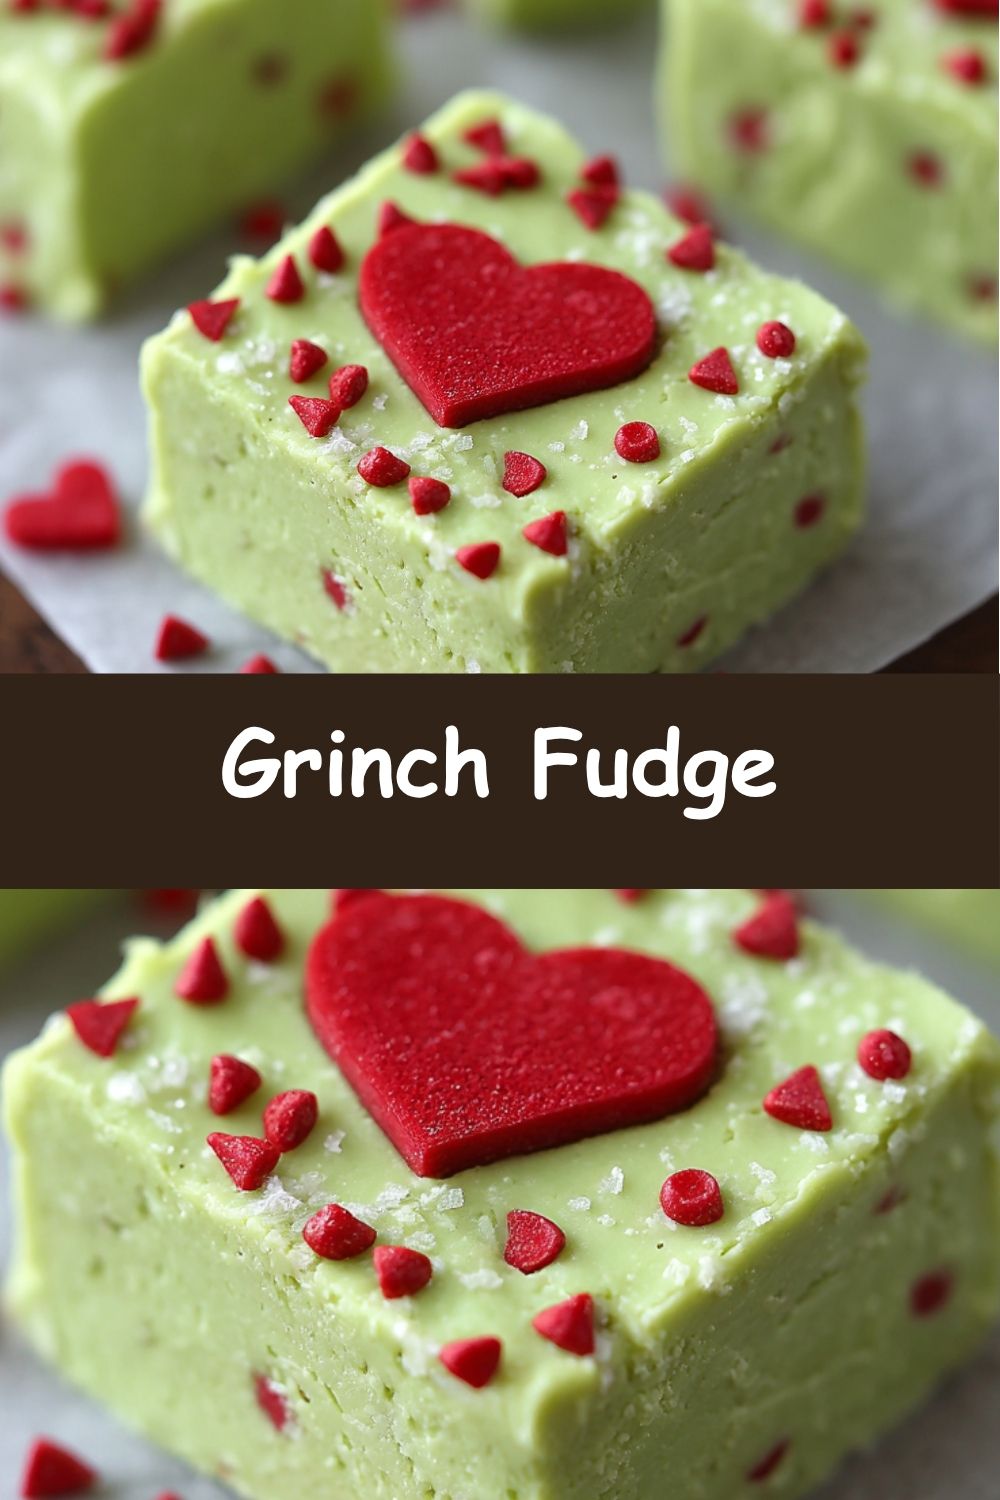
Picture this: it’s a crisp December evening. The lights are twinkling on the tree, your favorite holiday movie is queued up, and the scent of peppermint and pine fills the air. Now, imagine reaching into a festive tin and pulling out a square of the creamiest, dreamiest white chocolate fudge, colored a playful Grinch-green and topped with a tiny, defiant red heart. It’s sweet, simple, and has just the right amount of whimsy to make everyone—from the littlest Who down in Whoville to the grumpiest grown-up on your list—break into a giant, heart-growing-three-sizes smile.
This isn’t just a recipe; it’s a mood. It’s a declaration that holiday baking should be joyful, not stressful. We’re keeping things wonderfully straightforward with just a handful of ingredients, because let’s be real, December is busy enough without complicated recipes. This fudge is your secret weapon for potlucks, teacher gifts, cookie exchanges, or just a sweet moment of peace for yourself. So, tie on your favorite apron, put on the How the Grinch Stole Christmas! soundtrack, and let’s cook up a batch of pure, unadulterated holiday cheer. Get ready to make a treat that’s so good, it’s almost a little sneaky.
A Whoville-Worthy Memory: The Year of the Great Fudge Rescue
This recipe always takes me back to one particularly chaotic, yet magical, holiday season. I was maybe ten years old, and my family had decided to host a massive open house. My mom, the ultimate holiday hero, had been baking for days. The kitchen looked like a winter wonderland exploded in it, with trays of cookies, breads, and candies covering every surface. My designated important job? To make a simple batch of peanut butter fudge for the kids’ table.
Well, let’s just say my ten-year-old chef skills were… developing. I got distracted by the TV special of How the Grinch Stole Christmas! and let the sugar syrup boil a few seconds too long. The result was a pan of fudge that was, to put it kindly, more suitable for building a snow fort than for eating. It was a grainy, crumbly disaster. I was devastated. But my mom, with the quick thinking of the Mayor of Whoville himself, looked at my sad face and then at the bright green frosting we’d made for a Yule log cake. With a wink, she said, “Well, it may not be perfect peanut butter fudge, but I think we just invented Grinch Rocks!” We broke the fudge into chunks, drizzled it with green frosting, and stuck a red sprinkle on each piece. It was the hit of the party.
This recipe is my grown-up, much creamier, homage to that day. It proves that even kitchen “failures” can turn into the most beloved traditions. The spirit of the holidays isn’t about perfection; it’s about creativity, laughter, and a little bit of heart.
Print
Grinch Fudge
- Total Time: ~2 hrs 10 min
- Yield: 25 squares 1x
Description
This festive Grinch Fudge is sweet, simple, and just the right amount of mischievous. With its bright green color and signature red heart, it’s the perfect holiday treat to charm kids and grown-up Whos alike. Make it ahead, gift it in tins, or enjoy it while watching your favorite holiday movie.
Ingredients
3 cups white chocolate chips
1 (14 oz) can sweetened condensed milk
4 tbsp salted butter
¾ tsp clear vanilla extract
Green gel food coloring
25 red heart candy sprinkles
Instructions
Line an 8×8-inch pan with parchment paper and lightly grease it.
In a saucepan over low heat, combine white chocolate chips, sweetened condensed milk, and butter. Stir constantly until smooth and melted.
Remove from heat and stir in clear vanilla extract and green food coloring until you get that perfect Grinchy green.
Pour the fudge into the prepared pan and smooth the top.
Gently press red heart candy sprinkles into the top, spacing evenly (5×5 grid = 25 hearts).
Refrigerate for at least 2 hours, or until fully set.
Cut into squares and serve or package for gifting.
- Prep Time: 10 mins
- Cook Time: 2 hours
- Category: Dessert
Nutrition
- Calories: 140
- Sugar: 17g
- Carbohydrates: 18g
Gathering Your Whoville-Worthy Ingredients
One of the best things about this fudge is its beautiful simplicity. You only need a handful of pantry staples to create pure magic. Here’s what you’ll need, along with a few chef-y insights to make the process even smoother.
- 3 cups white chocolate chips: This is the star of our show! I recommend using a good-quality brand you trust. The better the chocolate, the creamier and more delicious your fudge will be. The chips melt evenly and give us that perfect, smooth base. Chef’s Tip: If you find white chocolate too sweet, you can swap in half semi-sweet chocolate chips for a swirled “Grinch” effect, but your green color won’t be as vibrant.
- 1 (14 oz) can sweetened condensed milk: This is our magic ingredient that creates that classic, soft fudge texture without any fussy candy thermometers. It provides the sweetness and the structure. Do not substitute with evaporated milk—they are very different!
- 4 tbsp salted butter: Salted butter adds a subtle depth that balances the intense sweetness of the white chocolate and condensed milk. It also contributes to the rich, melt-in-your-mouth feel. If you only have unsalted, just add a tiny pinch of fine sea salt to the pan.
- ¾ tsp clear vanilla extract: Using clear vanilla is my little secret for keeping that vibrant Grinch-green color pure. Regular brown vanilla will tint the fudge a slightly muddy, khaki green. If you don’t have clear, you can simply omit it—the flavor difference is minimal with all the other sweet ingredients.
- Green gel food coloring: Gel food coloring is a must here! It’s highly concentrated, so you can achieve a deep, festive green without adding excess liquid that could mess with the fudge’s texture. Start with a little toothpick dab and add more until you get that perfect, mischievous shade.
- 25 red heart candy sprinkles: The final, heartfelt touch! These are traditionally the small, flat red heart sprinkles. If you can’t find hearts, red M&Ms, red nonpareils, or even dried cranberries pressed in the center of each square would work beautifully.
Creating the Magic: Your Step-by-Step Fudge Guide
Ready to see how easily this comes together? Let’s get melting! The key to perfect fudge is low, gentle heat and a little bit of patience. Read through all the steps first, and you’ll be a fudge-making pro in no time.
- Prep Your Pan: First things first, let’s get our stage ready. Line an 8×8-inch baking pan with parchment paper, leaving a little overhang on two opposite sides. This creates “handles” that will make it super easy to lift the entire slab of fudge out later—no struggling to get the first piece out! Give the parchment a very light spritz with cooking spray or a dab of butter on a paper towel. This guarantees a flawless release. Chef’s Hack: If your parchment paper is being rebellious and won’t lay flat in the pan, crinkle it into a ball first, then smooth it out. The wrinkles relax, and it will conform to the pan much easier!
- The Gentle Melt: Now, for the main event. In a medium-sized saucepan, combine your white chocolate chips, the entire can of sweetened condensed milk, and the butter. Place this over low heat. I’m emphasizing low heat because we want everything to melt slowly and harmoniously. High heat is the enemy of smooth fudge and can cause the chocolate to seize (become grainy). Stir constantly with a spatula or wooden spoon. You’ll watch the butter melt first, then the chips will slowly begin to soften. Keep stirring until the mixture is completely smooth, glossy, and uniform. This usually takes about 5-7 minutes.
- Mix in the Flavor & Color: Once your mixture is silky smooth, take the pan off the heat. Stir in the clear vanilla extract. Now, for the fun part—the color! Add your green gel food coloring a little at a time. I like to start with a toothpick swirl of gel and stir it in thoroughly before adding more. You can always add more color, but you can’t take it away! Keep going until you achieve that signature, perfect Grinchy green that makes you smile.
- Spread and Smooth: Immediately pour your vibrant green fudge into your prepared pan. Use your spatula to spread it into an even layer, making sure to push it into all the corners. For an extra-smooth top, you can lightly wet your fingertips or the back of a spoon and gently glide it over the surface. Chef’s Tip: Work relatively quickly here, as the fudge will start to set as it cools.
- The Heart of the Matter: This is the most important step for maximum Whoville charm! Before the fudge starts to set, gently press your red heart sprinkles into the top. I like to imagine the fudge cut into a 5×5 grid (for 25 squares) and place a heart right in the center of where each square will be. This ensures every piece gets its own little heart. Press them in just enough so they’re secure.
- The Patience Game: Now, the hardest part: waiting. Carefully transfer the pan to the refrigerator. Let it chill, uncovered, for at least 2 hours, or until it’s completely firm to the touch. Don’t try to rush this by putting it in the freezer, as that can cause the fudge to become too hard and potentially develop condensation.
- Slice and Shine: Once fully set, use the parchment paper handles to lift the entire fudge slab out of the pan onto a cutting board. Using a large, sharp knife, wipe the blade clean with a hot, damp cloth between cuts for super clean edges. Slice along your imagined grid lines into 25 perfect squares.
How to Serve Your Grinch-y Masterpiece
Presentation is part of the fun! Pile these cheerful squares high on a festive platter for your holiday party—they’re an instant conversation starter. For gifting, layer them in a cellophane bag tied with a red ribbon or stack them in a holiday tin separated by layers of parchment paper. They also make the perfect sweet treat on a holiday dessert charcuterie board, nestled among cookies and fruit. However you serve them, be prepared for the delighted smiles they’ll inspire.
Get Creative! Fun Grinch Fudge Twists
Feel like playing around? This recipe is a wonderful canvas for creativity. Here are a few of my favorite twists:
- Peppermint Grinch: Add ½ teaspoon of peppermint extract (instead of or along with the vanilla) and fold in ¼ cup of crushed candy canes after you add the food coloring for a cool, festive crunch.
- Grinch Bark: For an even easier version, spread the mixed fudge onto a parchment-lined baking sheet in a thinner layer. Add the hearts, chill, and then break it into irregular pieces for a fun, rustic bark.
- Nutty Grinch: Fold in ½ cup of finely chopped pistachios for a little texture and a flavor that pairs beautifully with white chocolate.
- Dairy-Free Delight: Use dairy-free white chocolate chips and vegan butter. For the condensed milk, you can find store-bought vegan versions or make your own from coconut milk.
Clara’s Kitchen Notes & Stories
This recipe has become a non-negotiable part of my holiday season. It’s the one I make when I need a guaranteed win. I’ve learned a few things along the way: first, always buy an extra can of condensed milk, because someone (usually me) will inevitably want a second batch. Second, the color truly is a mood-lifter. There’s something about that bright green that just cuts through the winter grays and makes everything feel more festive.
One year, I was feeling extra ambitious and decided to make a triple batch for all my neighbors. I had three pots going at once, and my kitchen looked like a scene from a Dr. Seuss book. In my multi-tasking frenzy, I accidentally used an entire bottle of green food coloring in one pot. Let’s just say that batch was… vibrant. It stained a few mouths, but it’s now a legendary story in our neighborhood. The moral? A little color goes a long way, but a lot of color makes for a great story. Don’t be afraid to make it your own!
Your Grinch Fudge Questions, Answered!
Let’s tackle some common fudge-making queries to ensure your batch is perfect.
Q: My fudge is grainy. What happened?
A: Graininess usually occurs if the fudge was heated too quickly, causing the sugar in the chocolate to crystallize. Remember, low and slow is the mantra! Another cause can be if a tiny bit of moisture got into the melting chocolate. Always make sure your pan and utensils are completely dry.
Q: Can I use milk chocolate or dark chocolate chips instead?
A: Absolutely! The recipe will work with any chocolate chips. Just know that using a darker chocolate will, of course, change the color. You’ll get a deeper, forest green rather than a bright green. It will still be delicious, just a more camouflaged Grinch!
Q: How long does this fudge keep, and how should I store it?
A: This fudge stores beautifully. Keep it in an airtight container in the refrigerator for up to two weeks. It can also be frozen for up to three months! Just thaw it in the fridge overnight before serving. The texture might be slightly firmer after freezing, but it’s still fantastic.
Q: My fudge is too soft and won’t set. Help!
A: If your fudge isn’t setting, it likely didn’t get enough chilling time. Pop it back in the fridge for another hour or two. In very rare cases, it could be due to inaccurate measurements (too much condensed milk or butter) or not enough cooking time to evaporate a bit of the liquid. The fridge should almost always fix it!
Quick Nutrition & Prep Details
Prep Time: 10 minutes | Chill Time: 2 hours | Total Time: 2 hours 10 minutes | Servings: 25 squares
Per Square (approximate): Calories: 140 | Sugar: 17g | Fat: 7g | Carbs: 18g | Protein: 2g