Savory Mozzarella, Basil & Sun-Dried Tomato Bread: Your New Kitchen Obsession
Okay, let’s be real for a second. Sometimes, you just want bread. Not just any bread, but the kind of bread that feels like a warm, cheesy hug from the inside out. The kind that makes your kitchen smell like an Italian grandmother’s dream and has you sneaking back for “just one more slice” all afternoon. If you’re nodding your head, my friend, you have come to the right place.
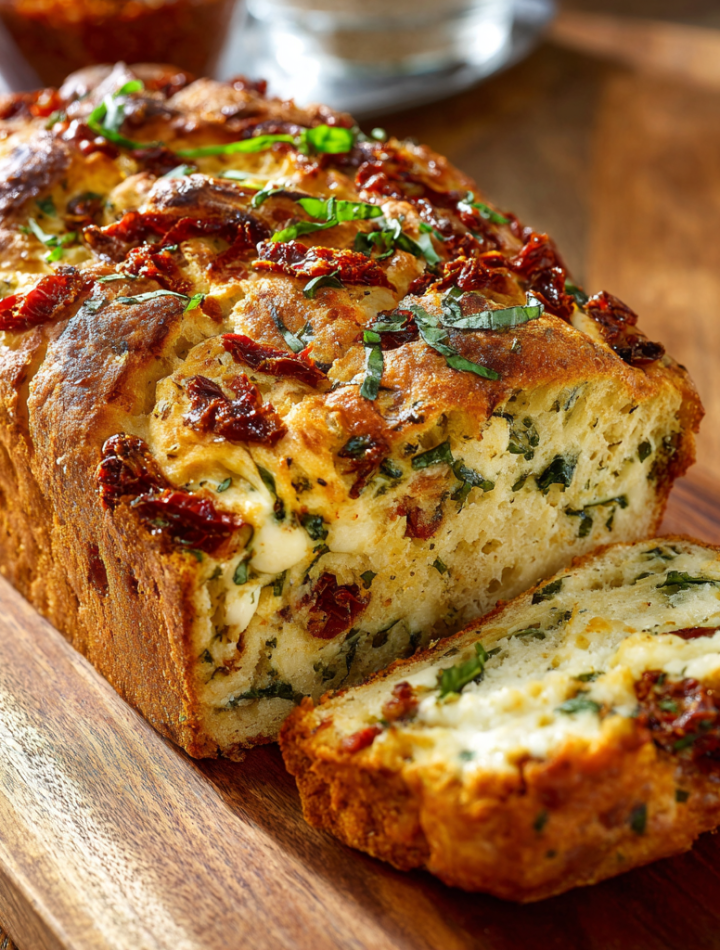
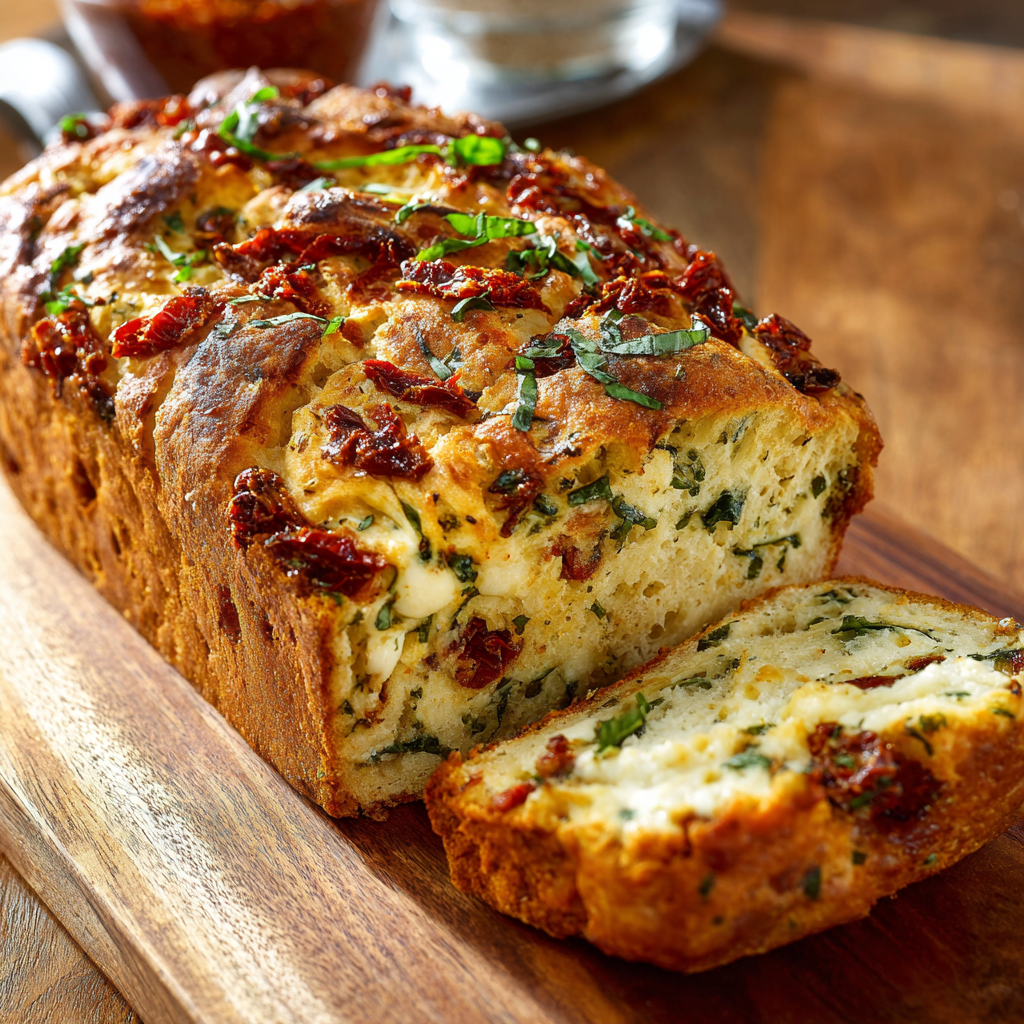
I want to introduce you to my absolute go-to, the recipe I turn to when I need to impress a crowd, comfort a friend, or simply treat myself to something spectacularly savory: my Savory Mozzarella, Basil & Sun-Dried Tomato Bread. This isn’t your average quick bread—it’s a flavor explosion. Imagine tender, moist crumb, pockets of gooey, melted fresh mozzarella, the sweet-tangy punch of sun-dried tomatoes, and the fresh, aromatic kiss of basil in every single bite.
It’s the perfect bridge between a bread and a meal, fantastic on its own with a little smear of butter, absolutely divine alongside a big, vibrant salad, or as the star player next to a cozy bowl of soup. And the best part? We’re making two loaves. One for now (because let’s be honest, it won’t last long), and one for later. Trust me, future-you will be sending present-you a thank you note. So, tie on your favorite apron, and let’s bake something that’s guaranteed to make your taste buds do a happy dance!
A Slice of Sunshine & A Kitchen Mishap
This recipe has a special place in my heart because it was born from a happy accident during a particularly grey and drizzly week. I was craving the flavors of a summer trip to Italy—the kind of simple, robust food that makes you feel alive. I had a block of fresh mozzarella begging to be used, a jar of sun-dried tomatoes winking at me from the pantry, and a basil plant on my windowsill that was thriving against all odds.
My initial plan was a frittata, but my craving for carbs had other ideas. I decided to throw caution to the wind and experiment with a savory quick bread. I’ll never forget the moment I pulled the first loaf out of the oven. It was golden, fragrant, and so beautiful. In my excitement, I attempted to slice it while it was still piping hot. Big mistake! The mozzarella, in its glorious, molten state, oozed out everywhere, creating a delicious but messy cheese-pull situation. My kitchen counter looked like a crime scene, but a delicious one! That first warm, slightly chaotic slice, eaten over the sink, was pure magic. It taught me two things: patience is a virtue when it comes to cooling bread, and sometimes the messiest kitchen creations are the ones you remember forever.
Print
Savory Mozzarella, Basil & Sun-Dried Tomato Bread
- Total Time: ~1 hour 5 minutes
Description
This savory quick bread is like a slice of Italy baked into every bite. With gooey mozzarella, fragrant basil, and tangy sun-dried tomatoes, it’s tender, flavorful, and perfect on its own or alongside soups and salads. Doubling the recipe makes two loaves—great for sharing or freezing. Plus, with a few fun twists, you can customize it to your taste!
Ingredients
2 ½ cups all-purpose flour
2 cups bread flour
4 tsp baking powder
1 tsp baking soda
2 tsp salt
7–8 oz fresh mozzarella cheese, cubed
4 tbsp chopped fresh basil
⅔ cup chopped sun-dried tomatoes (not packed in oil)
4 eggs
5 tbsp grapeseed oil (or extra virgin olive oil)
2 ½ cups buttermilk
Twist Options (choose one or mix & match):
Add ½ cup chopped Kalamata olives for a Mediterranean kick
Mix in 2 tsp Italian seasoning or fresh oregano for extra herb flavor
Sprinkle shredded Parmesan on top before baking for a cheesy crust
Fold in a pinch of red pepper flakes for subtle heat
Instructions
Preheat oven to 350°F (175°C). Grease and flour two 9×5-inch loaf pans or line with parchment.
In a large bowl, whisk together flours, baking powder, baking soda, and salt.
Stir in mozzarella cubes, basil, and sun-dried tomatoes until coated with flour mixture.
In a separate bowl, whisk eggs, oil, and buttermilk.
Pour wet ingredients into dry and fold until just combined (do not overmix).
Divide batter evenly between prepared loaf pans.
Bake for 45–50 minutes, or until golden brown and a toothpick inserted comes out clean.
Cool for 10 minutes in pans, then transfer to a wire rack.
- Prep Time: 10 minutes
- Cook Time: 50 minutes
- Category: Snack
Gathering Your Savory Bread Dream Team
Here’s everything you’ll need to create this masterpiece. I’ve included a few notes on why each ingredient is there and how you can play around with it. Baking is a science, but a friendly one!
- 2 ½ cups all-purpose flour & 2 cups bread flour: Using a blend gives us the best of both worlds. The all-purpose keeps the crumb tender, while the bread flour adds a lovely structure and a slightly chewier texture that stands up to all the goodies we’re adding. Chef’s Insight: If you only have all-purpose flour, you can use 4 ½ cups total. The texture will be a bit more cake-like, but still utterly delicious.
- 4 tsp baking powder & 1 tsp baking soda: This is our leavening dream team! The combination ensures our bread rises up tall and proud, creating a beautiful, light texture. Make sure your baking powder is fresh for the best lift.
- 2 tsp salt: Don’t be shy with the salt! It’s essential for balancing the flavors and making all the other ingredients sing.
- 7–8 oz fresh mozzarella cheese, cubed: The star of the show! I highly recommend using fresh mozzarella (the kind packed in water) rather than low-moisture, pre-shredded cheese. It gives you those incredible, stretchy, molten pockets. Pro Tip: Pat the mozzarella balls very dry with paper towels before cubing to prevent excess moisture in the batter.
- 4 tbsp chopped fresh basil: Fresh is key here! It infuses the bread with a bright, aromatic flavor that dried basil just can’t match. Substitution Tip: In a pinch, you can use 1 tbsp of dried basil, but the flavor will be more muted.
- ⅔ cup chopped sun-dried tomatoes (not packed in oil): These little gems pack a powerful punch of sweet, tangy, concentrated tomato flavor. Using the dry-packed ones (or rehydrating them) prevents the bread from becoming greasy. Chef’s Insight: If you only have oil-packed, that’s okay! Just drain them thoroughly and pat them dry with a paper towel. You can even use a bit of the oil in place of the grapeseed oil for an extra flavor boost!
- 4 eggs: Our binding agent and a source of richness. They give the bread structure and a beautiful golden color.
- 5 tbsp grapeseed oil (or extra virgin olive oil): Oil keeps the bread wonderfully moist. Grapeseed oil is neutral, letting the other flavors shine, while a good extra virgin olive oil will add a fruity, robust note. You can’t go wrong!
- 2 ½ cups buttermilk: The secret to an incredibly tender crumb! The acidity in buttermilk also reacts with the baking soda, giving us an extra lift. Quick Fix: No buttermilk? No problem! Make a DIY version by adding 2 ½ tbsp of white vinegar or lemon juice to a measuring cup, then filling it with regular milk to the 2 ½ cup line. Let it sit for 5 minutes until it curdles, and voila!
Let’s Bake! Your Step-by-Step Guide to Savory Bliss
Ready to get your hands dirty? Follow these steps, and you’ll be a savory bread pro in no time. I’ve sprinkled in all my favorite chef hacks to ensure your success.
- Preheat and Prep: Fire up your oven to 350°F (175°C). This is crucial for an even bake. While it’s heating, generously grease two 9×5-inch loaf pans with butter or non-stick spray. For absolute foolproof removal, I like to line the pans with parchment paper, leaving a little overhang on the two long sides. It creates a sling that lets you lift the loaves out effortlessly! Chef’s Hack: After greasing, give the pans a light dusting of flour. It creates a non-stick barrier that ensures your beautiful loaves will slide right out.
- Whisk the Dry Goods: In a large bowl, whisk together the all-purpose flour, bread flour, baking powder, baking soda, and salt. Whisk it really well! This isn’t just about mixing; it’s about aerating the flour and making sure the leaveners are evenly distributed. No one wants a bite of pure baking soda!
- Coat the Goodies: Now, add your cubed mozzarella, chopped basil, and sun-dried tomatoes to the flour mixture. Use a spatula to gently toss everything until each piece is lightly coated in flour. This little trick is a game-changer! The flour coating prevents the cheese and tomatoes from sinking to the bottom of the loaf during baking, ensuring every slice is packed with flavor.
- Combine the Wet Team: In a separate, medium-sized bowl, whisk the eggs until they’re pale and frothy. Then, whisk in the oil and buttermilk until the mixture is smooth and homogenous.
- The Grand Merge (Don’t Overmix!): Here’s the most important step: pour the wet ingredients into the dry ingredients. Using a spatula, gently fold the two together. I mean it—be gentle! Mix just until the last traces of flour disappear. The batter will be thick and a little lumpy, and that is perfectly okay. Overmixing is the enemy of tender quick breads, as it develops the gluten and can lead to a tough, dense loaf. A few flour streaks are better than an overmixed batter!
- Divide and Conquer: Carefully divide the batter evenly between your two prepared loaf pans. I like to use a kitchen scale for precision, but eyeballing it works just fine. Smooth out the tops with the back of your spatula.
- Bake to Golden Perfection: Place the pans in the preheated oven and bake for 45-50 minutes. Rotate the pans halfway through for even browning. You’ll know it’s done when the tops are a beautiful golden brown, the edges are pulling away from the pan, and most importantly, a toothpick or skewer inserted into the center of the loaf comes out clean. (A little melted cheese on the pick is fine; you’re just checking for uncooked batter!).
- The Patience Test (This is the Hard Part!): Once out of the oven, let the loaves cool in their pans on a wire rack for exactly 10 minutes. This allows the structure to set. Then, run a knife around the edges and carefully lift them out (using your parchment slings!) onto the wire rack to cool completely. I know it’s tempting, but try to wait until they are just warm to the touch before slicing. This prevents the gummy, cheese-oozing situation I found myself in during my first attempt!

How to Serve This Savory Masterpiece
The beauty of this bread is its versatility! For a simple, satisfying snack, a thick slice slathered with good salted butter is absolute heaven. To turn it into a meal, pair it with a big, zesty arugula salad with a lemon vinaigrette—the peppery greens are a perfect contrast to the rich, cheesy bread. It’s also the ultimate companion for a warm bowl of tomato basil soup or a hearty minestrone. For your next party, slice it into smaller pieces and serve it as part of an antipasti platter with olives, cured meats, and marinated artichokes. However you serve it, get ready for the compliments to roll in!
Make It Your Own: Fun Flavor Twists
Once you’ve mastered the base recipe, the fun really begins! Here are a few of my favorite ways to mix it up:
- Mediterranean Kick: Fold in ½ cup of chopped, pitted Kalamata olives along with the sun-dried tomatoes for a briny, sophisticated flavor.
- Herb Garden Delight: Add 2 teaspoons of Italian seasoning or a tablespoon of fresh chopped oregano to the dry ingredients for an extra layer of herbal fragrance.
- Cheesy Crust: Before baking, sprinkle the tops of the loaves with a generous handful of shredded Parmesan cheese. It creates a savory, crispy crust that is utterly addictive.
- Spicy Surprise: Love a little heat? Add a pinch (or two!) of red pepper flakes to the batter for a subtle, warming kick.
- Pizza Bread: Feeling nostalgic? Swap the sun-dried tomatoes for ⅔ cup of chopped pepperoni and add a teaspoon of garlic powder. It’s like a classic pizza in loaf form!
From My Kitchen to Yours: A Few Final Thoughts
This recipe has evolved so much since that first messy, wonderful attempt. I’ve learned that the key truly is in the gentle folding and the patience to let it cool. I’ve made this bread for countless potlucks, new parents, and holiday gatherings, and it never fails to disappear. One of my favorite memories is bringing it to a friend’s house for a game night. We ended up toasting slices on the grill and using them as the base for the most incredible open-faced sandwiches. Don’t be afraid to get creative with it!
The double batch is intentional—it’s a gift that keeps on giving. The second loaf freezes beautifully. Just let it cool completely, wrap it tightly in plastic wrap and then aluminum foil, and freeze for up to 3 months. When a bread emergency strikes (and they do!), you can thaw it overnight on the counter or gently reheat slices straight from the freezer in the toaster oven. Happy baking, everyone! I can’t wait for you to fill your kitchen with the amazing smell of this bread.
Your Questions, Answered!
Q: My cheese all sank to the bottom! What did I do wrong?
A: Ah, the classic cheese sink! This usually happens for one of two reasons. First, the cheese cubes might have been too wet or too heavy. Make sure to pat your fresh mozzarella very dry before cubing. Second, and most importantly, you might not have coated them in the flour mixture. That light dusting of flour is our secret weapon—it helps suspend the heavier ingredients in the batter. Next time, don’t skip that tossing step!
Q: Can I make this recipe gluten-free?
A> You can certainly try! I’ve had good results using a 1:1 gluten-free all-purpose flour blend that contains xanthan gum. Look for a blend meant for bread baking. The texture will be a bit more crumbly, but the flavor will still be fantastic. I haven’t tested it with every blend, so your experience may vary, but it’s a great starting point for a gluten-free version.
Q: Why is my bread dense and gummy in the middle?
A> A dense, gummy texture is almost always a sign of one of two things: 1) Overmixing: Remember, fold gently until *just* combined. 2) Underbaking: Ovens can vary, so your bread might need a few more minutes. Always use the toothpick test. If it comes out with wet batter, it needs more time. If it’s just cheese, it’s done! Also, ensure you’re using the correct pan size (9×5-inch) so the batter isn’t too deep, preventing the center from cooking through.
Q: How long does this bread stay fresh, and how should I store it?
A> Because it’s so moist, it’s best enjoyed within 2-3 days. Store it wrapped tightly in plastic wrap or in an airtight container at room temperature. For longer storage, freezing is your best friend! See my note above on how to freeze it perfectly.
Nutritional Information*
*Please note: These values are approximate and calculated using an online nutrition calculator. Actual values may vary based on specific ingredients used.
Prep Time: 15 minutes | Cook Time: 50 minutes | Total Time: ~1 hour 5 minutes | Servings: 32 slices (2 loaves)
Per Slice (approximate): Calories: 150 | Protein: 6g | Fat: 6g | Carbohydrates: 18g | Sodium: 320mg