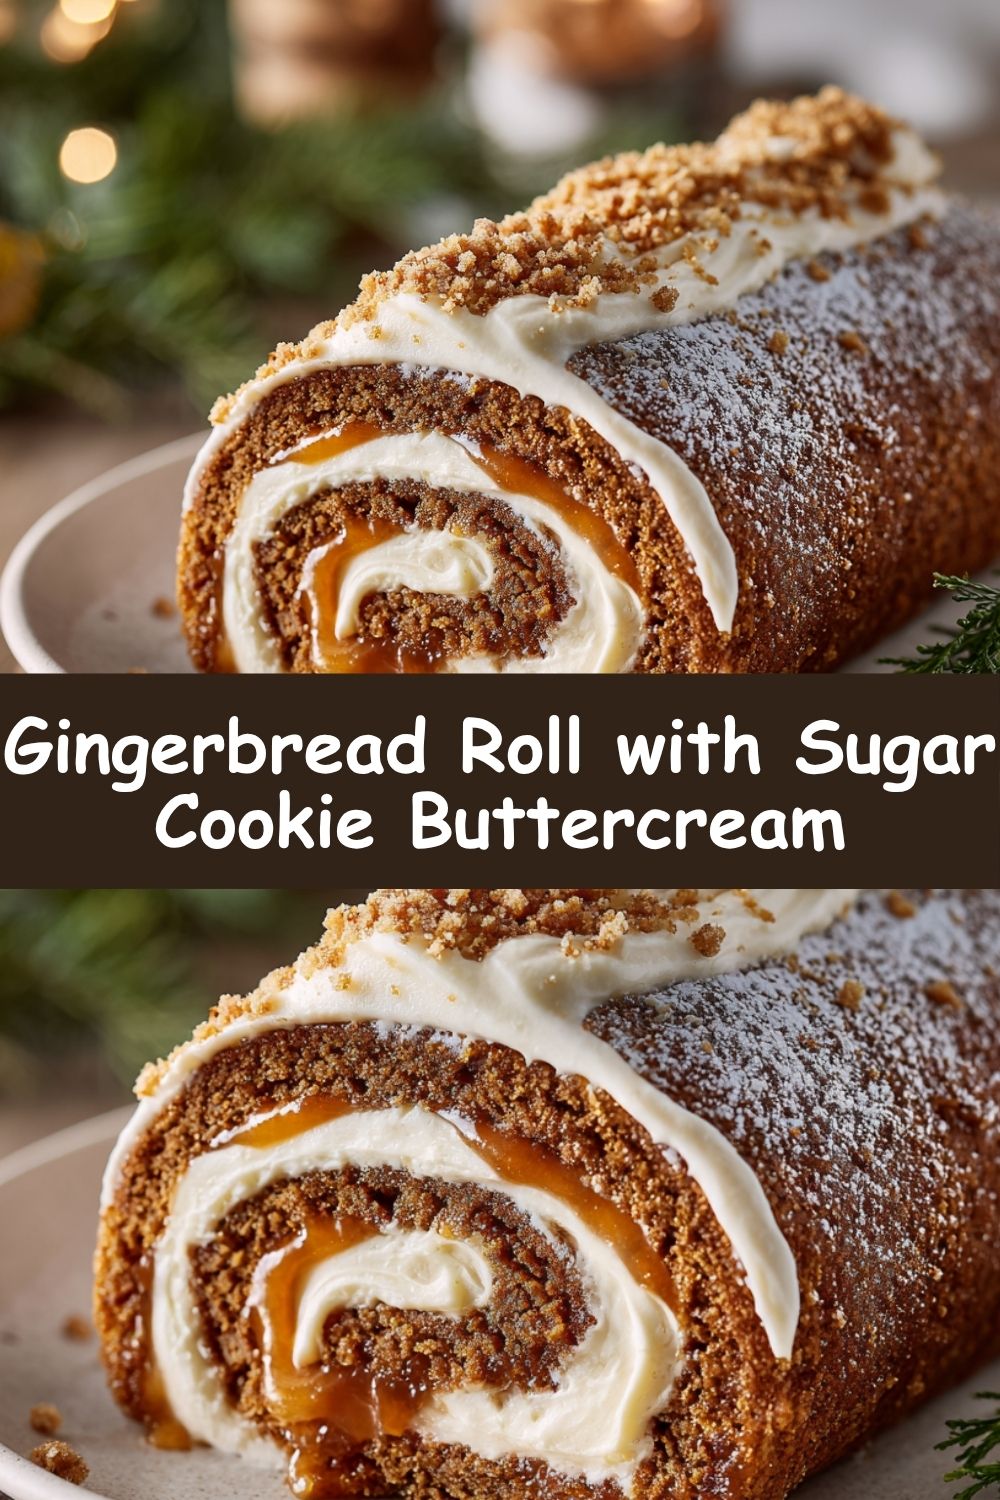
The Ultimate Gingerbread Roll with Sugar Cookie Buttercream: A Holiday Dream
Hey, my adventurous bakers! Clara here, from my flour-dusted kitchen to yours. Is there anything that captures the magic of the holiday season quite like the smell of gingerbread? That warm, spicy, deeply comforting aroma that seems to hug the whole house? It’s the scent of cozy socks, twinkling lights, and the happy chaos of family and friends gathered together.
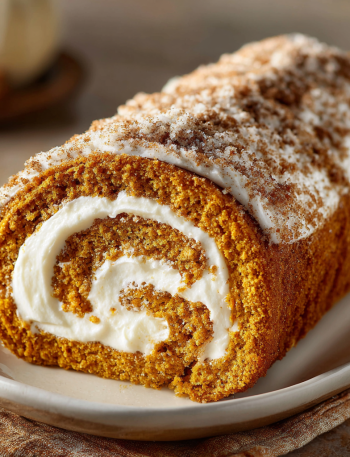
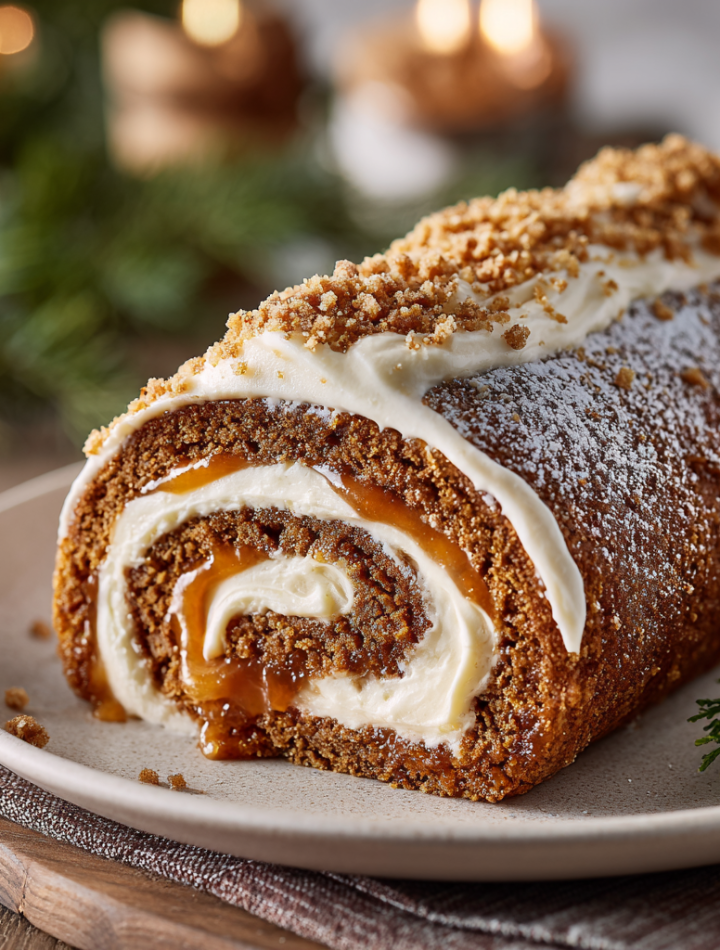
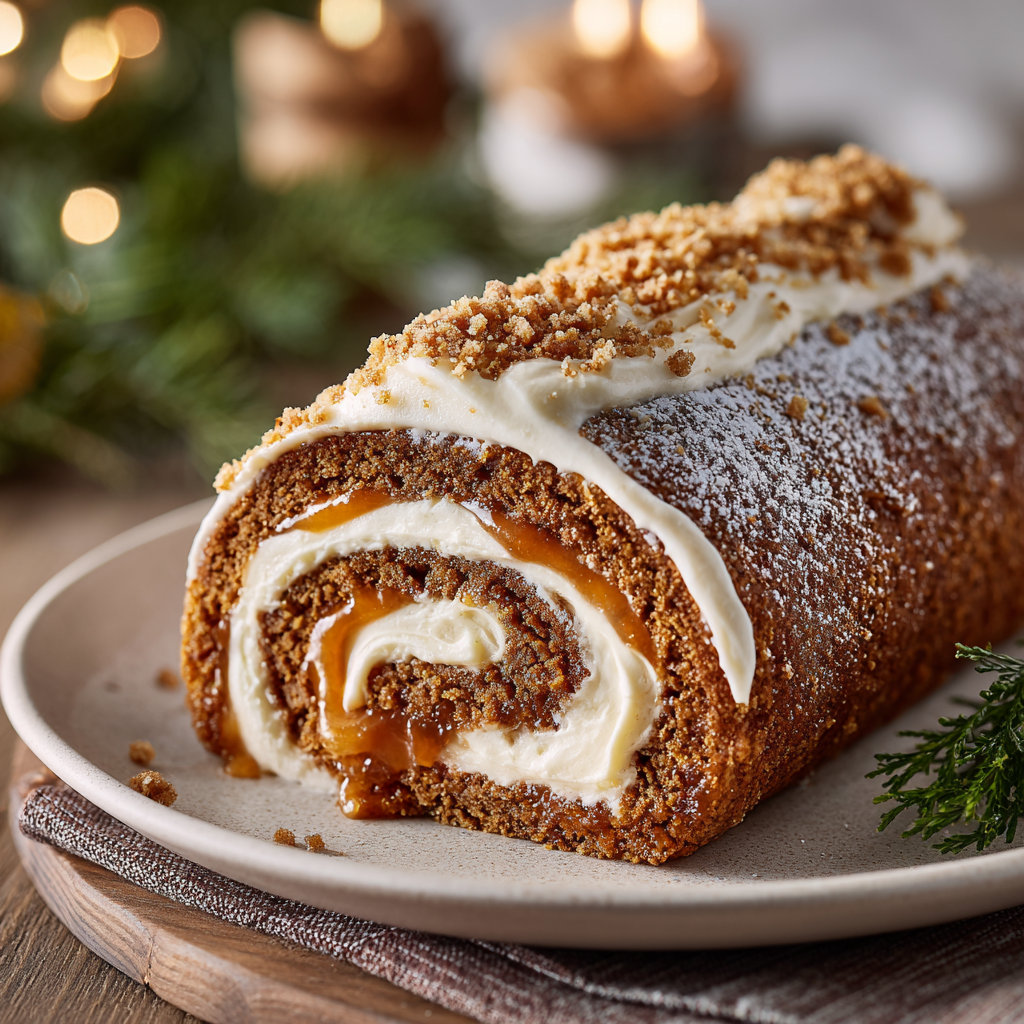
But today, we’re not just making gingerbread cookies. Oh no. We’re taking all that glorious flavor and transforming it into a stunning, show-stopping, absolutely irresistible Gingerbread Roll. Imagine a cake so incredibly soft and spiced it practically melts on your tongue, all rolled up with a cloud of the creamiest, dreamiest Sugar Cookie Buttercream you’ve ever tasted. It’s like your favorite holiday cookie and a cozy latte decided to have a party in cake form. This dessert isn’t just a treat; it’s an experience. It’s the kind of bake that makes everyone’s eyes go wide when you bring it to the table, and I’m so excited to guide you through every single step. Let’s create some holiday magic together!
The Gingerbread House That Started It All
This recipe always takes me right back to my grandma’s kitchen, circa 1998. Every December, we’d embark on our annual Gingerbread House Construction Project. It was a glorious, messy affair, with royal icing cement dripping everywhere and a serious negotiation process over who got the last red hot gumdrop. One year, I was in charge of the “glue,” and let’s just say my icing was… a little too enthusiastic. The walls were sliding, the roof was sagging, and my brother was laughing hysterically. In a moment of pure, sugar-fueled inspiration, I grabbed a handful of peppermint sticks and used them as architectural supports, propping up the entire wobbly structure. It was a Frankenstein’s monster of a gingerbread house, but it was ours. We were so proud.
This gingerbread roll is my edible tribute to that memory. It has all the warm, nostalgic spice of those gingerbread walls, but it’s infinitely more delicious (and, thankfully, structurally sound!). It’s a reminder that the best holiday creations are the ones made with a little bit of love and a whole lot of fun.
Gathering Your Ingredients
Here’s everything you’ll need to bring this festive masterpiece to life. Using the best ingredients you can find will really make the flavors sing!
For the Soft Gingerbread Cake:
- 6 eggs, separated: Room temperature is key here! They’ll whip up to a much greater volume, giving our cake that signature airy, flexible texture. If you forget, just pop them in a bowl of warm water for 5-10 minutes.
- 2 tbsp melted butter: This adds a touch of rich flavor and helps keep the cake moist. I use unsalted so I can control the salt level.
- 2/3 cup molasses: The heart and soul of the recipe! Use dark molasses for a deeper, more robust flavor. It’s what gives gingerbread its characteristic richness.
- 6 tbsp honey: This adds a lovely floral sweetness that balances the intensity of the molasses.
- 1/2 cup granulated sugar: For just the right amount of sweetness to complement the spices.
- 2 cups all-purpose flour: The trusty foundation of our cake. Be sure to spoon and level it into your measuring cup to avoid a dense cake.
- 1/2 tsp baking soda: Our leavening agent, helping the cake rise beautifully.
- 1/4 tsp salt: Don’t skip this! Salt is a flavor enhancer and makes all the warm spices pop.
- 1 tsp each: cinnamon, ginger, cloves: The holy trinity of gingerbread spices! Feel free to add a pinch of nutmeg or allspice if you’re feeling extra festive.
- Powdered sugar, for dusting: This is our non-stick secret weapon when it’s time to roll the cake.
For the Sugar Cookie Buttercream:
- 1 cup (2 sticks) butter, softened: I cannot stress “softened” enough! It should be at a cool room temperature, leaving a slight indent when you press it. This is the secret to a smooth, non-lumpy frosting.
- 1 cup shortening: This helps stabilize the buttercream, giving it a perfect piping consistency and preventing it from melting too easily.
- 8–10 cups powdered sugar: Yes, it’s a lot! We’ll add it gradually. You might not need all 10 cups, depending on your desired sweetness and thickness.
- 1 1/3 cups sugar cookie-flavored creamer: The star of the show! This is what gives the buttercream that magical, nostalgic sugar cookie flavor. If you can’t find it, vanilla creamer works beautifully, too.
- Optional: 1 tsp vanilla extract, 1/4 tsp almond extract: I highly recommend the almond extract—it adds a subtle, bakery-style depth that is just incredible.
- Crushed cookies or sprinkles for garnish: Go wild! Crushed gingerbread cookies, sanding sugar, or festive sprinkles add a wonderful texture and visual pop.Print

Gingerbread Roll with Sugar Cookie Buttercream
- Total Time: 1 hour
- Yield: 10 servings 1x
- Diet: Vegetarian
Description
This Gingerbread Roll with Sugar Cookie Buttercream is a festive holiday dessert featuring a soft, spiced gingerbread sponge rolled around a luscious, sugar cookie-inspired buttercream. Perfect for Christmas parties or cozy winter gatherings, this eye-catching cake roll is packed with seasonal flavor and a creamy, nostalgic filling.
Ingredients
Scale- For the gingerbread cake:
- 3 large eggs
- ½ cup granulated sugar
- ¼ cup molasses
- ¾ cup all-purpose flour
- 1 tsp baking powder
- 1 tsp ground ginger
- 1 tsp ground cinnamon
- ¼ tsp ground cloves
- ¼ tsp salt
- Powdered sugar, for dusting
- For the sugar cookie buttercream:
- ½ cup unsalted butter, softened
- 1 ½ cups powdered sugar
- 1–2 tbsp milk or heavy cream
- ½ tsp vanilla extract
- ½ tsp almond extract (optional)
- Pinch of salt
Instructions
- Preheat oven to 350°F (175°C). Line a 10×15-inch jelly roll pan with parchment paper and lightly grease it.
- In a bowl, beat eggs and granulated sugar until thick and pale. Add molasses and mix until combined.
- In another bowl, whisk together flour, baking powder, ginger, cinnamon, cloves, and salt. Gently fold into the wet mixture.
- Spread batter evenly in prepared pan and bake for 10–12 minutes or until cake springs back when touched.
- Immediately turn cake onto a clean kitchen towel dusted with powdered sugar. Peel off parchment and roll cake up in the towel from the short end. Let cool completely.
- Meanwhile, beat butter until creamy. Add powdered sugar, milk, vanilla, almond extract, and salt. Beat until smooth and fluffy.
- Unroll cooled cake, spread evenly with buttercream, and gently re-roll. Wrap in plastic and chill for at least 30 minutes before slicing.
- Dust with powdered sugar before serving if desired.
Notes
- Use a clean towel and powdered sugar to prevent sticking when rolling the cake.
- Chill the roll before slicing for cleaner cuts.
- Customize the buttercream with sprinkles or a dash of cinnamon for holiday flair.
- Store leftovers in the refrigerator for up to 3 days.
- Freeze unfilled cake roll for up to 1 month—thaw and fill before serving.
- Prep Time: 25 minutes
- Cook Time: 12 minutes
- Category: Dessert
- Method: Baking
- Cuisine: American
Nutrition
- Calories: 270
- Sugar: 26g
- Fat: 13g
- Saturated Fat: 8g
- Unsaturated Fat: 4g
- Carbohydrates: 35g
- Fiber: 0g
- Protein: 3g
Let’s Bake! Your Step-by-Step Guide
Don’t let the “roll” part intimidate you! I’m walking you through every step with all my favorite chef hacks to ensure success.
- Prep Your Pan and Preheat: Start by preheating your oven to 375°F (190°C). This is a little hotter than a standard cake, which helps the cake bake quickly and stay flexible. Line a 10×15-inch jelly roll pan with parchment paper, leaving a little overhang on the sides for easy removal. Give it a light spray with cooking spray—trust me, this extra step is a lifesaver!
- Whip Those Egg Whites: In a super clean, dry bowl, beat your room-temperature egg whites. We’re looking for soft peaks—that means when you lift the beaters out, the peaks gently curl over. This incorporates air, which is our primary leavening and gives the cake its lovely light texture. Set these aside for now.
- Combine the Wet Ingredients: In a larger bowl, whisk together the egg yolks, melted (but slightly cooled) butter, molasses, honey, and granulated sugar. Whisk it until it’s smooth and beautifully combined. It will be a rich, dark color and smell absolutely divine.
- Bring in the Dry Team: Sift the flour, baking soda, salt, and all those wonderful spices right into the wet mixture. Sifting is a non-negotiable step for a lump-free, tender cake. Gently fold everything together until just combined. Don’t overmix!
- The Gentle Fold: Here’s the crucial part! Take about a third of your whipped egg whites and gently fold them into the gingerbread batter. This helps to lighten the batter. Now, carefully fold in the remaining egg whites. Use a spatula and a light hand, cutting down the middle and folding over, until no white streaks remain. You want to keep all that lovely air you whipped in.
- Bake to Perfection: Pour the batter into your prepared pan and spread it into an even layer. Pop it in the preheated oven and bake for exactly 10 minutes. The cake is done when the top springs back lightly when touched. Do not overbake, or it might crack when rolling!
- The Roll & Cool (The Secret Step!): As soon as the cake comes out of the oven, run a knife around the edges to loosen it. Dust a clean, thin kitchen towel generously with powdered sugar. Invert the warm cake onto the towel. Carefully peel off the parchment paper. Now, starting at one short end, gently but firmly roll the cake up with the towel inside it. Let it cool completely on a wire rack in this rolled-up shape. This “trains” the cake to roll and prevents cracking later.
- Make the Dreamy Buttercream: While the cake cools, make the frosting. In a large bowl, beat the softened butter and shortening together until it’s light, fluffy, and completely smooth—about 2-3 minutes. Gradually add the powdered sugar, one cup at a time, beating well after each addition. Slowly pour in the sugar cookie creamer and the extracts (if using), and beat on medium-high speed for another 2-3 minutes until it’s wonderfully creamy and spreadable.
- The Grand Finale: Assemble! Once the cake is completely cool, carefully unroll it. It’s okay if it doesn’t lie perfectly flat. Spread an even layer of the buttercream over the entire surface, leaving a small border at one of the short ends (this will prevent squishing). Now, gently re-roll the cake, using the towel to help guide you, but this time, without the towel inside! Place it seam-side down on your serving platter.
- Garnish and Glow: Spread a thin layer of the remaining buttercream over the top of the roll, or get fancy and pipe some decorations. Sprinkle with your crushed cookies or festive sprinkles for that final holiday touch.
How to Serve This Showstopper
For the prettiest slices, I like to use a long, sharp knife that I wipe clean between each cut. Serve it on its own with a cup of strong coffee or a cold glass of milk. For an extra-special touch, a drizzle of warm caramel sauce or a dollop of lightly sweetened whipped cream on the side takes it to a whole new level of decadence. This is the dessert you proudly place in the center of the table and watch disappear!
Get Creative! Fun Recipe Twists
This recipe is a fantastic canvas for your creativity! Here are a few of my favorite variations:
- Eggnog Buttercream: Swap the sugar cookie creamer for eggnog and add a pinch of nutmeg for a classic holiday twist.
- Dairy-Free Delight: Use vegan butter and shortening, and replace the creamer with your favorite non-dairy milk (like oat or almond) mixed with a teaspoon of vanilla bean paste.
- Orange Zest Zing: Add the zest of one orange to the buttercream for a bright, citrusy burst that cuts through the richness beautifully.
- Chocolate Swirl: Before rolling, sprinkle the buttercream layer with mini chocolate chips for a delightful texture and flavor surprise.
- Spiced Apple Filling: For a less sweet option, mix some finely chopped, sautéed spiced apples into the buttercream before rolling.
Clara’s Kitchen Notes & Stories
This recipe has been a labor of love in my kitchen for several holiday seasons now. The first time I made it, I was so nervous about the roll cracking that I practically held my breath the entire time! And you know what? It cracked a little. And the world kept spinning. I just dusted it with a little extra powdered sugar, and it was still the star of the dinner party. So, if your cake cracks a bit, don’t panic! The buttercream is a wonderful “spackle,” and a little crack just adds character—proof that it’s homemade with heart.
Over the years, I’ve found that using the towel method religiously and not overbaking the cake are the two absolute golden rules. This cake has now become my most-requested holiday dessert, and I love that it feels both elegantly impressive and wonderfully homespun at the same time.
Your Questions, Answered!
Q: My cake cracked when I rolled it! What did I do wrong?
A: Oh, the classic cake roll worry! The most common culprits are overbaking (which dries it out) or letting it cool completely before the initial “training” roll. Remember, you must roll it in the towel *while it’s still warm* from the oven. This sets the muscle memory. If it does crack, don’t despair! Just position the crack on the bottom when you place it on the platter, and no one will ever know.
Q: Can I make this ahead of time?
A: Absolutely! This is a fantastic make-ahead dessert. You can assemble the entire roll, wrap it tightly in plastic wrap, and store it in the refrigerator for up to 2 days. The flavors actually meld and get even better! Let it sit at room temperature for about 30-60 minutes before serving to take the chill off the buttercream.
Q: I can’t find sugar cookie creamer. What’s the best substitute?
A: No problem! Vanilla creamer is the next best thing. You can also use whole milk or heavy cream, but you’ll want to increase the vanilla extract to 2 teaspoons and add that 1/4 teaspoon of almond extract. It will still taste like a delicious sugar cookie!
Q: Why do I have to separate the eggs? Can’t I just use them whole?
A> This is the secret to the cake’s flexible, airy texture! Whipping the egg whites separately and folding them in incorporates tons of tiny air bubbles. This acts as the main leavening agent, making the cake light enough to roll without breaking. Using whole eggs, while still tasty, will result in a denser, more muffin-like cake that will likely crack.
Nutritional Information (Per Slice, Approximate)
Servings: 10 | Prep Time: 30 mins | Cook Time: 10 mins | Chill Time: 1 hour
Calories: ~580 | Total Carbohydrates: 80g | Total Fat: 28g | Protein: 4g
(Remember, this is a special occasion treat meant to be savored and enjoyed with loved ones! Balance > perfection, always.)
I hope you love making (and devouring!) this Gingerbread Roll as much as I do. It’s a true celebration in dessert form.
With love and a sprinkle of spice,
Clara