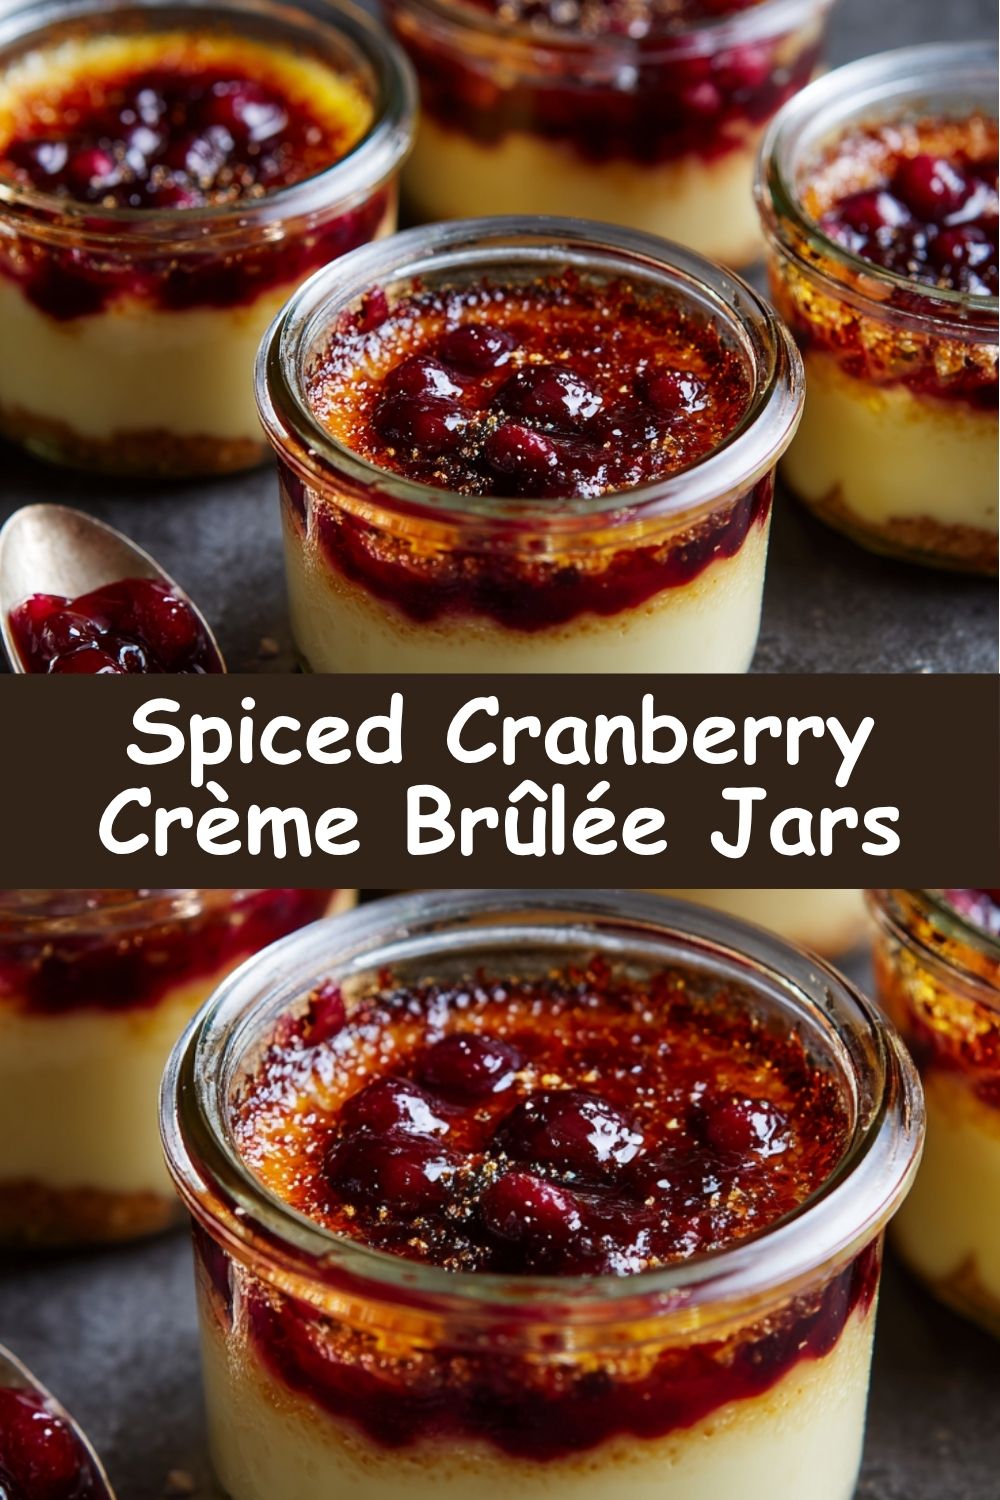
Spiced Cranberry Crème Brûlée Jars: Your New Holiday Obsession
Hey, my adventurous friend! Clara here, coming to you from a kitchen that currently smells like a cozy, spiced dream. I don’t know about you, but for me, the holiday season is all about those moments of pure, unapologetic magic. It’s the twinkle of fairy lights, the warmth of a crackling fire, and that first spoonful of a dessert that makes everyone at the table go completely silent.
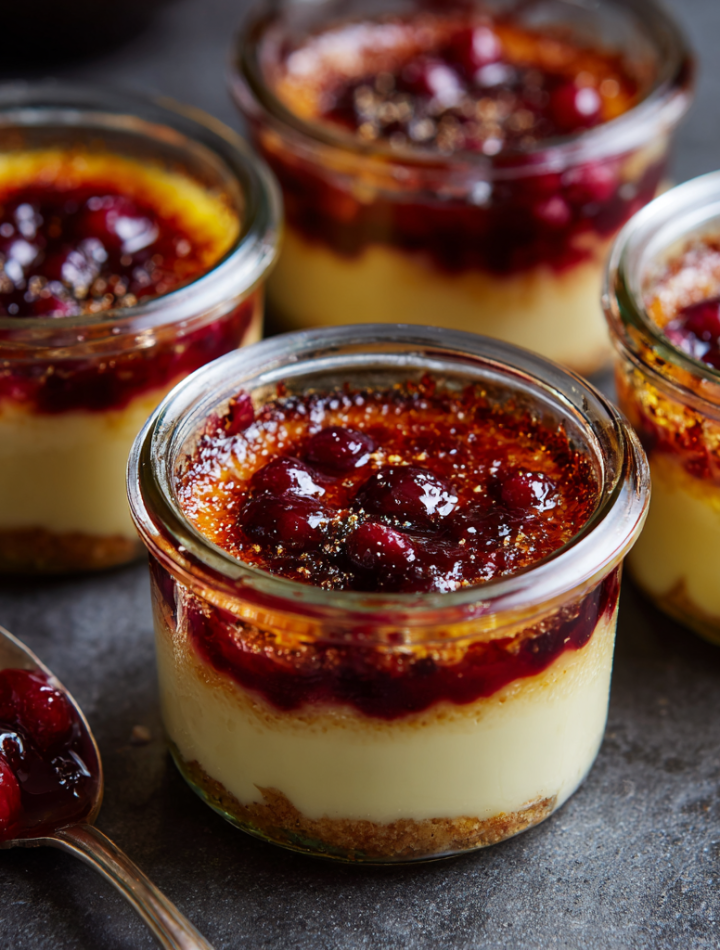
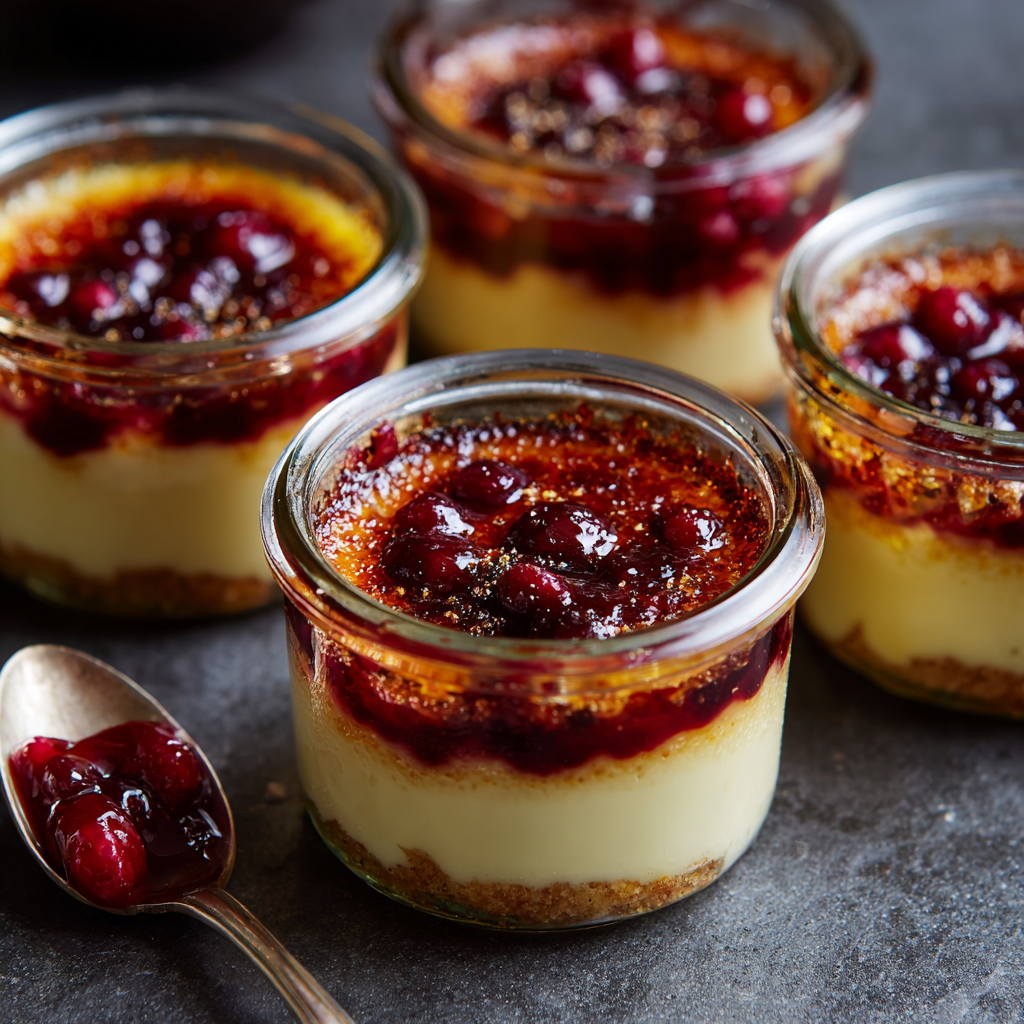
And that’s exactly why I’m so ridiculously excited to share these Spiced Cranberry Crème Brûlée Jars with you today. We’re taking the classic French dessert—you know, the one that feels impossibly fancy—and giving it a cozy, festive twist that’s totally approachable. Imagine this: a layer of bright, tart cranberry compote spiked with orange and warm spices, topped with the most velvety, luxurious vanilla custard you’ve ever tasted, all hiding under that signature, heart-racing caramelized sugar crackle.
These little jars are more than just a dessert; they’re an experience. They’re the perfect project for a quiet afternoon, a stunning showstopper for your holiday table, and the most heartfelt handmade gift you could possibly give. So, grab your favorite apron and let’s create some kitchen magic that’s all flavor, fire, and flair. Let’s make your taste buds dance!
The Christmas Eve Torch Fiasco: A Story of Sweet Beginnings
I have to confess, my love affair with crème brûlée didn’t start in a fancy culinary school. It started in my tiny first apartment, on a Christmas Eve that was equal parts chaotic and charming. I was determined to impress my family with a “grown-up” dessert, and I chose the most intimidating thing I could find: classic vanilla crème brûlée.
I fumbled through the recipe, my hands shaking as I strained the custard. The real drama, however, began when I pulled out my brand-new, slightly terrifying kitchen torch. I’d never used one before. With a dramatic flick of my wrist (and my entire family watching), I lit it. A jet of blue flame shot out with a mighty *WHOOMPH* that made everyone yelp and dive for cover. We spent the next ten minutes laughing until we cried, caramelizing sugar while crouched behind the kitchen island, treating the torch like a controlled explosive. The brûlées were a little uneven, a little singed in spots, but they were perfect. That moment of shared laughter and triumph over a “fancy” dessert is the heart and soul of why I create recipes like this. It’s not about perfection; it’s about the joy and the stories you cook up along the way.
Print
Spiced Cranberry Crème Brûlée Jars
- Total Time: 46 minute
Description
Bring a cozy, festive twist to the classic French dessert with these Spiced Cranberry Crème Brûlée Jars. Bursting with the bright tartness of cranberry compote and a hint of orange zest, each spoonful melts into velvety custard under that signature caramelized sugar crackle. Whether you’re crafting a standout treat for a holiday table or gifting something decadent and handmade, these jars do more than impress—they enchant.
Ingredients
For the cranberry compote:
• 1 cup fresh or frozen cranberries
• 1/4 cup sugar
• Zest of 1 orange
• 2 tbsp orange juice
• 1/4 tsp ground cinnamon
• Pinch of ground cloves
For the custard:
• 2 cups heavy cream
• 1 vanilla bean (or 1 tbsp vanilla paste)
• 5 large egg yolks
• 1/3 cup granulated sugar
• Pinch of salt
Topping:
• 6 tsp granulated sugar (1 tsp per jar, for brûlée)
Instructions
Make the compote: Simmer cranberries, sugar, orange zest & juice, cinnamon, and cloves until berries burst and mixture thickens (8–10 mins). Cool slightly, then spoon 1 tbsp into the bottom of each jar.
Heat the cream: In a saucepan, gently warm cream with vanilla until just steaming—don’t boil. Let sit to infuse (10 mins).
Whisk custard base: In a bowl, whisk yolks, sugar, and salt until pale. Gradually whisk in warm cream.
Assemble: Strain custard through a fine sieve. Pour gently over the cranberry layer in each jar.
Bake: Place jars in a baking dish, fill dish with hot water halfway up the sides. Bake at 300°F (150°C) for 30–35 mins until custards are just set but still jiggly. Cool, then chill for at least 4 hours or overnight.
Brûlée time: Right before serving, sprinkle sugar evenly on top of each custard. Torch until golden and crackly.
- Prep Time: 25 mins
- Cook Time: 35 mins + chilling
- Category: Dessert
Nutrition
- Calories: ~320 per jar
Gathering Your Glow-Up Ingredients
This recipe is a beautiful symphony of simple, high-quality ingredients. Each one plays a crucial role, so let’s get to know them a little better! This recipe makes 6 perfectly portioned small jars (about 4-6 oz each).
For the Spiced Cranberry Compote:
- 1 cup fresh or frozen cranberries: Don’t stress if you can’t find fresh! Frozen work beautifully and are often picked at their peak. They bring that essential tart, vibrant pop that cuts through the rich custard.
- 1/4 cup sugar: This sweetens the tart berries just enough. I like using regular granulated sugar here for a clean flavor that lets the cranberries shine.
- Zest of 1 orange: This is my secret weapon! The bright, citrusy oils in the zest lift the entire compote and make it taste incredibly fresh. Chef’s Insight: Use a microplane to get the zest without the bitter white pith underneath.
- 2 tbsp orange juice: This adds a touch of liquid to help the cranberries break down and reinforces that beautiful citrus flavor. Freshly squeezed is best, but from a carton works in a pinch!
- 1/4 tsp ground cinnamon: The coziest of spices, it adds a warm, familiar depth that just screams “holidays.”
- Pinch of ground cloves: A little goes a long way! Cloves add an intense, aromatic warmth. If you’re not a huge fan, you can swap it for a tiny pinch of nutmeg or even ginger.
For the Velvety Vanilla Custard:
- 2 cups heavy cream: This is the foundation of our luxurious custard. For that signature melt-in-your-mouth texture, heavy cream (or double cream in the UK) is non-negotiable. Substitution Tip: For a slightly lighter version, you can use half heavy cream and half whole milk, but the custard won’t be *quite* as rich.
- 1 vanilla bean (or 1 tbsp vanilla paste): This is where the magic happens! Splitting a vanilla bean and scraping out those tiny, fragrant seeds gives you the most incredible flavor and those beautiful little specks. Vanilla paste is a fantastic, cost-effective alternative that also gives you those specks. In a real pinch, 2 teaspoons of a high-quality vanilla extract will work.
- 5 large egg yolks: Yolks are the natural thickeners that give crème brûlée its signature silky body. Save the whites for a healthy omelet or a batch of meringues!
- 1/3 cup granulated sugar: This sweetens the custard base. We’ll use more sugar later for the crackly top.
- Pinch of salt: Never, ever skip the salt in desserts! It’s not to make it taste salty, but to enhance and balance all the other flavors, making the vanilla pop and the custard taste richer.
For That Iconic Crackly Top:
- 6 tsp granulated sugar (1 tsp per jar): Regular, fine granulated sugar is your best bet here. It caramelizes evenly and creates that perfect, glass-like sheet we all love to crack.
Let’s Create Some Magic: Step-by-Step
Ready to transform these simple ingredients into pure bliss? Follow these steps, and I’ll walk you through every chef hack and secret I’ve learned along the way.
- Make the Compote: In a small saucepan, combine the cranberries, 1/4 cup sugar, orange zest, orange juice, cinnamon, and that pinch of cloves. Bring it to a gentle simmer over medium heat. You’ll hear the cranberries start to pop and sizzle—that’s exactly what you want! Let it bubble away for 8-10 minutes, stirring occasionally, until the mixture has thickened and most of the berries have burst. Chef’s Hack: You can mash a few berries with the back of your spoon to help it along. Take it off the heat and let it cool slightly. It will continue to thicken as it cools. Spoon about one tablespoon of this gorgeous, ruby-red compote into the bottom of each of your six jars. Give them a little tap on the counter to settle the layer evenly.
- Infuse the Cream: Now, for the custard! Pour the 2 cups of heavy cream into a medium saucepan. If you’re using a vanilla bean, slice it lengthwise and use the back of your knife to scrape all those tiny, fragrant seeds out. Add both the seeds and the scraped pod to the cream. If you’re using vanilla paste, just stir it in now. Place the saucepan over medium-low heat. We are NOT boiling the cream. We just want to warm it until it’s steaming hot and you see tiny bubbles forming around the edges. The second it starts to steam, take it off the heat, cover the pot, and let it sit for 10 minutes. This “steeping” time is crucial—it allows the vanilla flavor to deeply infuse the cream, creating a much more complex and beautiful custard.
- Whisk the Custard Base: While the cream is infusing, let’s tackle the egg yolks. In a separate medium bowl, whisk together the 5 egg yolks, 1/3 cup sugar, and that all-important pinch of salt. Whisk vigorously for a good minute or two until the mixture becomes pale yellow, thickens slightly, and forms “ribbons” that hold their shape for a second on the surface. This step, called “blanching,” helps create a smoother, more stable custard. Now, here’s the key to not making scrambled eggs: tempering. Slowly, and I mean a tiny drizzle at a time, whisk about 1/4 cup of the warm vanilla cream into the egg yolk mixture. This gently brings the temperature of the eggs up. Once that’s incorporated, you can slowly pour in the rest of the cream while whisking constantly.
- Strain and Assemble: Place a fine-mesh sieve over a large liquid measuring cup or a bowl with a spout. Pour your custard mixture through the sieve. This step is non-negotiable! It catches any little bits of cooked egg and the vanilla bean pod, guaranteeing you the silkiest, smoothest custard imaginable. Now, gently pour the strained custard over the cranberry layer in each jar, filling them up almost to the top. Pro Tip: To minimize bubbles, you can pour the custard down the side of the jar or use a spoon to deflect the stream.
- The Water Bath Bake: Preheat your oven to 300°F (150°C). Place your filled jars in a baking dish that’s at least 2 inches deep. Bring a kettle of water to a boil. Carefully pour the hot water into the baking dish, around the jars, until it comes about halfway up their sides. This water bath (or bain-marie) is the secret to a gentle, even bake that prevents the custard from curdling. Carefully transfer the whole setup to the oven and bake for 30-35 minutes. The custards are done when the edges are set, but the centers still have a slight, confident jiggle when you gently shake the jar—like Jell-O, not like soup. They will firm up as they cool.
- Cool and Chill: Using tongs or a dry kitchen towel (wet ones are slippery!), carefully remove the jars from the water bath and place them on a wire rack to cool to room temperature. Once they’re no longer warm, cover them with their lids or plastic wrap and transfer them to the refrigerator. They need to chill for at least 4 hours, but overnight is truly best. This resting time allows the custard to fully set and the flavors to meld beautifully.
- The Grand Finale: Brûlée Time! Right before you’re ready to serve, take the jars out of the fridge. Uncover them and use a paper towel to gently blot away any condensation on the surface—this is key for a perfectly crisp top. Sprinkle one teaspoon of granulated sugar evenly over each custard. Now, fire up your kitchen torch! Hold the flame a few inches away and move it in slow, steady, circular motions until the sugar melts, bubbles, and turns a deep, golden amber. Let them sit for just a minute—the sugar top will harden into that glorious, crackable shell. No Torch? No Problem! Place the sugared jars on a baking sheet and set them under a preheated broiler for 1-3 minutes, watching them like a hawk until the sugar caramelizes.
How to Serve with Serious Style
Presentation is part of the fun with these little jars! I love serving them straight on the kitchen counter for a casual gathering, letting everyone grab one and dig in. For a more formal dinner party, place each jar on a small dessert plate with a festive napkin and a tiny spoon. The contrast of the elegant spoon against the rustic jar is just *chef’s kiss*. The best part? They are self-contained, portable, and utterly Instagrammable. Just hand your guests a spoon and watch their eyes light up with that first satisfying *crack*.
Get Creative: Your Jars, Your Rules!
Once you’ve mastered the base recipe, the flavor world is your oyster! Here are a few of my favorite twists:
- Gingerbread Spice: Swap the cinnamon and cloves in the compote for 1/4 tsp each of ginger and allspice. It tastes like the holidays in a jar!
- Chocolate Orange: Whisk 2 tablespoons of sifted cocoa powder into the egg yolk mixture before adding the cream for a rich chocolate custard. The combination with the orange-cranberry compote is sublime.
- Boozy & Bright: Stir a tablespoon of Grand Marnier, Cointreau, or even bourbon into the cooled cranberry compote for a grown-up kick.
- Pomegranate Passion: Replace the cranberry compote with a layer of straight pomegranate molasses or a quick pomegranate seed compote for a different kind of tart, jewel-toned beauty.
- Dairy-Free Dream: Use full-fat, canned coconut cream in place of the heavy cream. The result is incredibly lush and has a subtle tropical note that pairs wonderfully with the cranberry.
Clara’s Kitchen Chronicles: A Few Final Thoughts
This recipe has been a living, evolving thing in my kitchen. The first time I made it, I was so nervous about the custard that I overbaked it, and it was a bit rubbery. (We ate it anyway, of course—waste not, want not!) The beauty of cooking is that we learn from every slightly-wobbly, slightly-singed attempt. Over the years, I’ve learned that the secret isn’t just in the technique, but in the joy you bring to the process. Put on some holiday music, pour yourself a little sparkling cider, and don’t fret over a few bubbles in the custard. The real magic is in sharing something made with your own two hands. These jars have been gifted to new neighbors, brought to potlucks, and have even been the star of my own quiet, solo Christmas evenings. They are a little vessel of joy, and I’m so thrilled to pass the recipe on to you.
Your Crème Brûlée Questions, Answered!
I’ve gotten so many questions about this recipe over the years! Here are the ones that pop up most often.
Q: My custard is watery/ didn’t set. What happened?
A: Oh, I’ve been there! This usually boils down to one of two things. First, it might have been under-baked. Remember, you’re looking for a set edge and a jiggly (but not sloshy) center. Second, it might not have chilled long enough. The custard continues to firm up significantly in the fridge, so that 4-hour minimum chill is non-negotiable. If it’s still soupy after chilling, it likely needed more time in the oven.
Q: Can I make these ahead of time?
A: Absolutely! This is one of their best features. You can assemble and bake the jars up to 2 days in advance. Just keep them covered in the fridge. The *only* thing you should do right before serving is the sugar topping and torching. If you caramelize the sugar and then refrigerate them again, the top will get soft and weepy.
Q: I don’t have a kitchen torch. Can I still make the brûlée top?
A> You sure can! Your broiler is a perfectly good stand-in. Place the sugared jars on a baking sheet and put them under a preheated broiler. Watch them CLOSELY—it can take anywhere from 1 to 4 minutes, depending on your broiler’s power. Rotate the pan if needed for even browning. The second they turn a deep amber, pull them out!