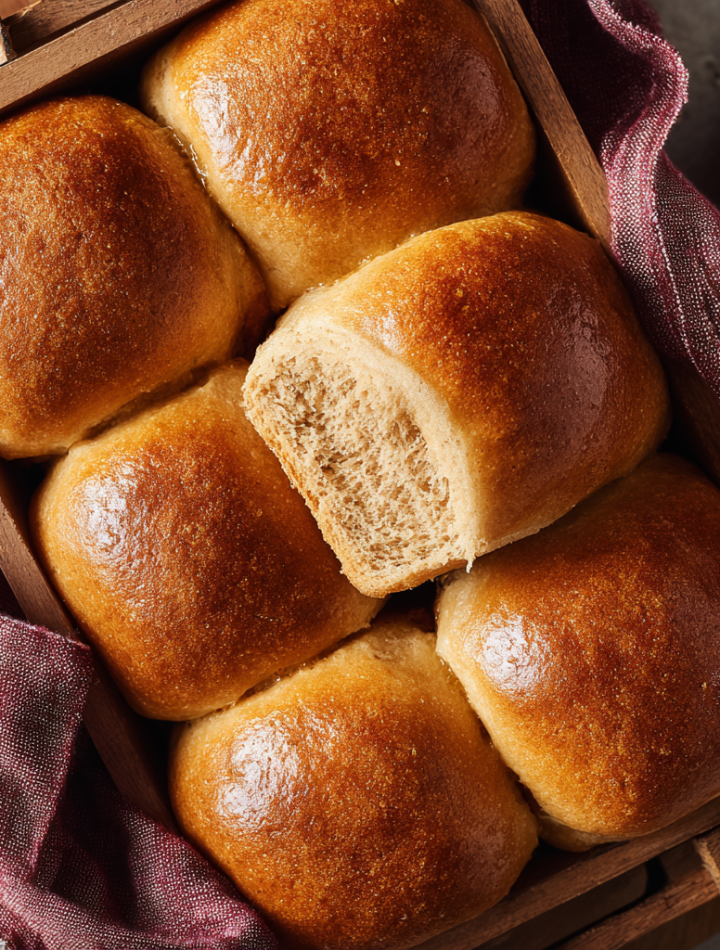
Your New Favorite Reason to Pass the Bread Basket
Let’s be real for a second. Is it even a proper holiday meal if the bread basket doesn’t make your heart skip a beat? I’m talking about that warm, fluffy, slightly sweet roll that you use to sop up every last drop of gravy on your plate. The one you strategically save a tiny piece of to enjoy with a smear of cranberry sauce as your grand finale. For me, that roll has a name, and it’s this Honey Wheat Roll.
I used to think baking bread was this intimidating, day-long affair reserved for people with magical kitchen powers. I’d watch the bread rise in ovens on cooking shows and think, “Nope, not for me.” But then I discovered this recipe, and it changed everything. It’s the gateway recipe to becoming a confident bread baker. It’s forgiving, it’s straightforward, and the payoff is monumental. You get these soft, golden-brown pillows of joy with the perfect balance of hearty whole wheat and a delicate, honeyed sweetness that makes them impossible to resist.
These rolls aren’t just for Thanksgiving, though they absolutely deserve a standing ovation there. They’re for cozy Sunday suppers, for impressing your friends at a dinner party, or for just making a regular Tuesday night feel a little bit special. They’re the kind of wholesome, feel-good food that makes your kitchen smell like a hug and reminds you that the best meals are made with your own two hands. So, tie on your apron, friend. We’re about to bake something truly magical.
The Roll That Started It All
My love affair with these honey wheat rolls began not in a fancy culinary school, but in my Grandma Eleanor’s kitchen, which always smelled like a beautiful collision of cinnamon, coffee, and yeast. I was about ten years old, and my job was the “official dough puncher.” After what felt like an eternity of waiting for the dough to rise, Grandma would call me over, her eyes twinkling. “It’s ready for you, Clara-belle,” she’d say. I’d stand on my tiptoes, peer into the giant yellow bowl, and with all my might, give that puffy, airy dough a satisfying PUNCH. It would deflate with a soft whoosh, and I’d giggle every single time.
She’d then tear off a little piece of the raw dough, roll it into a tiny ball, and let me have my own “mini roll” to bake alongside the big ones. That tiny, personalized roll, golden and glistening with butter, tasted like pure love and accomplishment. It was my first taste of that magical alchemy of flour, yeast, and heat. Baking these rolls now always brings me right back to that linoleum floor, covered in a light dusting of flour, learning that the best recipes aren’t just about ingredients—they’re about the memories you knead into them.
Print
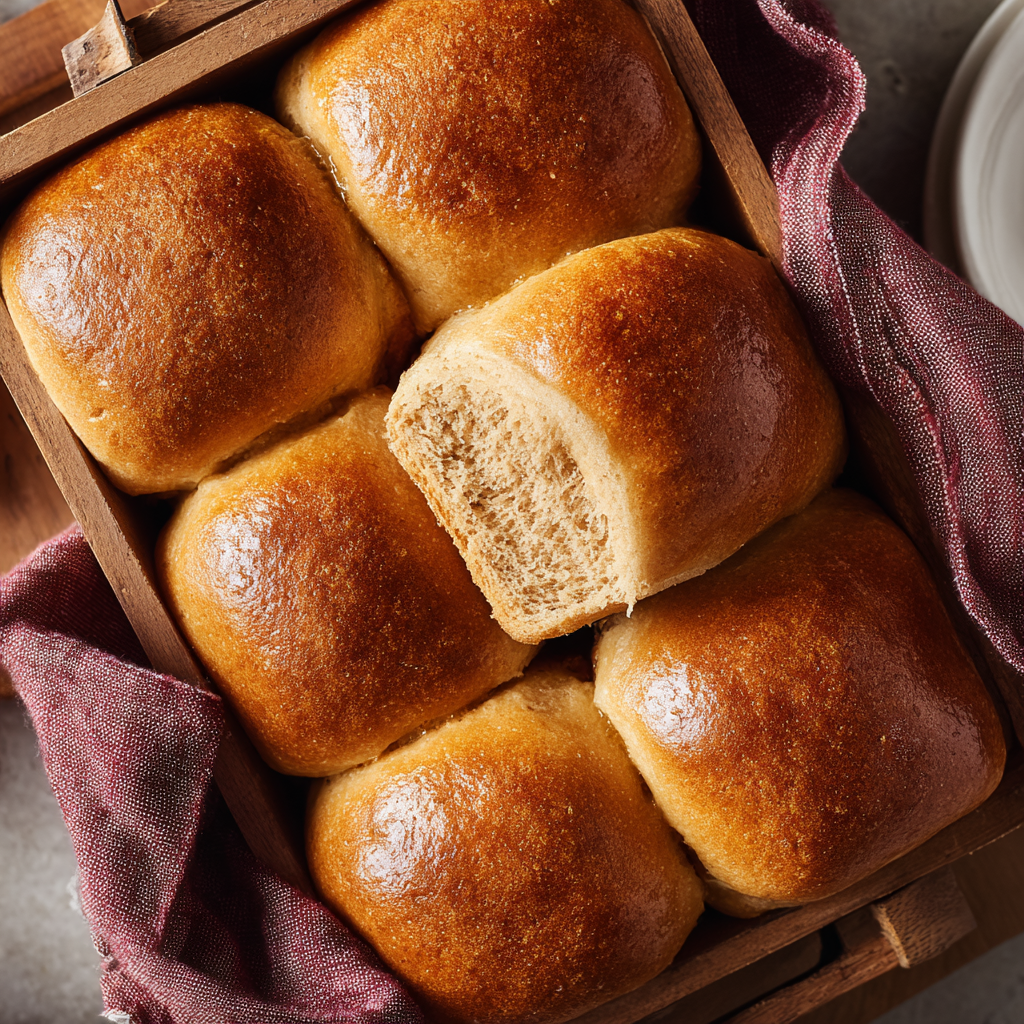
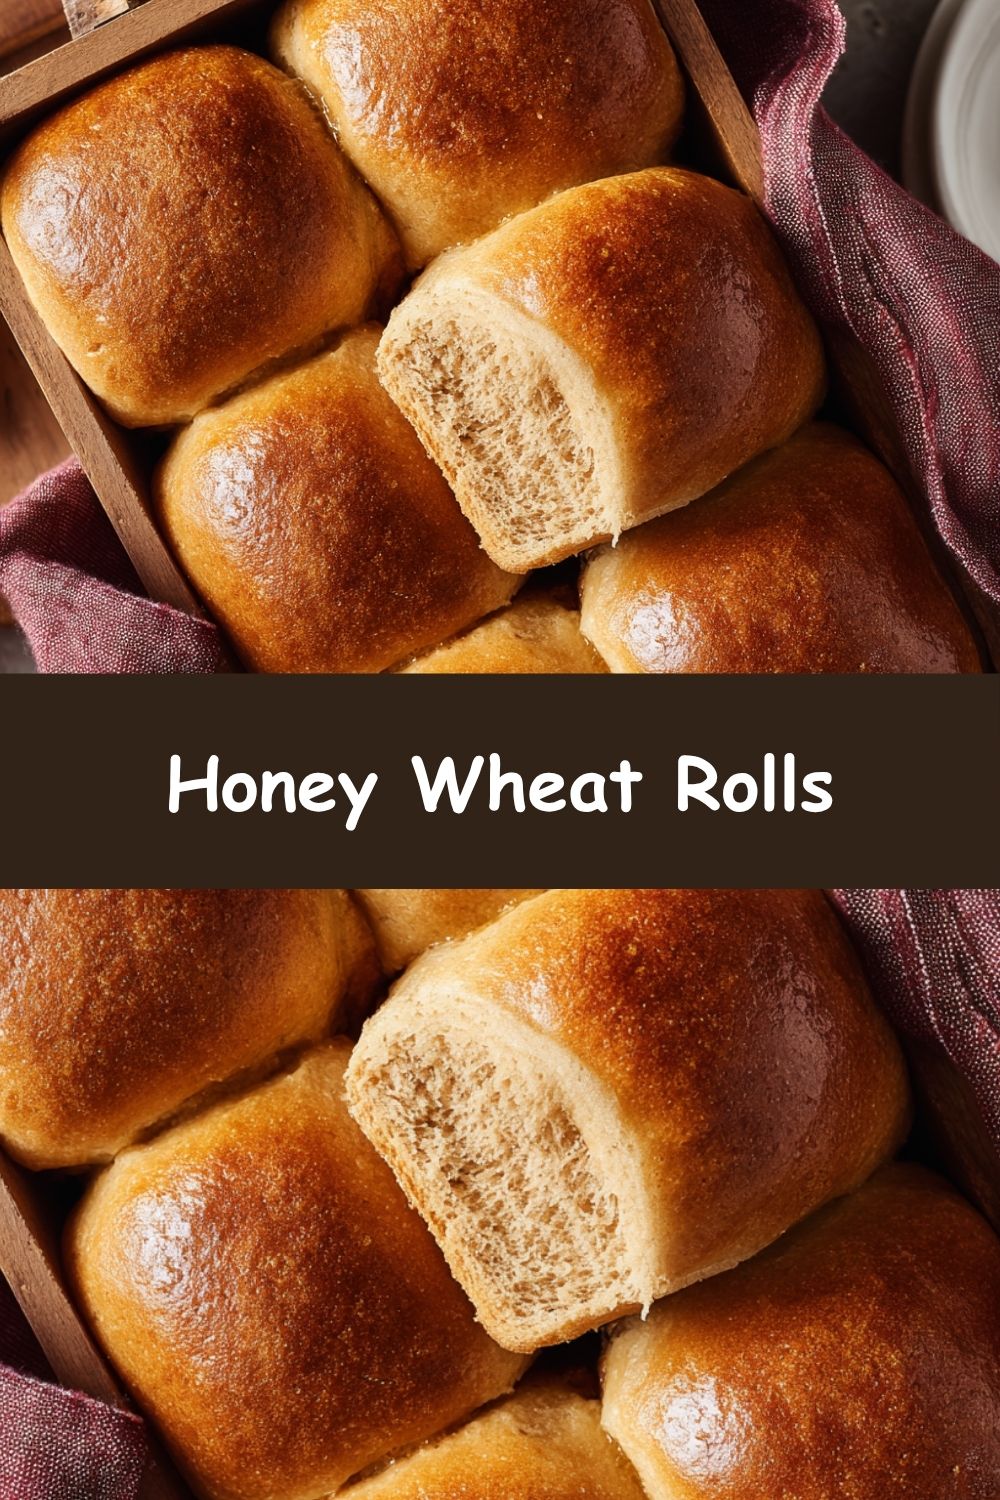
Honey Wheat Rolls
- Total Time: 2 hours (including rise time)
- Yield: 12 rolls 1x
- Diet: Vegetarian
Description
These Honey Wheat Rolls are soft, fluffy, and slightly sweet—perfect for dinner, holiday feasts, or sandwich sliders. Made with whole wheat flour, honey, and a touch of butter, they’re wholesome and comforting with a golden crust and tender crumb.
Ingredients
- 1 cup warm water (110°F)
- 2 1/4 teaspoons active dry yeast (1 packet)
- 1/4 cup honey
- 2 tablespoons melted butter
- 1 large egg
- 1 1/2 cups whole wheat flour
- 1 1/2 to 2 cups all-purpose flour
- 1 teaspoon salt
- Additional melted butter for brushing (optional)
Instructions
- In a large bowl, combine warm water and yeast. Let sit for 5–10 minutes until foamy.
- Stir in honey, melted butter, and egg until combined.
- Add whole wheat flour and salt. Mix to form a batter.
- Gradually add all-purpose flour, 1/2 cup at a time, until a soft dough forms.
- Knead the dough on a lightly floured surface for 6–8 minutes, until smooth and elastic.
- Place dough in a greased bowl, cover, and let rise in a warm place for 1 hour or until doubled in size.
- Punch down dough and divide into 12 equal pieces. Shape into rolls and place in a greased 9×13-inch baking dish.
- Cover and let rise again for 30–45 minutes, until puffy.
- Preheat oven to 375°F (190°C). Bake for 15–18 minutes or until golden brown.
- Brush tops with melted butter, if desired, and cool slightly before serving.
Notes
- Use white whole wheat flour for a lighter texture and flavor.
- Substitute maple syrup for honey if desired.
- Dough can be made ahead and refrigerated after first rise—bring to room temp before shaping.
- Freeze baked rolls and reheat in oven when needed.
- Prep Time: 20 minutes
- Cook Time: 18 minutes
- Category: Bread
- Method: Baked
- Cuisine: American
Nutrition
- Serving Size: 1 roll
- Calories: 160
- Sugar: 5g
- Sodium: 180mg
- Fat: 4g
- Saturated Fat: 2g
- Unsaturated Fat: 1g
- Trans Fat: 0g
- Carbohydrates: 27g
- Fiber: 2g
- Protein: 4g
- Cholesterol: 20mg
Keywords: honey wheat rolls, homemade dinner rolls, soft wheat rolls, whole wheat bread, holiday rolls, easy yeast rolls, sweet wheat rolls, fluffy dinner rolls
Gathering Your Golden Ingredients
One of the things I adore about this recipe is its beautiful simplicity. We’re using whole, honest ingredients that work together to create pure magic. Here’s your shopping list and a few of my chef-y insights to set you up for success!
- 1 cup warm milk (about 110°F): This is our liquid base, and its temperature is KEY! Too hot, and it will kill the yeast; too cold, and the yeast won’t wake up. Think “baby bottle warm”—you should be able to comfortably hold your finger in it. Chef’s Tip: No milk? Unsweetened almond or oat milk work beautifully here too.
- 2¼ teaspoons active dry yeast (1 packet): Our little miracle workers! These tiny granules are what will make our rolls rise into fluffy clouds.
- ¼ cup honey: This is our natural sweetener, and it gives the rolls their signature flavor and gorgeous golden color. Chef’s Insight: The honey also helps keep the rolls wonderfully soft and tender for days.
- 1 egg: This adds richness, structure, and helps with that beautiful browning.
- ¼ cup butter, melted: For unbeatable flavor and a soft, tender crumb. I use salted butter for a lovely sweet-and-salty balance.
- 1½ cups whole wheat flour: This is where our wholesome, nutty flavor comes from. It gives the rolls a heartier texture and a nutritional boost.
- 1½ cups all-purpose flour (plus more as needed): The trusty sidekick! All-purpose flour gives us the structure and lightness that can sometimes be tricky with 100% whole wheat. The “plus more” is your secret weapon—flour humidity can vary, so we’ll adjust as we go.
- 1 teaspoon salt: The flavor enhancer! Don’t you dare forget it. Salt makes all the other flavors, especially the honey, pop.
- Optional: extra melted butter for brushing: This is non-negotiable for me. Brushing the warm rolls with butter gives them a professional, glossy finish and an extra layer of decadent flavor.
Let’s Get Baking: The Step-by-Step Magic
Ready to create some kitchen magic? Follow these steps, and don’t skip my little commentary—it’s packed with all the hacks I’ve learned from making these rolls approximately a million times!
- Wake Up the Yeast: In a large bowl, combine your warm milk, yeast, and honey. Give it a gentle stir and then walk away for 5-10 minutes. This is your first sign of magic! You’re looking for a foamy, creamy layer on top—this tells you your yeast is alive, happy, and ready to make your dough rise. Chef’s Hack: If you don’t see foam after 10 minutes, your yeast might be old or your liquid was too hot/cold. It’s best to start over to avoid dense rolls.
- The First Mix: To the foamy yeast mixture, add the egg, melted butter, salt, whole wheat flour, and 1 cup of the all-purpose flour. Stir everything together with a wooden spoon or a dough whisk until you have a shaggy, sticky batter. It won’t look pretty yet, and that’s perfectly okay!
- Find the Perfect Dough: Now, gradually add the remaining ½ cup of all-purpose flour, a little at a time, while stirring. You might not need all of it, or you might need a tablespoon or two more. Stop adding flour when the dough pulls away from the sides of the bowl and is soft to the touch, but still just a tiny bit tacky. A slightly tacky dough makes for a softer roll! Chef’s Insight: It’s better to have a slightly sticky dough than a dry, tough one. We can always add a sprinkle of flour during kneading.
- The Kneading Dance: Lightly flour your clean countertop and turn the dough out. Now for the fun part! Knead the dough for 8-10 minutes. Use the heels of your hands to push the dough away from you, then fold it back over, give it a quarter turn, and repeat. You’ll feel it transform from sticky and clumsy to smooth, elastic, and supple. This is my favorite part—it’s like a mini workout with the best reward imaginable.
- The First Rise: Place your beautiful, smooth dough ball into a lightly greased bowl (I just use the same one I mixed in, wiped clean and greased). Turn the dough over once to coat it lightly in oil. Cover the bowl with a clean kitchen towel or plastic wrap and place it in a warm, draft-free spot. Let it rise for about 1 hour, or until doubled in size. Chef’s Hack: No warm spot? Turn your oven on to the “warm” setting for one minute, then turn it OFF. Place the covered bowl in the slightly warm oven—it’s the perfect rising environment!
- Shape the Rolls: Once your dough is beautifully puffed up, it’s time for the most satisfying step: punch it down! Gently press the air out. Turn it out onto your counter and divide it into 12 equal pieces. I like to use a kitchen scale for precision, but eyeballing it works just fine. Roll each piece into a smooth ball by tucking the edges under, creating a tight “skin.” Place them in a greased 9×13 inch baking dish or on a baking sheet, just touching each other. This helps them rise up nice and tall.
- The Second Rise: Cover your shaped rolls and let them rise again for 30-45 minutes. They should look puffy and have filled out the pan. Meanwhile, preheat your oven to 375°F (190°C).
- Bake to Golden Perfection: Bake your rolls for 15-18 minutes. You’re looking for a gorgeous golden-brown top and a heavenly aroma filling your kitchen. To be absolutely sure they’re done, you can check the internal temperature with a thermometer—it should read 190°F (88°C).
- The Final Flourish: The second those rolls come out of the oven, brush the tops with the optional melted butter. This gives them a gorgeous sheen and an irresistible buttery flavor. Let them cool in the pan for just a few minutes before devouring.
How to Serve These Golden Gems
Presentation is part of the fun! I love serving these rolls right in the baking dish, nestled together, for a rustic, family-style feel. Place a small dish of softened salted butter and a little pot of honey right next to them for a DIY honey-butter situation. They are the ultimate sidekick to your holiday turkey, a perfect partner for a big bowl of soup or stew, and an absolute dream when split open and used to make a leftover sandwich with cranberry sauce and turkey the next day. Honestly, they’re incredible all on their own, still warm from the oven.
Mix It Up! Creative Twists on the Classic
Once you’ve mastered the basic recipe, the fun really begins! Here are a few of my favorite ways to play with the flavors:
- Herb & Garlic Swirl: Roll the dough out into a rectangle before the second rise, brush with garlic butter, and sprinkle with fresh rosemary and thyme. Roll it up, slice into swirls, and bake for stunning pull-apart rolls.
- Seeded & Grainy: For extra texture, knead in ¼ cup of a seed mix (sunflower, pumpkin, flax) into the dough. Before baking, brush the tops with an egg wash and sprinkle with rolled oats or more seeds.
- Maple & Oat: Swap the honey for pure maple syrup and substitute ½ cup of the all-purpose flour with old-fashioned oats for a cozy, autumnal flavor.
- Vegan-Friendly: Use plant-based milk, a flax egg (1 tbsp ground flax + 3 tbsp water), and vegan butter. The result is just as soft and delicious!
- Cinnamon Sugar Knots: After the first rise, roll the dough into small ropes, tie them into knots, brush with butter, and toss in cinnamon sugar before the second rise and baking.
Clara’s Kitchen Confidential
This recipe has been my trusty sidekick for years, and it’s evolved in tiny ways with every batch. I’ve learned that on a humid day, the dough might need a bit more flour, and on a cold day, the rising time might be a little longer. Don’t stress! Bread baking teaches you to be intuitive. The biggest “aha!” moment I ever had was realizing I was adding too much flour during the kneading process, leading to slightly denser rolls. Now, I’m much more gentle with my flour additions, and the texture is always cloud-like.
One of my favorite kitchen fails turned into a win: I once accidentally used the entire ¼ cup of honey AND an extra tablespoon I had measured for my tea. I decided to roll with it, and I created the sweetest, most decadent “dessert” rolls that my friends still talk about. It just goes to show that sometimes the best recipes come from happy accidents. So, make this recipe your own. Add a little more love, a dash of curiosity, and don’t be afraid to get your hands a little dirty.
Your Honey Wheat Roll Questions, Answered!
I’ve gotten so many wonderful questions about this recipe over the years. Here are the ones that pop up most often!
Q: My dough didn’t rise. What went wrong?
A: Oh, I’ve been there! The most common culprits are old yeast (always check the expiration date!) or liquid that was too hot and killed the yeast. The liquid should be warm, not hot. Another reason could be a cold kitchen. Next time, try my “warm oven” trick for the perfect rising environment.
Q: Can I make these rolls ahead of time?
A: Absolutely! You have two great options. 1) Refrigerate the shaped rolls: After shaping the rolls in the pan, cover them tightly and refrigerate overnight. The next day, let them sit at room temperature for about an hour to finish rising, then bake as directed. 2) Freeze the baked rolls: Bake them completely, let them cool fully, then freeze in a zip-top bag for up to 3 months. Reheat in a 350°F oven until warm.
Q: My rolls are a bit dense. How can I make them lighter?
A> A dense roll usually means one of three things: 1) Too much flour was added, so be lighter-handed next time. 2) The dough needed more kneading to develop the gluten. 3) The rising time was too short—make sure the dough has truly doubled in size. Be patient with the rise!
Q: Can I use 100% whole wheat flour?
A> You can, but the rolls will be much denser and heartier. Whole wheat flour absorbs more liquid and has less gluten, so I highly recommend the 50/50 blend for the perfect texture. If you do use all whole wheat, you may need to add a bit more liquid and be prepared for a more rustic result.
Nutritional Info (Because Knowledge is Power!)
This is a rough estimate per roll, based on the recipe making 12 equal-sized rolls. Values can vary based on specific ingredients used.
Calories: ~160 | Carbohydrates: 25g | Protein: 4g | Fat: 5g