Craving That Takeout Magic? Let’s Make Sweet & Sour Chicken That Crushes Delivery!
Hey foodie friend! Clara here, your partner-in-crime for turning kitchen adventures into pure joy. Raise your hand if Friday nights used to mean greasy takeout boxes and that oh-so-tempting sweet and sour chicken? 🙋♀️ Same! But what if I told you we could whip up a version at home that’s crispier, stickier, and bursting with more flavor than anything that ever arrived in a cardboard container? No mystery sauces, no “why does my stomach feel weird?”—just golden, crunchy chicken tossed in a glossy, tangy-sweet symphony with those iconic colorful peppers. It’s the kind of meal that makes you do a little happy dance while you’re cooking (and definitely while you’re eating!). We’re talking under an hour, simple ingredients, and that unbeatable feeling of nailing a restaurant classic in your own space. Forget soggy disappointments—let’s create sweet & sour fireworks that’ll make your eyes light up and your chopsticks fly! 🔥🍍🍗
My Takeout Epiphany & the Sauce That Started It All
Picture this: It’s my first tiny apartment kitchen circa 2018. I’d just moved cities, was surviving on sad salads, and desperately missed the comfort of my favorite Chinese takeout spot back home. One rainy Tuesday, craving hit hard. But delivery? Nope. My budget said “Clara, figure it out.” I stared at a lone bell pepper and a sad chicken breast. Challenge accepted! Cue the chaos: cornstarch everywhere, questionable frying attempts (hello, slightly charred bits!), and a sauce experiment involving waaay too much vinegar (RIP tastebuds!). But then… magic. Batch three finally clicked. That first perfect bite of crispy chicken coated in that vibrant, tangy-sweet sauce? Pure euphoria. It tasted like comfort, victory, and a big, delicious “I can DO this!” That messy kitchen victory became Unknown’s very first recipe test. Now, it’s my go-to for cheering up friends, impressing my niece (“Auntie Clara’s magic chicken!”), and reminding myself that sometimes the best adventures start with a little kitchen courage (and maybe a splatter guard!).
Print
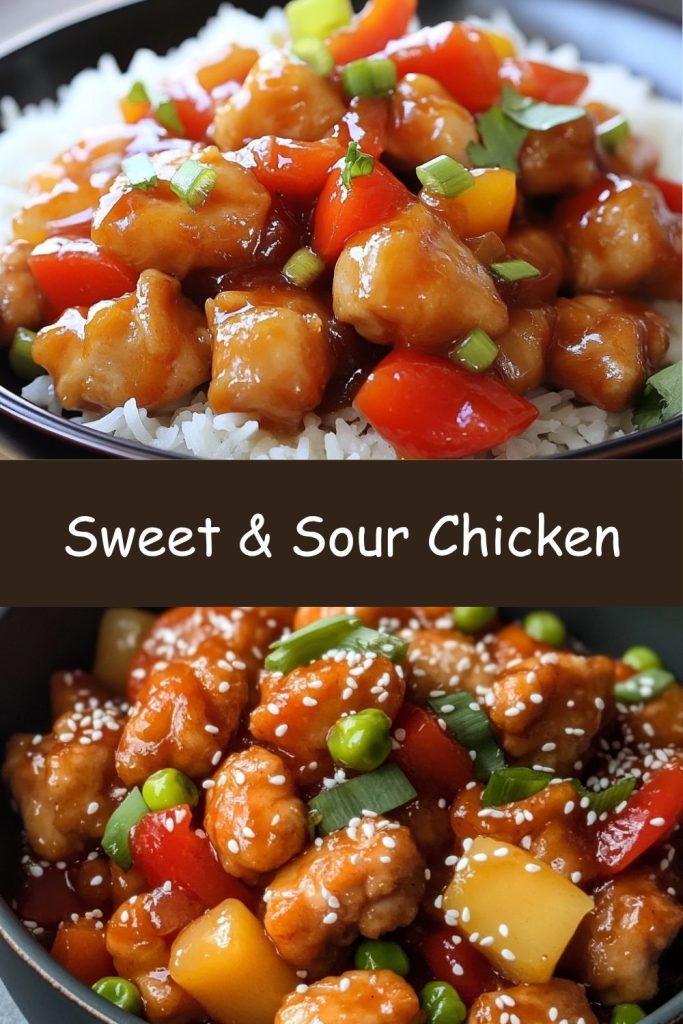
Sweet & Sour Chicken
- Total Time: 40 mins
- Yield: 4 servings
Description
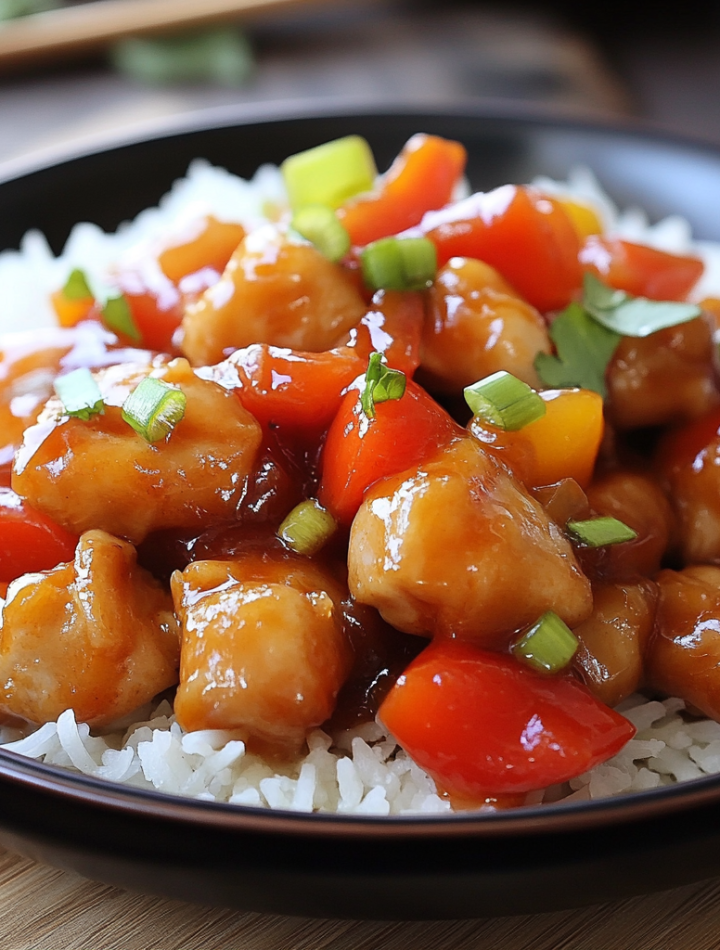
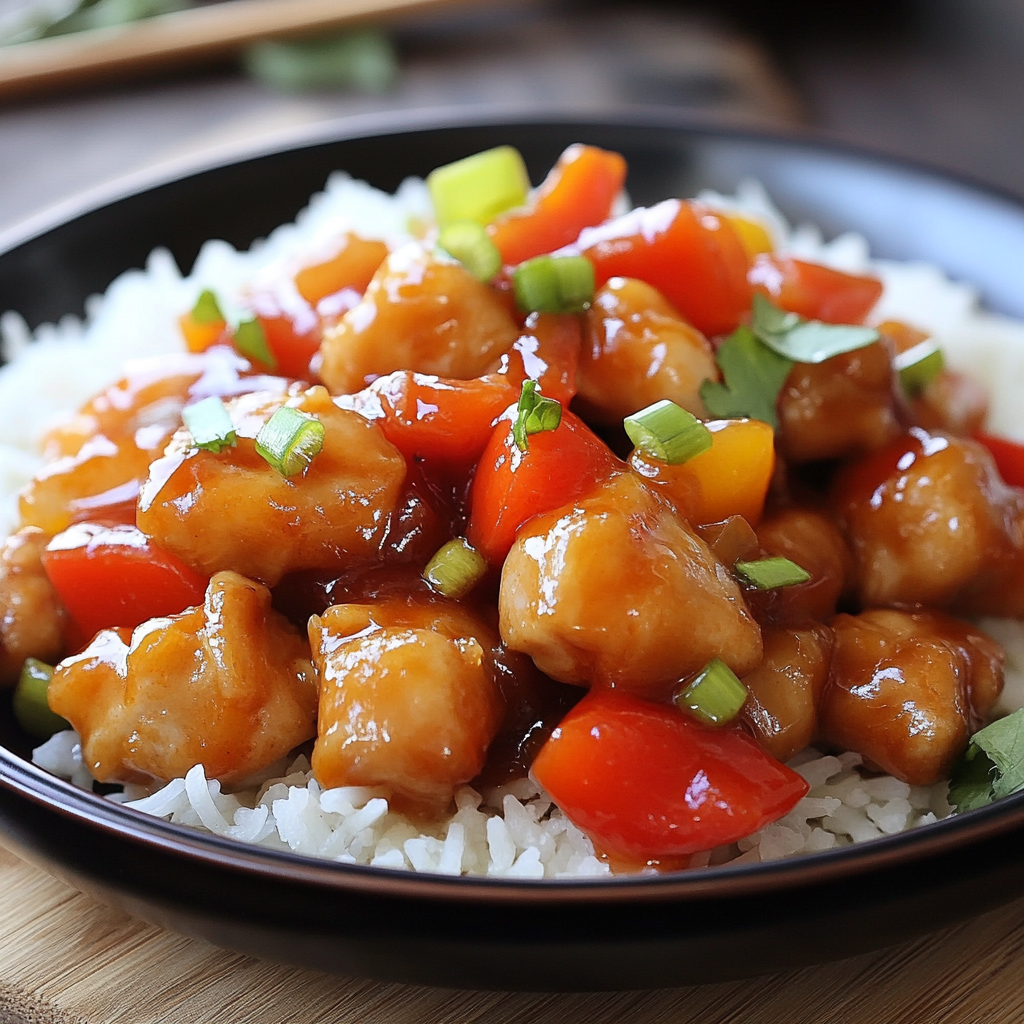
Crispy fried chicken tossed in a glossy, sweet-and-tangy sauce with peppers and garlic—this dish is a favorite for a reason. It’s a perfect balance of flavor and texture, all made from scratch in under an hour. Serve it over rice and top with scallions and sesame seeds for that restaurant finish.
Instructions
Prepare Chicken: Season chicken with salt and pepper. Toss in cornstarch, then dip in beaten egg.
Fry: Heat oil in a skillet or wok. Fry chicken pieces until golden and crispy. Remove and set aside.
Make Sauce: In the same pan, heat 1 tbsp oil. Sauté garlic and bell pepper for 2 minutes.
Add vinegar, soy sauce, ketchup, and sugar. Stir and simmer until thickened slightly.
Toss Together: Return chicken to the pan. Coat evenly in the sauce and cook 2–3 more minutes.
Serve: Garnish with scallions and sesame seeds. Serve over rice.
- Prep Time: 15 mins
- Cook Time: 25 mins
- Category: Dinner
Nutrition
- Calories: ~500
- Fat: 25g
- Carbohydrates: ~35g
- Protein: ~30g
Gather Your Flavor Squad: What You’ll Need
Don’t stress—this is all pantry-friendly stuff! Here’s your lineup, plus my chef-y whispers for each:
- 🍗 Chicken (1 lb boneless, skinless breast): The star! Cubed for max crisp-to-sauce ratio. Chef’s Swap: Thighs work beautifully for extra juicy bites! Just trim excess fat.
- 🧂 Salt & Pepper: Essential flavor foundation. Season generously!
- 🌽 Cornstarch (1/2 cup): The CRISPY secret weapon! Creates that incredible, airy crunch. Chef’s Tip: Tapioca starch works in a pinch, but cornstarch is gold.
- 🥚 Eggs (2, beaten): Our glue! Helps the cornstarch cling for perfect coating.
- 🔥 Oil for Frying: Use a neutral, high-heat oil like avocado, canola, or peanut. Fill your skillet/wok about 1/2 inch deep.
- 🧄 Garlic (1/2 tbsp minced): Flavor bomb base! Fresh is best here.
- 🫑 Bell Pepper (1, diced): Color & crunch! I love red or orange for sweetness. Green adds a classic bite.
- 🍎 Cider Vinegar (3/4 cup): Tangy backbone! Chef’s Swap: Rice vinegar or white vinegar work, but cider adds a lovely fruity note.
- 🥢 Soy Sauce (1 tbsp): Salty depth & umami. Use low-sodium if watching salt. Gluten-Free? Tamari is your friend!
- 🍅 Ketchup (1/4 cup): Don’t knock it! Adds body, sweetness, and that iconic red hue.
- 🍚 Sugar (1/2 cup): Balances the tang. Chef’s Insight: The sugar helps the sauce get gloriously sticky. Brown sugar adds a hint of molasses depth if you like!
- 🌿 Garnish (Scallions & Sesame Seeds): The confetti! Freshness + nutty finish. Non-negotiable for that restaurant flair.
Let’s Get Cooking: Crispy, Sticky Success in Steps!
Ready for the fun part? Channel your inner wok master! Here’s how we build the magic, step-by-step:
- Chicken Prep Power: Pat your cubed chicken super dry with paper towels (CRUCIAL for crispiness!). Season well with salt and pepper. Toss it vigorously in a bowl with the cornstarch until every piece is evenly coated – it should look like little ghosts! Chef Hack: Let it sit for 5 mins after coating. This helps the coating adhere better during frying.
- Egg-cellent Adhesion: Dip each cornstarch-dusted chicken piece into the beaten eggs. Let any excess drip off. Think “lightly armored,” not swimming! Tip: Use one hand for dry (cornstarch) and one for wet (egg) to avoid claw-fingers!
- Fry to Golden Glory: Heat your oil in a large skillet, wok, or Dutch oven over medium-high heat (around 350-375°F / 175-190°C). Test it: a tiny bit of cornstarch should sizzle immediately. Working in batches (don’t crowd the pan!), carefully add the chicken. Fry for 3-5 minutes per side, turning occasionally, until deeply golden brown, crispy, and cooked through. Pro Move: Use tongs or a spider strainer! Transfer crispy bites to a wire rack set over a baking sheet (this keeps them crisp WAY better than paper towels!).
- Sauce Symphony: Carefully pour out all but 1 tablespoon of the frying oil (save it for stir-fries!). Return the pan to medium heat. Add the minced garlic and diced bell pepper. Sauté for 1-2 minutes until fragrant and the pepper just starts to soften – keep it vibrant!
- Tangy-Sweet Alchemy: Pour in the cider vinegar, soy sauce, ketchup, and sugar. Whisk it together! Bring it to a lively simmer (little bubbles popping consistently). Let it bubble gently for 3-5 minutes, stirring often. Watch it transform: It will thicken slightly and become glossy – like vibrant, edible lava! Taste it (careful, it’s hot!). Want more tang? A splash more vinegar. More sweet? Pinch more sugar.
- The Grand Toss: Reduce the heat to low. Add all that glorious crispy chicken back into the pan with the sauce. Gently toss and fold (don’t stir aggressively!) for 1-2 minutes, just until every piece is evenly coated and heated through. Key Tip: Don’t over-toss or let it simmer too long here, or the crispiness will soften. We want sticky, not soggy!
- Finishing Touch: Remove from heat immediately! That’s it! Your masterpiece is ready.
Plate It Like a Pro: Serving Up Sunshine
Presentation is part of the fun! Fluff up a big bed of steamed jasmine or brown rice (or cauliflower rice for a lighter vibe!) in bowls or on plates. Pile that gorgeous, glossy sweet and sour chicken and peppers high on top. The final flourish? A generous sprinkle of chopped fresh scallions and a shower of toasted sesame seeds. That pop of green and nutty crunch makes it *chef’s kiss* restaurant-worthy! Serve immediately while it’s piping hot and the chicken is still ultra-crispy. Chopsticks optional, but highly encouraged for maximum fun!
Mix It Up! Sweet & Sour Adventures
This recipe is your playground! Try these tasty twists:
- Pineapple Party: Add 1 cup of fresh or canned pineapple chunks (drained) with the bell peppers! Tropical sweetness for the win. 🍍
- Spicy Fiesta: Love heat? Add 1-2 minced red chili peppers or 1/2 tsp red pepper flakes when sautéing the garlic. Sriracha in the sauce works too!
- Veggie Power (Vegan/Vegetarian): Swap chicken for extra-firm tofu (pressed, cubed, coated & fried/baked) or cauliflower florets! Use veggie broth instead of soy sauce if needed.
- Honey Harmony: Replace half the sugar with honey or maple syrup for a deeper, floral sweetness.
- Ginger Zing: Add 1 tbsp freshly grated ginger with the garlic for an extra aromatic kick!
Clara’s Kitchen Confessions & Evolution
Oh, this recipe! It’s come a LONG way from that chaotic first apartment attempt. Batch testing involved my patient (and slightly sauce-splattered) roommate taste-testing *seven* sauce variations in one night. Verdict? Cider vinegar + ketchup was the golden ratio! The biggest game-changer? Ditching paper towels for the wire rack after frying. Total crispiness revelation! I also learned the hard way that overcrowding the pan = steamed chicken sadness 😭. Now, I fry in batches religiously. It’s become my ultimate crowd-pleaser – I once made a quadruple batch for a friend’s potluck and came home with an empty dish and three recipe requests scribbled on napkins. That’s the magic of this dish: it feels special, tastes incredible, and makes everyone feel like they’ve won takeout lottery… from your kitchen!
Sweet & Sour SOS: Your Questions Answered
Ran into a hiccup? No worries! Here’s the fix:
- Q: My chicken isn’t crispy! Help! 😫
A: Three main culprits: 1) Oil wasn’t hot enough. Use a thermometer or test with cornstarch! 2) Crowded the pan. Fry in smaller batches! 3) Let it sit on paper towels. Paper traps steam = soggy. Always use a wire rack! - Q: Sauce too thin? Too thick? 😬
A: Too thin? Let it simmer a bit longer to reduce and thicken naturally. Too thick? Whisk in a teaspoon of warm water or pineapple juice at a time until it loosens up. It thickens more as it coats the hot chicken too! - Q: Can I bake the chicken instead of frying?
A: Absolutely! Coat the chicken as directed. Preheat oven to 425°F (220°C). Place chicken on a wire rack set over a baking sheet (crucial!). Lightly spray with oil. Bake for 15-20 mins, flipping halfway, until crispy and cooked. Toss with sauce! It’s less traditional but still tasty. - Q: How do I store leftovers? Will it stay crispy?
A: Store chicken and sauce separately in airtight containers in the fridge for up to 3 days. Reheat the sauce gently on the stove. Reheat the chicken in a 400°F (200°C) oven on a wire rack for 5-10 mins to re-crisp! Note: It won’t be *as* crisp as fresh, but still delicious.
Nourishment Notes (Approx Per Serving)
Calories: ~500 | Protein: ~30g | Carbs: ~35g | Fat: ~25g
Remember: This is an estimate based on specific ingredients/portions. Using different oils, chicken cuts, or rice amounts will change it! Focus on the joy of homemade goodness.
And there you have it, flavor friend—your very own Sweet & Sour Chicken masterpiece, right from your own kitchen! Crispy, juicy bites coated in that glossy, tangy-sweet sauce, all made without takeout tabs or mystery oils. This recipe isn’t just a dinner—it’s a triumph of flavor, comfort, and kitchen confidence. So the next time you’re tempted to hit that delivery app, grab a pepper, heat that skillet, and treat yourself to the joy of home-cooked magic. You’ve got the tools, the story, and the sauce. Now go make those chopsticks dance! 🍍🍗🔥