
Your New Go-To Party Star: The Bruschetta Cheese Ball
Hey there, my fellow food adventurer! Clara here. Tell me, have you ever been to a party, spotted a cheese ball on the table, and felt a little spark of joy? There’s something so wonderfully classic about it, right? But then, have you also taken a bite of the most incredible, garlicky, tomato-topped bruschetta and thought, “I wish I could eat this forever?” Well, my friend, today is the day those two delicious worlds collide in the most spectacular way.
I’m so excited to introduce you to my Bruschetta Cheese Ball—the Ultimate Party Appetizer. This isn’t your grandma’s cheese ball (though I love hers dearly!). This is a vibrant, flavor-packed masterpiece that takes everything we adore about that classic Italian starter—the juicy tomatoes, the fragrant basil, the punch of garlic—and rolls it into a creamy, dreamy, shareable centerpiece. It’s elegant enough to be the star of your holiday spread but so simple and fun that you’ll want to whip it up for a casual Friday night with friends.
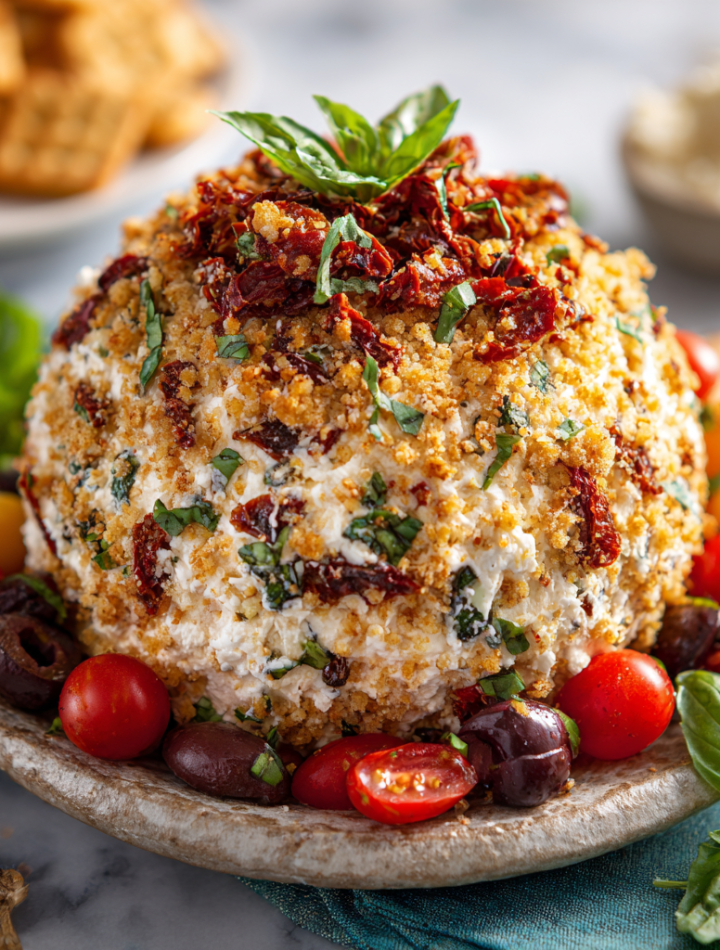
Imagine a creamy base loaded with sun-dried tomatoes, fresh basil, briny olives, and a mix of savory cheeses. Now, picture that glorious mixture rolled in a crunchy, golden blanket of toasted panko breadcrumbs and more of those intense sun-dried tomatoes. The result? A textural symphony in every single bite. It’s creamy, it’s crunchy, it’s savory, and it’s fresh. Served with some crispy crostini or simple crackers, it’s the kind of appetizer that disappears in minutes, leaving everyone begging for the recipe. So, let’s roll up our sleeves and create some kitchen magic together!
Print
Bruschetta Cheese Ball – Ultimate Party Appetizer
- Total Time: ~1 hour 15 minutes
- Yield: 10–12 1x
Description
This Bruschetta Cheese Ball combines the bold, fresh flavors of Italian bruschetta with the creamy, savory goodness of a classic cheese ball. It’s loaded with sun-dried tomatoes, basil, garlic, and olives, then rolled in golden breadcrumbs for the perfect crunch. Elegant enough for holiday gatherings yet simple enough for casual parties—this is an appetizer guaranteed to impress.
Ingredients
12.35 oz cream cheese, softened
1 cup shredded cheese mix (mozzarella + Parmesan)
½ cup oil-packed sun-dried tomatoes, chopped (reserve half for coating)
½ cup fresh basil, chopped
½ cup olives, chopped
2 cloves garlic, minced
2 tsp dried oregano
1 tsp salt
1 tsp black pepper
1 cup panko breadcrumbs
1 tbsp butter
1 fresh tomato, diced (for garnish)
Fresh basil leaves (for garnish)
Instructions
In a large bowl, mix cream cheese, shredded cheeses, ¼ cup sun-dried tomatoes, basil, olives, garlic, oregano, salt, and pepper until smooth and well combined.
Shape the mixture into a ball, wrap in plastic wrap, and chill for at least 1 hour to firm up.
In a skillet, melt butter over medium heat. Toast panko breadcrumbs with the remaining ¼ cup sun-dried tomatoes until golden and fragrant. Let cool.
Roll the chilled cheese ball in the breadcrumb mixture until fully coated.
Garnish with diced fresh tomato and basil leaves.
Serve with crostini, crackers, or veggie sticks.
- Prep Time: 15 min
- Category: Snack
Nutrition
- Calories: 190
- Fat: 14g
- Carbohydrates: 6g
- Protein: 7g
A Happy Accident: How This Cheese Ball Came to Be
This recipe has a special place in my heart because it was born from a classic “kitchen sink” moment. It was a few years ago, right before a last-minute holiday potluck. I’d promised to bring an appetizer, but my fridge was looking… creative, to say the least. I had a block of cream cheese, the last scraps of a mozzarella ball, a jar of sun-dried tomatoes that was nearly empty, and a bunch of basil that needed to be used ASAP.
My first thought was, “Bruschetta!” But I didn’t have enough fresh tomatoes or nice bread. My second thought was, “Cheese ball!” But my usual recipe felt a little boring. Then, in a flash of inspiration (or desperation!), I decided to mash the two ideas together. I chopped everything up, mixed it with the cream cheese, and rolled it in the only crunchy thing I had: some panko breadcrumbs I toasted in a pan with a little butter. I shaped it into a ball, crossed my fingers, and brought it to the party.
You guys, it was the hit of the night. People were raving about it! They couldn’t figure out what made it so deliciously different. That happy accident taught me a valuable lesson: the best recipes often come from a place of improvisation and using what you love. I’ve tweaked and perfected it since then, but every time I make it, I smile, remembering that frantic, fun evening and the delicious surprise that came out of it.
Gathering Your Flavor All-Stars
Here’s everything you’ll need to create this flavor bomb. Don’t be intimidated by the list—it’s mostly pantry staples and fresh goodies. I’ve included some notes and swaps because I want this to work perfectly in your kitchen!
- 12.35 oz Cream Cheese, softened: This is our creamy, dreamy base. Let it sit on the counter for at least 30 minutes until it’s soft and spreadable. This is non-negotiable for a smooth, lump-free cheese ball! For a lighter version, Neufchâtel cheese works beautifully.
- 1 cup Shredded Cheese Mix (Mozzarella + Parmesan): I love this duo for its perfect balance of melty, mild mozzarella and sharp, salty Parmesan. A pre-shredded Italian blend is a great shortcut, but grating your own cheese from a block always gives you the best melt and flavor.
- ½ cup Oil-Packed Sun-Dried Tomatoes, chopped (reserve half for coating): These are the secret weapon! They pack an intense, sweet-tomato punch that fresh tomatoes can’t. Using the oil-packed ones keeps them tender and flavorful. Be sure to reserve half for the crunchy coating—it makes all the difference.
- ½ cup Fresh Basil, chopped: Fresh is key here! It brings that unmistakable, aromatic sweetness that defines bruschetta. If you’re in a pinch, you can use 2 tablespoons of pesto instead, but fresh basil is truly magic.
- ½ cup Olives, chopped: I use a mix of Kalamata and green olives for a balance of briny and tangy flavors. If you’re not an olive fan, you can leave them out, but they add a wonderful savory depth.
- 2 cloves Garlic, minced: Because what’s bruschetta without garlic? Feel free to add an extra clove if you’re a true garlic lover like me!
- 2 tsp Dried Oregano: This dried herb adds a classic Italian earthiness. If you have fresh oregano, use 1 tablespoon, finely chopped.
- 1 tsp Salt & 1 tsp Black Pepper: Seasoning superstars! Always taste as you go, especially since the cheeses and olives already bring some saltiness.
- 1 cup Panko Breadcrumbs & 1 tbsp Butter: This is what creates that incredible “crust” on the outside. Panko is lighter and crunchier than regular breadcrumbs. Toasting them in butter first is a chef’s hack for maximum flavor and golden color.
- 1 fresh Tomato, diced & Fresh Basil Leaves (for garnish): A final flourish! The fresh tomato and basil on top make it look stunning and give a little hint of the flavors inside.

Let’s Build Our Masterpiece: Step-by-Step
Okay, team, let’s get mixing! This process is seriously simple and kinda therapeutic. Follow these steps, and you’ll have a show-stopping appetizer in no time.
Step 1: The Big Mix-In
Grab a large mixing bowl and plop in your softened cream cheese. Using a spatula or a hand mixer on low speed, beat it until it’s smooth and creamy. This is your blank canvas! Now, add in the shredded cheeses, ¼ cup of the chopped sun-dried tomatoes (remember, we’re saving the other ¼ cup!), the fresh basil, olives, minced garlic, oregano, salt, and pepper. Chef’s Tip: If your sun-dried tomatoes are super oily, you can give them a very quick pat with a paper towel, but a little oil is great for flavor and moisture. Mix everything until it’s fully combined and you see all those beautiful red and green specks evenly distributed.
Step 2: The Chill Out
This might be the hardest step because it requires patience! Lay a large piece of plastic wrap on your counter. Scoop the cheese mixture into the center. Now, using the plastic wrap, gently shape and form the cheese into a ball. Don’t worry about it being perfectly round—rustic is charming! Wrap it tightly and pop it into the refrigerator for at least 1 hour. Chef’s Hack: This chilling time is non-negotiable. It firms up the cheese ball, making it much, much easier to roll in the coating later without it turning into a messy puddle. You can even make this up to 2 days in advance—talk about a party lifesaver!
Step 3: Create the Golden Crunch
While the cheese ball is chilling, let’s make that incredible coating. Place a skillet over medium heat and add the tablespoon of butter. Once it’s melted and maybe even starting to foam a little, add the panko breadcrumbs and the remaining ¼ cup of chopped sun-dried tomatoes. Now, stir constantly! You’ll watch the panko turn from pale white to a beautiful, golden brown. This should take about 3-5 minutes. The second it’s golden and smells toasty and amazing, take it off the heat and pour it onto a plate or shallow bowl to cool completely. Chef’s Insight: Cooling is key! If the breadcrumbs are still warm, they’ll melt the outside of your cheese ball when you roll it.
Step 4: The Grand Finale – Rolling & Garnishing
Time for the fun part! Take your firmly chilled cheese ball out of the fridge and unwrap it. Now, roll it gently but firmly in the cooled panko mixture, pressing lightly to make sure the entire surface is covered in that gorgeous, crunchy confetti. Once it’s fully coated, transfer it to your serving plate. For the final touch, artfully scatter the diced fresh tomato and a few whole basil leaves on top and around the base. It instantly elevates it from “yum” to “WOW!”
How to Serve Your Bruschetta Cheese Ball
Presentation is part of the fun! I love to place my finished cheese ball on a beautiful wooden board or a colorful platter. Arrange an assortment of dippers around it. My go-to’s are:
- Crostini: Thinly sliced baguette, brushed with olive oil and toasted until crisp.
- Crackers: Simple water crackers or something with a little flavor like rosemary crackers work wonderfully.
- Veggie Sticks: For a lighter option, cucumber rounds, bell pepper strips, and carrot sticks are fantastic for scooping.
Don’t forget a small cheese knife or spreader so your guests can dig in with ease!
Make It Your Own: Delicious Twists & Swaps
The beauty of this recipe is its flexibility. Feel free to get creative and tailor it to your taste or dietary needs!
- Spicy ‘Nduja Twist: For a kick, mix in 2 tablespoons of softened ‘nduja or chopped Calabrian chilies into the cheese mixture.
- Prosciutto & Fig: Swap the olives for ¼ cup of finely chopped prosciutto and ¼ cup of chopped dried figs for a sweet and salty vibe.
- Vegan Version: Use your favorite plant-based cream cheese and shredded cheeses. For the coating, toast the panko in olive oil instead of butter.
- Nutty Crunch: Replace half of the panko with finely chopped toasted pine nuts or walnuts for an extra layer of texture and flavor.
- Everything Bagel Style: Roll the chilled cheese ball in “Everything Bagel” seasoning instead of panko for a totally different, delicious experience.
Clara’s Kitchen Notes & Stories
Over the years, this cheese ball has become a signature dish for me, and it’s evolved in funny ways. One time, I was so excited to bring it to a friend’s house that I forgot to chill it. Let’s just say the “cheese ball” turned into a “cheese puddle” on the car ride over. We laughed, scooped it into a bowl, and rebranded it as “Bruschetta Cheese Dip”—and it was still a hit! So, if something goes slightly wrong, just roll with it. The flavors are so good, it’s hard to mess up.
I also love making a mini version for parties. Instead of one big ball, I use a small cookie scoop to form bite-sized cheese balls. They’re the perfect little one-bite appetizer and look adorable on a platter. However you make it, the most important ingredient is to have fun with it!
Your Questions, Answered!
Q: My cheese ball is too soft to roll. What happened?
A: The most common culprit is not chilling it long enough! The cream cheese needs that solid hour (or even 90 minutes) in the fridge to firm up. If your kitchen is particularly warm, it might need more time. If you’re in a rush, you can pop it into the freezer for 20-25 minutes, but keep a close eye on it so it doesn’t freeze solid.
Q: Can I make this ahead of time?
A: Absolutely! This is a fantastic make-ahead appetizer. You can prepare the entire cheese ball, wrap it tightly in plastic wrap, and store it in the refrigerator for up to 2 days. I’d recommend adding the fresh tomato and basil garnish right before serving so they stay bright and fresh.
Q: I can’t find oil-packed sun-dried tomatoes. Can I use the dry ones?
A: You can, but you’ll need to rehydrate them first. Simply place the dry sun-dried tomatoes in a bowl and cover them with very hot water. Let them sit for about 20-30 minutes until they’re soft and plump, then drain and chop them. The flavor will be a bit less intense than the oil-packed version, but it will still be delicious.
Q: The breadcrumbs aren’t sticking to the cheese ball. Help!
A: This usually happens if the coating mixture is too coarse or if the cheese ball is too cold and hard (which is rare!). Try pressing the coating onto the ball with your hands gently. If it’s really not sticking, you can give the chilled cheese ball a very light “spritz” with a bit of cooking spray or a tiny brush of olive oil to act as a glue before rolling.
Nutritional Information*
*Please note: These values are approximate and can vary based on specific ingredients used.
Prep Time: 15 minutes | Chill Time: 1 hour | Total Time: 1 hour 15 minutes | Servings: 10-12
Per Serving (approximate): Calories: 190 | Fat: 14g | Carbs: 6g | Protein: 7g | Sodium: 370mg