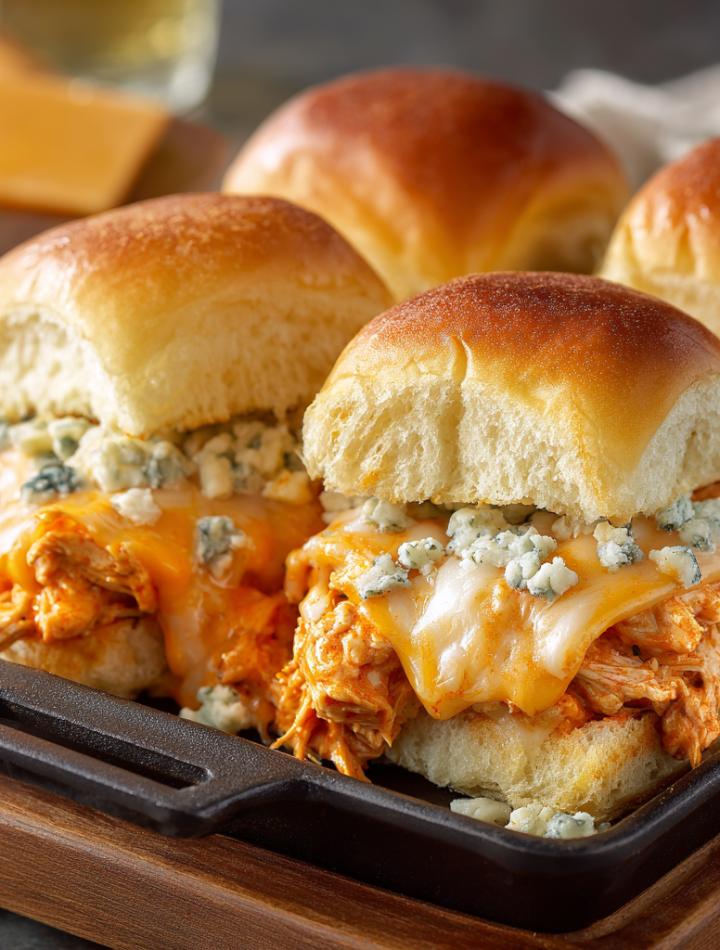
Spicy, Cheesy, and Unapologetically Delicious: Your New Favorite Buffalo Chicken Sliders
Hey there, my fellow flavor adventurer! Clara here, from my cozy, probably-slightly-messy kitchen to yours. Let’s be real: sometimes, you just need that perfect bite. You know the one. It’s the kind of food that makes you close your eyes for a second, do a little happy dance in your chair, and immediately reach for another. For me, that magic almost always involves the holy trinity of spicy buffalo sauce, melty cheese, and something soft and pillowy to bring it all together.
That’s exactly why these Buffalo Chicken Sliders are a permanent star in my recipe rotation. They deliver every single bit of that addictive, tangy, fiery flavor we love from classic buffalo wings, but they’re so much easier to eat (and share!). No sticky fingers, no pile of napkins—just pure, unadulterated joy tucked into a soft, sweet Hawaiian roll. They’re the ultimate crowd-pleaser for game day, a killer easy dinner for those “I-can’t-even” weeknights, and my secret weapon for potlucks where I want to be the person everyone remembers for bringing that dish.
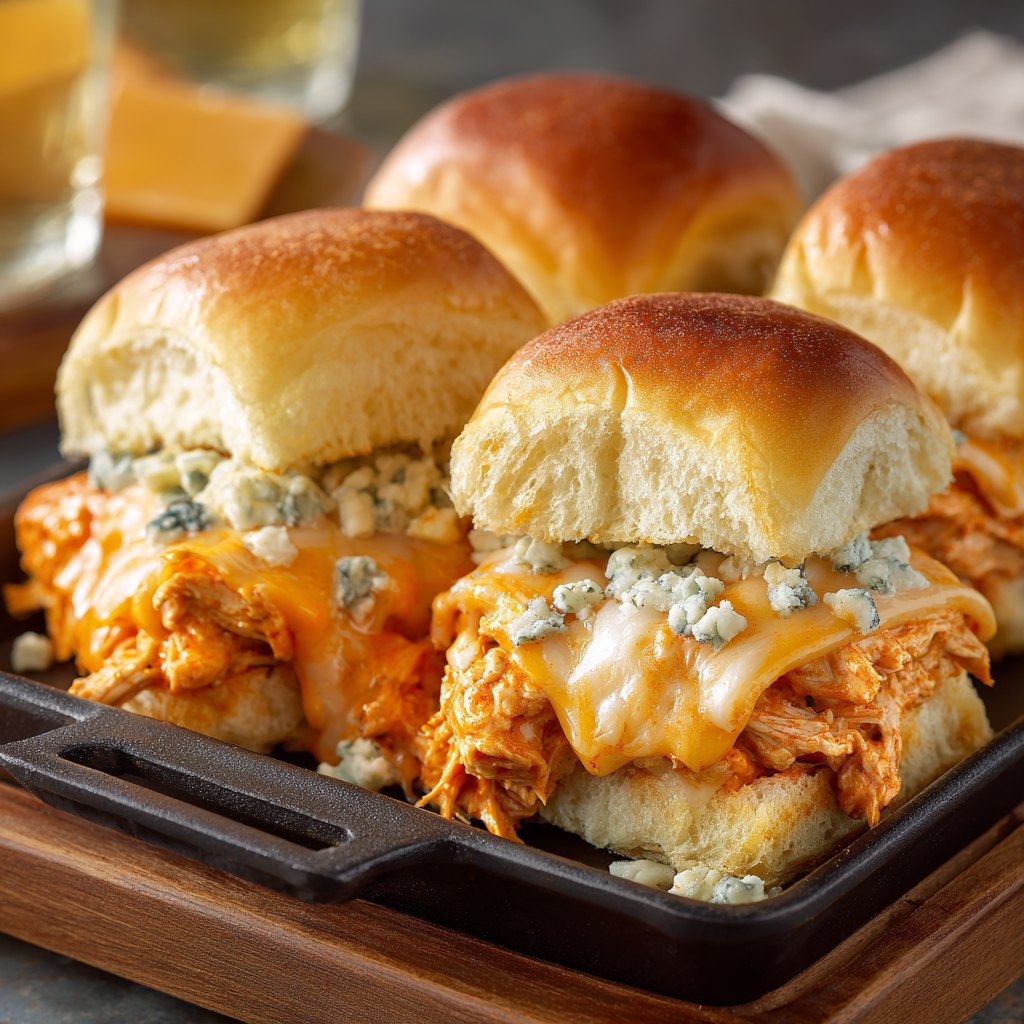
We’re talking tender, shredded chicken soaked in a buttery, mouth-tingling buffalo sauce, smothered in not one, not two, but three kinds of cheese, all baked until the tops are golden and the cheese is bubbling into every nook and cranny. It’s a beautiful, beautiful thing. So, grab your favorite apron, and let’s cook up a batch of these irresistible sliders that are guaranteed to make your taste buds do a full-on salsa.
Print
Buffalo Chicken Sliders
- Total Time: 30 mins
- Yield: 12 sliders 1x
Description
Spicy, cheesy, and dripping with flavor—these Buffalo Chicken Sliders deliver all the heat and comfort of classic buffalo wings, minus the mess. Tucked into soft Hawaiian rolls and smothered with melty cheese and blue cheese crumbles, they’re a guaranteed hit at any gathering.
Ingredients
3 cups cooked, shredded chicken
¾ cup buffalo sauce
2 tbsp unsalted butter
1 package Hawaiian rolls (12-count), halved horizontally
½ cup shredded mozzarella cheese
½ cup shredded cheddar cheese
½ cup blue cheese crumbles
2 tbsp ranch seasoning
Optional Twists:
Add a drizzle of ranch or blue cheese dressing inside for extra creaminess
Top with chopped celery or green onions after baking for crunch
Use pepper jack for extra spice
Instructions
Preheat oven to 350°F (175°C). Lightly grease or line a 9×13-inch baking dish.
Make the filling: In a skillet over medium heat, melt butter. Add buffalo sauce and shredded chicken. Stir until evenly coated and warmed through.
Assemble sliders: Place bottom half of rolls in the baking dish. Spread chicken mixture evenly, then top with mozzarella, cheddar, and blue cheese crumbles. Sprinkle with ranch seasoning.
Place top buns over the filling. Brush lightly with melted butter if desired.
Bake uncovered for 15–18 minutes, until cheese is melted and tops are golden.
Slice and serve warm—add extra sauce on the side if you’re feeling bold.
- Prep Time: 10 min
- Cook Time: 15 mins
- Category: Snack
Nutrition
- Calories: 270
- Sugar: 4g
- Fat: 15g
- Carbohydrates: 14g
- Protein: 18g
The Night We Became Slider Converts
I’ll never forget the first time I truly understood the power of a great slider. It was a chaotic, wonderful, and very loud family gathering a few years back. My cousin, who fancies himself a grill master, was manning the burgers, but he’d dramatically underestimated our collective hunger. The patties were taking forever, and the hungry masses (read: my very vocal aunts and uncles) were getting restless.
In a moment of pure kitchen panic, I looked at the leftover rotisserie chicken and the package of rolls on the counter and had a lightbulb moment. I shredded the chicken, tossed it with the only hot sauce I could find and a pat of butter, layered it with whatever cheese was in the fridge, and threw the whole tray into the oven. Fifteen minutes later, I emerged with a tray of golden, cheesy, mini sandwiches. The chaos stopped. The crowd descended. They were gone in under five minutes, and my cousin’s burgers were suddenly old news. That night, we weren’t just feeding people; we were creating a core memory. It was messy, it was improvised, and it was absolutely perfect. It taught me that the best food isn’t about perfection—it’s about connection, a little creativity, and a whole lot of flavor.
Gathering Your Flavor Squad: The Ingredients
This recipe is wonderfully forgiving and flexible, but each ingredient plays a key role in building those incredible layers of flavor and texture. Here’s what you’ll need and why!
- 3 cups cooked, shredded chicken: This is your star player! I’m a huge fan of using a rotisserie chicken here for ultimate ease—it’s juicy, pre-cooked, and packed with flavor. Leftover grilled or baked chicken breast or thighs work beautifully too. For a vegetarian twist, see the variations section below!
- ¾ cup buffalo sauce: The heart and soul of the dish! I use a classic like Frank’s RedHot, but feel free to use your favorite brand. For a milder kick, you can use a half-hot sauce, half-melted butter mixture. For extra heat, grab a habanero-based sauce!
- 2 tbsp unsalted butter: This mellows out the sharp vinegar bite of the hot sauce and creates a richer, silkier coating for the chicken. It’s a non-negotiable for authentic buffalo flavor!
- 1 package (12-count) Hawaiian rolls: The secret weapon! Their slight sweetness is the perfect counterbalance to the spicy chicken. They also bake up incredibly soft and hold everything together without getting too tough. If you can’t find them, any soft slider buns or even potato rolls will work.
- ½ cup shredded mozzarella cheese: This is your gooey, stretchy cheese. It melts like a dream and creates that iconic cheese-pull effect.
- ½ cup shredded cheddar cheese: This brings a sharp, tangy depth that complements the buffalo sauce perfectly. I like to use a medium or sharp cheddar for more flavor.
- ½ cup blue cheese crumbles: Now, I know blue cheese can be divisive, but trust me on this. It adds a pungent, salty, creamy element that cuts through the heat and takes these sliders to a gourmet level. If you’re truly anti-blue cheese, you can skip it or add more cheddar.
- 2 tbsp ranch seasoning: This is my little chef’s hack! The dried herbs and garlic in the seasoning mix add a fantastic savory layer right into the filling. You can use a store-bought packet or make your own blend with dried dill, parsley, garlic powder, onion powder, and a touch of salt and pepper.
Let’s Get Building: The Step-by-Step Magic
Okay, friends! This is where the fun begins. These sliders come together in a flash, and I’ve got some little tips along the way to make them absolutely foolproof.
Step 1: Preheat and Prep
Fire up your oven to 350°F (175°C). Take a 9×13-inch baking dish and give it a light coating of non-stick spray or line it with parchment paper. This little step ensures your bottom buns won’t stick and makes cleanup a total breeze. You’ll thank yourself later!
Step 2: Create That Irresistible Filling
Grab a medium skillet and place it over medium heat. Toss in your 2 tablespoons of butter and let it melt until it’s just starting to foam. This is your signal! Pour in the ¾ cup of buffalo sauce and give it a good whisk with the butter. Let it warm through for just a minute—you’ll see it become a cohesive, glorious orange sauce. Now, dump in your 3 cups of shredded chicken and stir, stir, stir until every single piece is lovingly coated in that spicy, buttery goodness. Let it heat through for about 2-3 minutes. Your kitchen should already smell amazing.
Step 3: The Art of Assembly
Take your whole package of Hawaiian rolls and, using a long serrated bread knife, slice the entire block in half horizontally, so you have one giant top and one giant bottom. This is so much easier than assembling each slider individually! Place the bottom half of the rolls snugly into your prepared baking dish.
Now, spread that beautiful buffalo chicken mixture evenly over the bottom buns. Press it down gently into all the corners. Next up: the cheese avalanche! Sprinkle on your mozzarella, followed by the cheddar, and then boldly scatter those blue cheese crumbles over everything. Finally, dust the entire thing with the ranch seasoning. This layers the flavors perfectly.
Step 4: The Grand Finale & Bake
Carefully place the top half of the rolls over your cheesy, chicken-filled masterpiece. If you’re feeling fancy, you can brush the tops very lightly with a little extra melted butter. This will give them a gorgeous, golden-brown, slightly crispy finish as they bake. Pop the whole dish, uncovered, into your preheated oven for 15-18 minutes.
You’re waiting for that moment of perfection: the cheese should be completely melted and bubbly around the edges, and the top of the rolls should be a perfect toasty gold. Your house will smell like a sports bar paradise.
Step 5: Serve with Love (and Extra Sauce!)
Take the tray out of the oven—careful, it’s hot!—and let it rest for just 2-3 minutes. This lets the cheese set slightly so they’re easier to slice. Then, use a sharp knife to slice along the perforations of the rolls, creating your individual sliders. Serve them immediately while they’re warm, gooey, and utterly irresistible. I always put extra buffalo sauce and ranch dressing on the table for my fellow dip enthusiasts!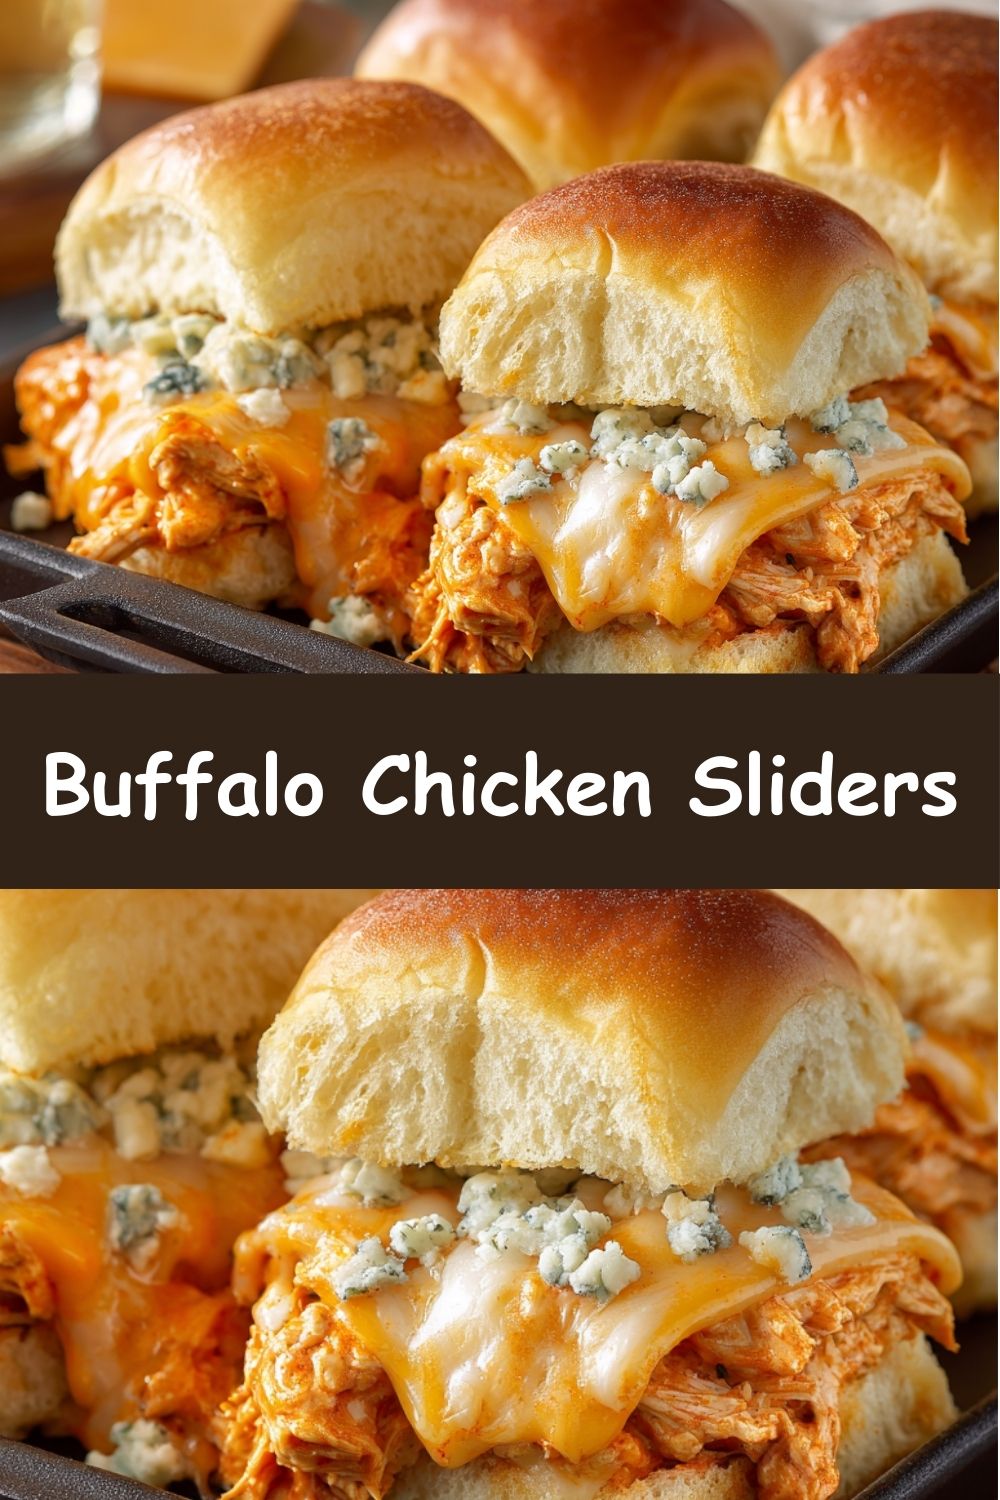
How to Serve These Bad Boys
Presentation is part of the fun! You can serve these right from the baking dish for a cozy, family-style vibe. For a party, transfer them to a large wooden board or platter. Scatter some finely chopped celery and green onions over the top just before serving for a pop of fresh color and a delightful crunch that contrasts with the soft, warm sliders. Don’t forget little bowls of extra buffalo sauce, creamy ranch dressing, and blue cheese dressing for dipping! They’re the perfect handheld food, but I always provide plenty of napkins—things might get deliciously messy.
Mix It Up! Delicious Variations
The beauty of this recipe is its flexibility. Don’t be afraid to make it your own!
- Spice Level Up: Use pepper jack cheese instead of mozzarella and add a few slices of pickled jalapeños on top of the chicken before adding the cheese.
- Ranch Everything: Drizzle a few tablespoons of ranch dressing directly over the chicken layer before adding the cheese for an extra creamy, herby interior.
- Veggie Power: Add a layer of very thinly sliced celery or carrot ribbons under the chicken for a hidden veggie boost and a nice textural crunch.
- Keep it Classic: Not a blue cheese fan? No problem! Simply omit it and double up on the cheddar. You can also add a drizzle of blue cheese dressing after baking instead.
- Meatless Marvel: For a vegetarian version, swap the chicken for 3 cups of cooked, crumbled cauliflower florets or a plant-based chicken alternative. Toss it with the sauce just the same!
Clara’s Chef Notes & Kitchen Stories
This recipe has evolved so much from that first panicked family party! I’ve learned a few things along the way. First, if you have an extra minute, toasting the inside of the top and bottom buns in the oven for 3-4 minutes before assembling adds a wonderful barrier against sogginess. It’s a pro move, but not essential.
Secondly, I once accidentally used a whole stick of butter instead of two tablespoons (I was distracted by a very cute dog outside my window). It was… a very greasy situation. So learn from my mistake and measure your butter! Lastly, these sliders reheat surprisingly well. If you have leftovers (a rare occurrence in my house), wrap them in foil and warm them in a 300°F oven for 10-15 minutes. They won’t be *quite* as perfect as fresh, but they’ll still hit the spot.
Your Questions, Answered!
Q: Can I make these Buffalo Chicken Sliders ahead of time?
A: Absolutely! You can assemble the entire tray a few hours ahead of time, cover it tightly with plastic wrap or foil, and keep it in the fridge. When you’re ready, just pop it straight into the preheated oven. You might need to add 2-3 extra minutes to the bake time since it’s starting from cold.
Q: My sliders got a bit soggy. How can I prevent that?
A: The main culprit is usually the buffalo sauce soaking into the bottom bun. Two tricks: 1) Make sure your chicken mixture isn’t overly watery. If your sauce seems thin, let it simmer for an extra minute to reduce slightly. 2) As mentioned in my notes, you can pre-toast the insides of the buns for a few minutes to create a protective, slightly crispy layer.
Q: I don’t have a skillet. Can I just mix the chicken and sauce cold?
A: You can mix them cold, but I highly recommend warming them together. Melting the butter into the sauce and heating the chicken allows the flavors to meld and penetrate the chicken much more deeply. It makes a huge difference in the final taste!
Q: Can I use a different kind of bun?
A: Of course! While Hawaiian rolls are our favorite for the sweet-spicy contrast, any soft dinner rolls or small brioche buns will work great. Just try to keep them in a connected sheet for easy assembly and baking.
Nutritional Information*
Prep Time: 10 minutes | Cook Time: 15-18 minutes | Total Time: 30 minutes | Servings: 12 sliders
*This is an estimate provided for informational purposes only. Values can vary based on specific ingredients used.
Calories per slider: ~270 kcal | Protein: 18g | Fat: 15g | Carbohydrates: 14g | Sugar: 4g | Sodium: 510mg
These Buffalo Chicken Sliders are everything you want in a party appetizer—spicy, cheesy, messy, and downright addictive. With plenty of ways to customize, easy make-ahead options, and even tips to prevent soggy buns, this recipe is as practical as it is delicious. Whether you’re serving them straight from the pan at a family dinner or dressed up on a platter for game day, they’re guaranteed to steal the show. Don’t forget the napkins—and extra sauce!