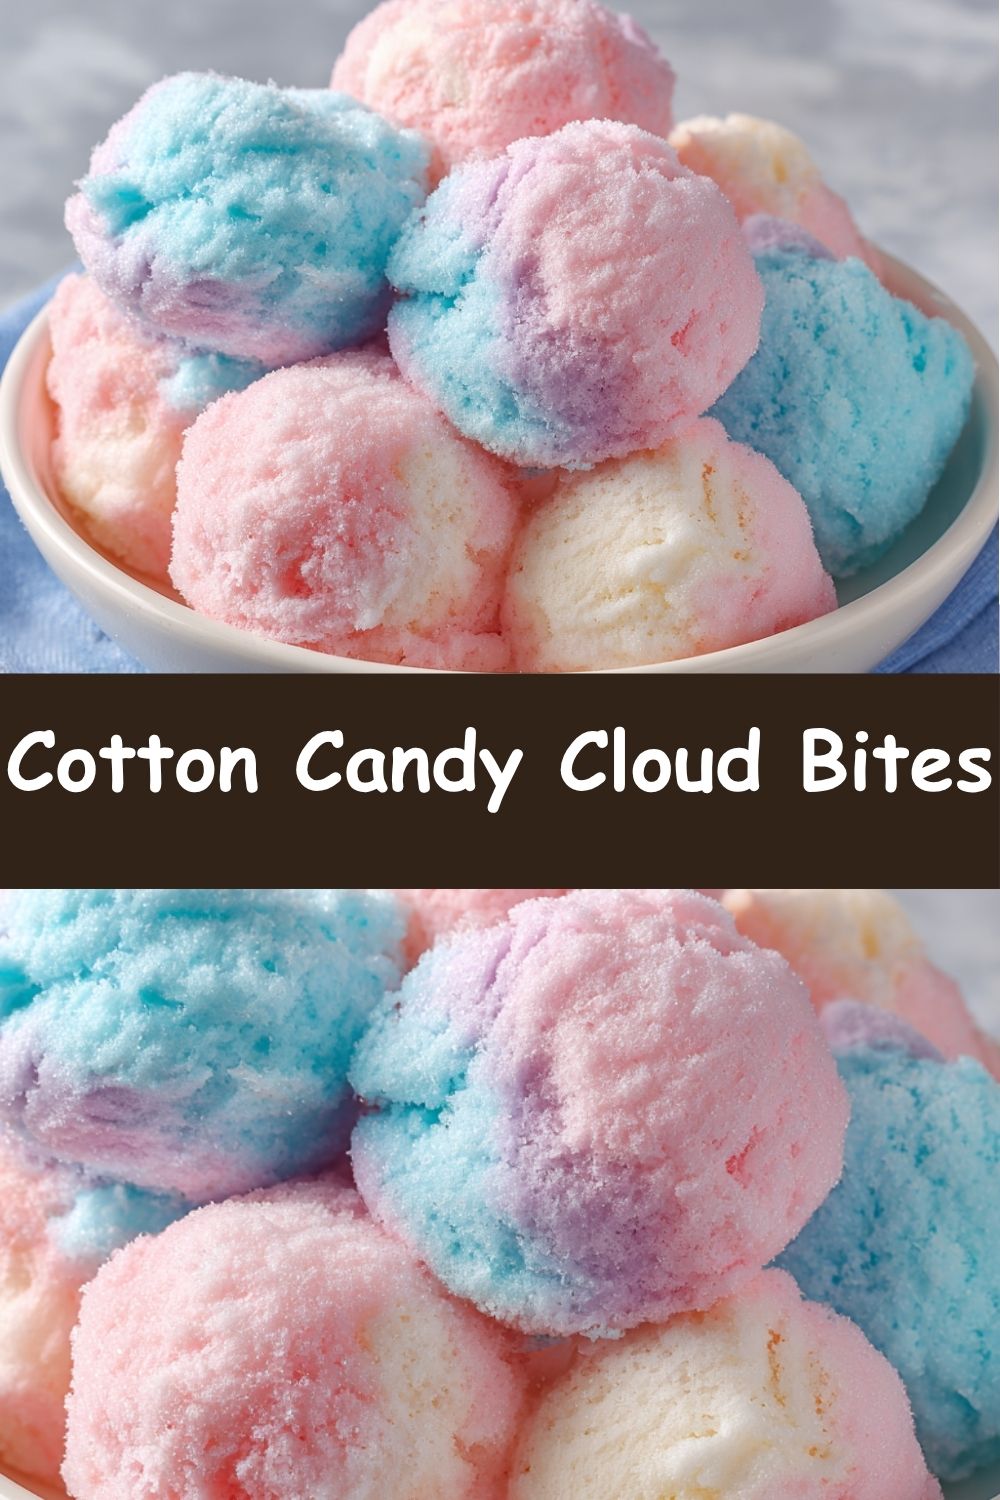
Let’s Make Some Magic: Introducing Cotton Candy Cloud Bites!
Hey there, my adventurous foodie friend! Clara here, welcoming you back to my kitchen. Today, we’re throwing practicality out the window and diving headfirst into a recipe that’s pure, unadulterated joy. We’re talking about my Cotton Candy Cloud Bites—little pastel squares of happiness that are fluffy, sweet, and so light they practically float right off the plate.
Have you ever been at a fair, the warm summer air buzzing with laughter, and the first thing you see is that giant, colorful puff of cotton candy on a paper cone? That’s the feeling we’re capturing today. But here’s the twist: we’re making it a treat you can actually hold in your hands, share with friends, and feel a little bit like a kitchen wizard while you’re at it. These bites are like if a marshmallow and a sugar cloud had a beautiful, pastel-colored baby. They melt in your mouth, leaving behind that nostalgic cotton candy flavor and the biggest, silliest grin.
I know what you might be thinking: “Clara, this sounds complicated!” But I promise you, it’s a surprisingly simple process. The magic happens with just a few key ingredients and a trusty mixer. This is a project that’s perfect for a lazy Sunday, a fun activity with kids (who will be mesmerized by the whipping process!), or for gifting to someone who needs a dose of whimsy. So, tie on your favorite apron, and let’s create something that’s not just a treat for the taste buds, but a full-on experience for the soul. Get ready to whip up some magic!
Print
Cotton Candy Cloud Bites
- Total Time: 15 minutes (plus cooling)
- Yield: 16 bites 1x
Description
These Cotton Candy Cloud Bites are soft, fluffy, and melt-in-your-mouth treats that bring all the whimsical fun of cotton candy into bite-sized form. Perfect for parties, fairs, or just a playful sweet snack, they’re as dreamy to eat as they are to look at.
Ingredients
- 2 cups cotton candy (any flavor, pulled into small pieces)
- 1½ cups mini marshmallows
- 2 tbsp unsalted butter
- ½ tsp vanilla extract
- ½ cup pastel sprinkles (optional, for decoration)
Instructions
- Line an 8×8-inch baking pan with parchment paper and lightly grease it.
- In a saucepan over medium heat, melt butter and add mini marshmallows. Stir until smooth and fully melted.
- Remove from heat and quickly stir in the vanilla extract.
- Fold in cotton candy gently (do not overmix, as it will melt). Spread the mixture evenly into the prepared pan.
- Top with sprinkles if desired and let set for 30–45 minutes at room temperature.
- Cut into bite-sized squares and serve.
Notes
- Handle the cotton candy gently to preserve its color and flavor.
- Add a drop of pink or blue food coloring to the marshmallow mix for a brighter pastel look.
- Can use white chocolate drizzle instead of sprinkles for decoration.
- Best enjoyed the same day, as cotton candy may dissolve over time.
- Prep Time: 10 minutes
- Cook Time: 5 minutes
- Category: undefined
- Method: undefined
- Cuisine: undefined
Nutrition
- Serving Size: 1 bite
- Calories: 95
- Sugar: 13g
- Sodium: 25mg
- Fat: 3g
- Saturated Fat: 2g
- Unsaturated Fat: 1g
- Trans Fat: 0g
- Carbohydrates: 18g
- Fiber: 0g
- Protein: 0.5g
- Cholesterol: 7mg
Keywords: cotton candy cloud bites, cotton candy dessert, marshmallow cotton candy recipe, pastel party snack, whimsical no-bake dessert
A Sticky-Fingered Memory: My Love Affair with Cotton Candy
My obsession with cotton candy started young. Every year, my town had a summer fair, and my dad would take me. He’d hold my hand as we weaved through the crowds, the scent of popcorn and diesel fuel hanging in the air. But my eyes were always locked on one destination: the cotton candy spinner. I was fascinated by the machine—how a tiny scoop of plain white sugar could be transformed, through centrifugal force and a little bit of magic, into a giant, airy web of pink or blue bliss.
I’d get my cone, and my dad would always say the same thing: “Don’t get it all over your face, Clara-Bear.” And without fail, two minutes later, I’d have pink sugar dust from my forehead to my chin, my fingers stuck together in a happy, sugary mess. He’d just laugh and shake his head. It wasn’t about the sugar rush, really; it was about the moment. The sheer, uncomplicated joy of it. That’s the feeling I wanted to bottle up when I created these Cloud Bites. They’re my grown-up, slightly more elegant (and far less sticky-fingered) way of capturing that fairground magic and sharing it with you.
Gathering Your Cloud-Making Supplies
One of the best parts of this recipe is its simplicity. You only need a handful of ingredients to create this edible enchantment. Here’s what you’ll need, with a few of my chef-y insights to guide you.
- 2½ tablespoons unflavored gelatin (about 3 packets): This is the star of the show! Gelatin is what gives these bites their signature marshmallow-y, stable structure. It’s what allows us to trap all that air and create that cloud-like texture. I use a powdered, unflavored variety. A quick tip: if you’re vegetarian, agar-agar powder can be a substitute, but the texture will be slightly different (a bit firmer and less elastic). You’ll need to follow the package instructions for blooming and activating it.
- ¾ cup granulated sugar: This provides the sweetness and, when turned into a hot syrup, helps to dissolve the gelatin completely, giving us that smooth, non-grainy finish.
- ½ cup + ¼ cup water, divided: We use cold water to “bloom” the gelatin (awaken its gelling power) and a separate amount with the sugar to create our simple syrup. It’s important to keep them separate in the beginning!
- 1½ teaspoons cotton candy extract: This is the flavor bomb! You can find this in the baking aisle of most craft stores or online. It truly captures that distinct, nostalgic cotton candy taste. If you can’t find it, a clear vanilla extract or a mix of raspberry and vanilla extracts can work in a pinch for a different, but still delicious, fruity flavor.
- A few drops of pink and blue food coloring: Go for gel food coloring if you have it! It’s more concentrated, so you’ll use less and won’t water down your mixture. This gives you those beautiful, vibrant pastel hues. Of course, feel free to choose any colors that spark joy for you!
- Optional: Sparkling sugar or sanding sugar for coating: This is the finishing touch that adds a delightful crunch and a gorgeous, glittery effect. It makes them look like little jeweled cubes of happiness.
The Whipping Magic: Step-by-Step to Cloud Bite Bliss
Okay, friends, this is where the fun begins! Don’t be intimidated by the steps—it’s a straightforward process, and I’ll be with you for every whip and fold.
- Bloom the Gelatin: In the bowl of your stand mixer (or a large heatproof bowl if you’re using a hand mixer), sprinkle the gelatin over the ½ cup of COLD water. Now, just walk away! Let it sit for about 5 minutes. It will transform from a powder into a thick, spongy, somewhat lumpy-looking mass. This is called “blooming,” and it’s a crucial step to ensure the gelatin dissolves evenly later without forming icky little clumps. Think of it as waking the gelatin up from a deep sleep.
- Make the Sugar Syrup: While the gelatin is blooming, combine the sugar and the remaining ¼ cup of water in a small saucepan. Stir it just to combine, then place it over medium-high heat. Bring it to a rolling boil. The second it reaches a full boil—when the entire surface is covered in bubbles—immediately remove it from the heat. You don’t need a candy thermometer for this one; we’re just creating a simple syrup to melt the gelatin. Chef’s Hack: To prevent sugar crystals from forming on the sides of the pan, you can brush them down with a wet pastry brush before the mixture starts to boil.
- Combine and Whip (The Magical Part!): Carefully pour the scalding hot sugar syrup directly over the bloomed gelatin. It might sizzle a bit—that’s normal! Now, attach the whisk attachment to your mixer. Start on low speed to initially combine (this prevents a hot syrup splash!), then crank it up to high. Now, set a timer for 10-12 minutes and let the machine do its thing. Walk away, do a little dance, but don’t peek too much! You’ll witness an incredible transformation: the mixture will go from thin and watery to thick, white, glossy, and incredibly voluminous. It should form stiff, glossy peaks that hold their shape when you lift the whisk. This is the foundation of our cloud-like texture!
- Add Flavor and Color: Once your mixture is thick and glorious, beat in the cotton candy extract until just combined. Now, for the art project! Divide the fluffy mixture evenly into three separate bowls. Leave one bowl plain white. To the second, add a few drops of pink food coloring, and to the third, a few drops of blue. Gently fold the color in until you achieve a beautiful, swirly, pastel hue. Don’t overmix, or you might deflate some of that precious air.
- Layer It Up: Grab an 8×8-inch baking pan. Lightly grease it with a neutral oil or cooking spray, then line it with parchment paper, leaving some overhang on two opposite sides. This creates a “sling” that will make removing your giant cloud block so much easier later! Now, pour your first colored layer into the bottom of the pan. I like to start with blue, then white, then pink, but this is your creation—layer them in any order that makes your heart sing! Use a small offset spatula or the back of a spoon lightly greased with cooking spray to gently spread each layer evenly.
- The Patient Wait (The Hardest Step!): Once all your beautiful pastel layers are nestled in the pan, it’s time to let science do its final work. You can let the pan sit uncovered at room temperature for 4-6 hours, or you can pop it in the fridge to speed things up a bit. The Cloud Bites are ready when the top is no longer sticky to a gentle touch and the whole block feels firm.
- Cut and Decorate: Use the parchment paper sling to lift the entire marshmallow block out of the pan onto a cutting board. Using a sharp knife (lightly greased or dipped in hot water and dried between cuts), slice the block into small, bite-sized cubes. Now, for the glitter! Pour some sparkling sugar into a shallow bowl and gently roll each Cloud Bite in the sugar to coat all sides. This not only looks stunning but also prevents them from sticking together.
How to Serve These Dreamy Delights
Presentation is part of the fun! Pile these pastel-perfect bites high on a cake stand or a pretty platter for maximum visual impact. They’re the absolute star of any dessert table at a birthday party, baby shower, or holiday gathering. For a truly magical touch, serve them in a glass jar or a mini paper cupcake liner for each guest. They also make incredible edible gifts—tie them up in a clear cellophane bag with a colorful ribbon, and you’ve just given someone a jar of happiness.
Get Creative! Flavor & Color Twists
The basic recipe is a dream, but don’t be afraid to make it your own! Here are a few ideas to spark your imagination:
- Tropical Sunset: Use a mix of mango or pineapple extract and color your layers with yellow, orange, and pink for a vibrant, fruity twist.
- Chocolate-Dipped Dreams: After cutting, dip half of each Cloud Bite in melted dark or white chocolate and let it set. The combination of airy marshmallow and rich chocolate is divine.
- Confetti Funfetti: Fold a tablespoon or two of rainbow sprinkles into the white layer before pouring it into the pan for a festive, confetti-filled bite.
- Strawberry Shortcake Vibes: Use strawberry extract and pink coloring. Serve the bites alongside fresh, sliced strawberries and a dollop of whipped cream.
- “Gourmet” Vanilla Bean: Swap the cotton candy extract for pure vanilla bean paste. You’ll see those beautiful little black specks throughout the white layers for a truly elegant treat.
Clara’s Kitchen Confessions & Notes
I’ll let you in on a little secret: the first time I made these, I was so impatient that I tried to cut them after only two hours. Let’s just say I ended up with a delicious, sticky, pink-and-blue mess more suited for spoon-eating than neat little squares! The waiting truly is the hardest part, but it’s non-negotiable for the perfect texture.
This recipe has become a staple in my house for celebrations. I love how it feels both sophisticated and completely childlike at the same time. Over time, I’ve learned that a really powerful stand mixer is your best friend here—it makes the whipping process effortless. But a good, high-powered hand mixer works just fine, too! Just make sure your bowl is deep enough to contain the initial splashes. The beauty of these Cloud Bites is that they feel fancy, but they’re built on a foundation of simple, forgiving steps. So embrace the process, have fun with the colors, and get ready to impress everyone (including yourself!).
Your Cloud Bite Questions, Answered!
I’ve made these enough times to have encountered (and solved!) a few common hiccups. Here’s a quick troubleshooting guide.
Q: My mixture never got thick and fluffy after whipping. What went wrong?
A: The most common culprit here is the sugar syrup not being hot enough. It needs to be at a full, rolling boil to properly dissolve and activate the gelatin. If the syrup was lukewarm, the gelatin won’t set up correctly. Another possibility is not whipping for long enough. The full 10-12 minutes on high speed is crucial for incorporating enough air. Don’t rush it!
Q: My Cloud Bites are super sticky and hard to cut. Help!
A: This usually means they needed more time to set! Patience is key. If you’re in a hurry, the fridge is your best friend. Also, make sure your knife is very sharp and lightly greased or dipped in hot water (and wiped dry) between each cut. This will give you super clean edges.
Q: Can I make these ahead of time?
A: Absolutely! In fact, they are a fantastic make-ahead treat. Once cut and coated in sugar, store them in an airtight container at room temperature for up to a week. The sugar coating acts as a barrier, keeping them from drying out or sticking together.
Q: I’m a vegetarian. Is there a way to make these without gelatin?
A> Yes! You can experiment with agar-agar powder, which is derived from seaweed. It’s a 1:1 substitution by weight, but not by volume, so check your specific product’s instructions carefully. The texture will be slightly different—less fluffy and more firm—but it will still be a delicious, gelled treat!
Quick Nutritional Note
Let’s keep it real—these are a treat, through and through! They’re all about joy, not everyday fuel. But for those who are curious, here’s a rough estimate per Cloud Bite (without the optional sugar coating). Remember, these are approximations and can vary based on specific ingredients used.
Per Piece (approximate):
Calories: 25 | Sugar: 5g | Fat: 0g | Protein: 1g