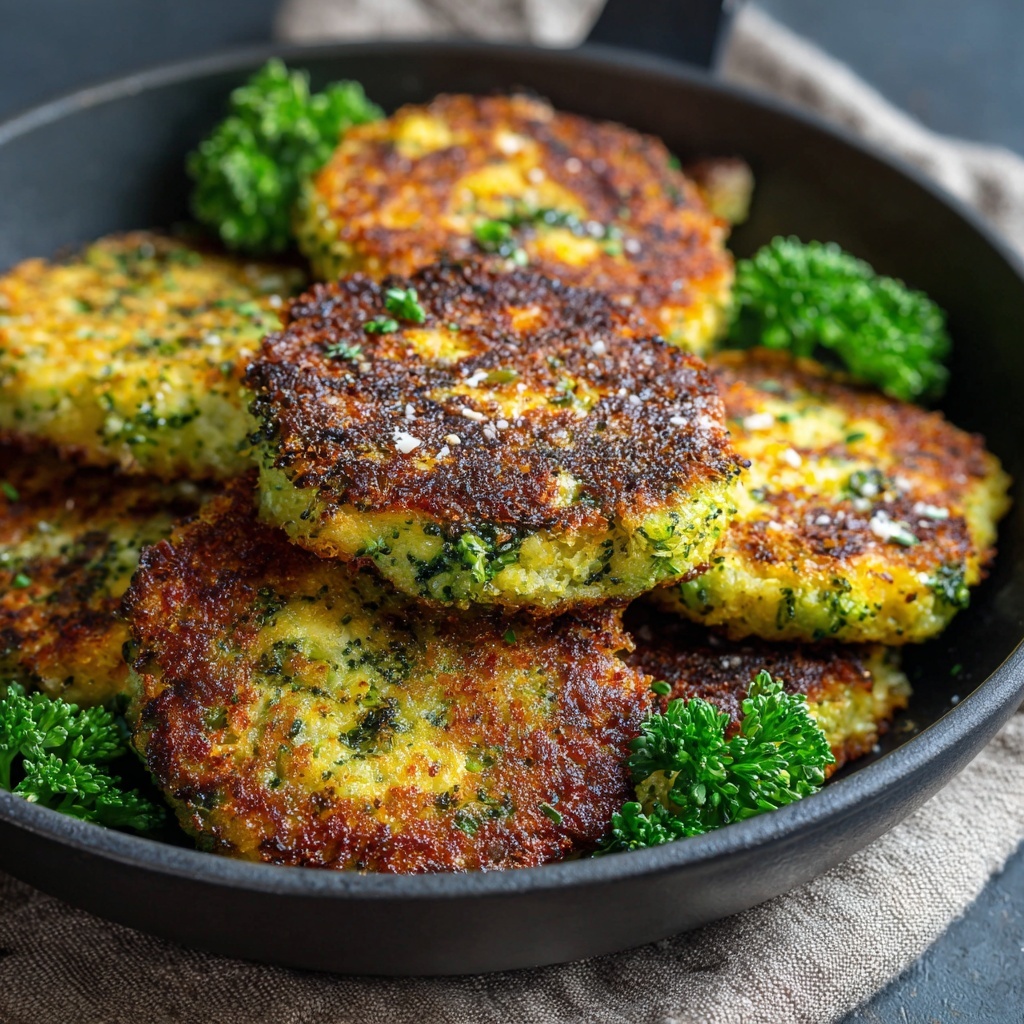
Golden Broccoli Cheese Patties You’ll Want on Repeat
Hey there, my kitchen adventurer! Let’s be real for a second. We all have that one veggie that sometimes feels like a chore, right? For a long time, for me, that was broccoli. Steamed, roasted, stir-fried… I felt like I had hit a delicious but predictable wall. I wanted something more. Something that felt a little indulgent but was still packed with all that good, green power. Something that could make you actually excited to eat your broccoli.
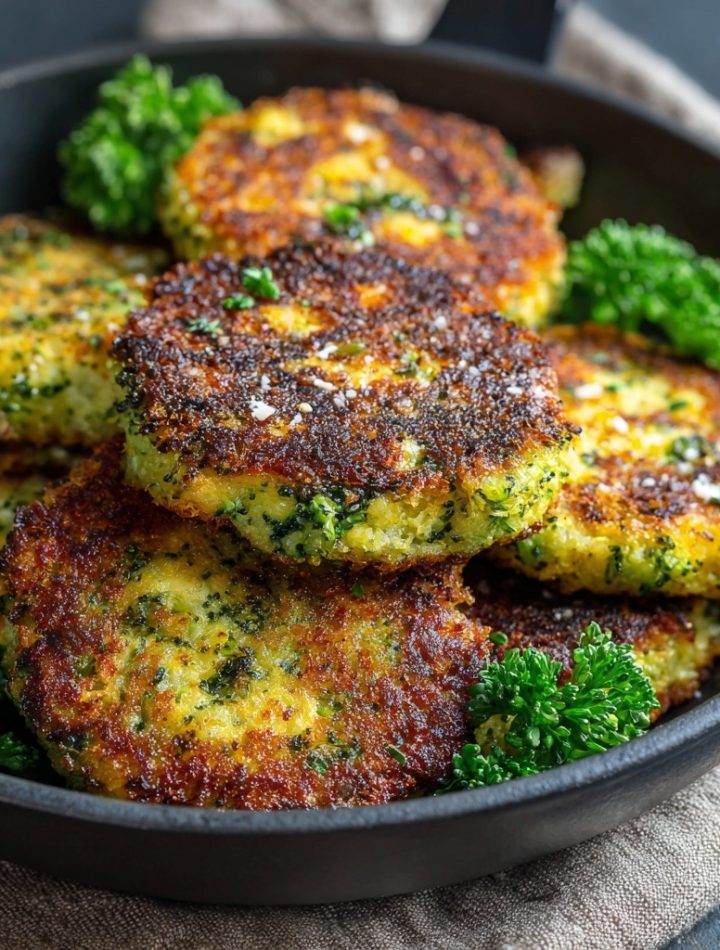
Well, my friends, after a particularly fun (and slightly messy) kitchen experiment, I stumbled upon the answer. And it comes in the form of a crispy, golden, impossibly cheesy patty. These Broccoli Cheese Patties are the ultimate veggie snack glow-up. They’re the perfect marriage of nutritious and downright irresistible. Imagine biting through a beautifully crunchy exterior into a tender, flavour-packed centre where the broccoli shines, supported by a chorus of melty cheddar and savoury Parmesan. It’s a texture and flavour party, and your taste buds are definitely invited.
Whether you’re looking for a quick and easy side dish, a meal-prep hero for your lunches, a sneaky way to get more greens into your family, or just a seriously satisfying snack that won’t leave you in a slump, this recipe is your new best friend. They’re beginner-friendly, come together in about 20 minutes, and are so versatile you’ll never get bored. So, tie on your favourite apron, and let’s cook up a batch of these little green miracles together!
Print
Crispy Broccoli Cheese Patties : Easy & Delicious Veggie Snack
- Total Time: 20 mins
- Yield: serves 6
Description
These broccoli cheese patties are a crispy, cheesy, and veggie-packed delight – perfect for beginners or anyone wanting a quick, satisfying snack or side dish. Whether you’re eating low-carb or just sneaking in more greens, this pan-fried recipe is a total win. Try them with your favorite dip or on their own – they’re impossible to resist!
Ingredients
2 cups broccoli florets (finely chopped)
1 cup shredded cheddar cheese (or mozzarella)
½ cup grated Parmesan cheese
½ cup breadcrumbs (or almond flour for a low-carb version)
2 eggs
1 tsp garlic powder
½ tsp salt
½ tsp black pepper
½ tsp red pepper flakes (optional)
2 tbsp chopped parsley (optional)
2 tbsp olive oil (for frying)
Instructions
In a large bowl, combine broccoli, cheeses, breadcrumbs (or almond flour), eggs, garlic powder, salt, pepper, red pepper flakes, and parsley.
Mix until fully combined – it should hold together like a soft dough.
Shape into small patties using your hands.
Heat olive oil in a skillet over medium heat.
Fry patties 3–4 minutes per side until golden brown and crispy.
Place on paper towels to drain. Serve hot!
- Prep Time: 10 min
- Cook Time: 10 mins
- Category: Snack
Nutrition
- Calories: 180
- Fat: 13g
- Protein: 9g
The Broccoli Rebellion & A Happy Accident
My journey to these patties started, oddly enough, with a bit of a broccoli rebellion. Picture this: It’s a rainy Tuesday, and I’m staring into my fridge, willing it to produce dinner inspiration. There, front and centre, is a giant head of broccoli, looking back at me with what I can only describe as culinary judgment. “Not again,” I sighed. Roasting felt like too much time, steaming felt too… virtuous.
But then, a memory flickered. My mom used to make these incredible potato patties when I was a kid, and I’d always hover by the stove, waiting for the first crispy one to come out. In that moment of nostalgia and stubbornness, I thought, “What if I swapped the potatoes for broccoli?” I grabbed my trusty cutting board, chopped that broccoli into oblivion, and started throwing things into a bowl with wild, hopeful abandon. Cheese? Obviously. An egg for binding? Sure! A generous shake of garlic powder for good measure? You bet. The first batch was a tad too wet, the second a bit bland, but the third… the third batch was pure magic. They were crispy, cheesy, and the broccoli was the star, not an afterthought. It was a happy accident born from a Tuesday night rut, and it’s a recipe I’ve cherished ever since.
Gathering Your Veggie-Packed Arsenal
One of the best things about this recipe is its beautiful simplicity. You likely have most of these ingredients in your kitchen right now! Here’s the full lineup and my little chef insights to set you up for success.
- 2 cups broccoli florets, finely chopped: This is our star! You’ll want to chop them quite fine so they blend seamlessly into the patty mixture. Chef’s Insight: Don’t toss the stems! You can peel the tough outer skin and finely grate the tender inside for extra fibre and zero waste.
- 1 cup shredded sharp cheddar cheese: The melty, gooey heart of the patty. Sharp cheddar gives a fantastic flavour punch. Substitution Tip: Mozzarella will give you an epic cheese pull, a mild Gouda would be lovely, or a pepper jack for a little kick!
- ½ cup grated Parmesan cheese: This is our secret weapon for savoury, salty depth. It adds a nuttiness that makes these patties truly addictive.
- ½ cup breadcrumbs: These are our binding agents and crumb-makers, helping to soak up any excess moisture and create that perfect texture. Dietary Swap: For a low-carb or gluten-free version, almond flour works like a dream! It gives a slightly nuttier, denser texture that’s equally delicious. Panko will give you an extra-crispy crunch.
- 2 large eggs: Our culinary glue! They bind everything together so the patties don’t fall apart in the pan.
- 1 tsp garlic powder: I prefer powder here over fresh garlic because it distributes flavour evenly without risking any bitter, burnt garlic bits. Flavour Boost: Onion powder is a fantastic addition here too!
- ½ tsp salt & ½ tsp black pepper: The essential flavour enhancers. Don’t be shy!
- ½ tsp red pepper flakes (optional): For those, like me, who believe a little warmth makes everything better. It’s completely optional but highly recommended.
- 2 tbsp chopped fresh parsley (optional): A pop of fresh colour and a hint of brightness. Chives or dill would also be wonderful here.
- 2 tbsp olive oil (for frying): For achieving that gorgeous, golden-brown, crispy crust. Avocado oil also works well for its high smoke point.
Let’s Make Some Magic: Step-by-Step
Ready to transform these simple ingredients into crispy perfection? Follow these steps, and you’ll be a broccoli patty pro in no time. I’ve sprinkled in all my best tips and hacks to ensure your success!
- Prep Your Broccoli: First, finely chop your broccoli florets. You want them small enough that they’ll cook through quickly and blend well into the patty mixture. Chef’s Hack: If you have a food processor, you can pulse the broccoli a few times until it reaches a rice-like consistency. It’s a huge time-saver! No food processor? No problem. Just channel your inner chef and get chopping with a sharp knife.
- The Big Mix: In a large mixing bowl, combine the finely chopped broccoli, shredded cheddar, grated Parmesan, breadcrumbs (or almond flour), eggs, garlic powder, salt, pepper, red pepper flakes, and parsley. Now, roll up your sleeves and get in there with your hands! Mix everything until it’s fully combined. Chef’s Insight: Using your hands is the best way to feel the texture. The mixture should hold together when you squeeze it, like a soft, slightly sticky dough. If it feels too wet, add another tablespoon of breadcrumbs. If it feels too dry and crumbly, you can add a tiny splash of milk or even another egg yolk.
- Shape Your Patties: Using your hands, scoop out about ¼ cup of the mixture and shape it into a small patty, about ½-inch thick. Gently press it together to ensure it’s compact. Place the formed patties on a plate. Pro Tip: If the mixture is sticking to your hands too much, lightly wet your palms with a bit of water or oil. This creates a non-stick barrier and makes shaping a breeze.
- Heat the Pan: Place a large skillet (non-stick is great for beginners) over medium heat. Add your olive oil and let it get nice and hot. How to know it’s ready? Flick a tiny drop of water into the pan—if it sizzles, you’re good to go!
- Fry to Golden Perfection: Carefully place your patties in the hot skillet, without overcrowding them. You’ll probably need to do this in batches. Let them cook, undisturbed, for 3-4 minutes on the first side. Resist the urge to press down on them with your spatula! You’ll squeeze out all the lovely moisture. Wait until you see the edges turning golden brown, then gently flip them.
- Flip and Finish: Cook for another 3-4 minutes on the second side until both sides are deeply golden, crispy, and the cheese is beautifully melty inside. You should see little cheesy bits caramelizing around the edges—that’s the good stuff!
- Drain and Serve: Once cooked, transfer the patties to a plate lined with a paper towel to soak up any excess oil. This helps them stay crispy. And here’s the hardest part… try to let them cool for just a minute or two before you dive in! The inside will be piping hot.

How to Serve These Veggie Stars
These patties are incredibly versatile! Of course, they’re amazing all on their own, straight from the pan. But let’s talk about elevating them. For a full meal, I love to place two patties on a bed of fresh greens or quinoa for a glorious “glow bowl.” Top with a dollop of Greek yogurt mixed with lemon juice or your favourite creamy dressing. As a side, they’re the perfect partner to a juicy grilled chicken breast or a piece of flaky baked fish. And for the ultimate snack experience, you absolutely MUST serve them with a dipping sauce. A creamy ranch, a zesty sriracha mayo, or a simple marinara for dipping are all game-changers.
Get Creative: Recipe Variations
Once you’ve mastered the basic recipe, the world is your oyster (or, well, your broccoli patty)! Here are a few of my favourite twists:
- Everything Bagel Twist: Swap the parsley for a tablespoon of Everything Bagel Seasoning in the mix. It’s a flavour explosion!
- Spicy Southwest: Add ¼ cup of finely chopped canned green chiles, a teaspoon of cumin, and swap the cheddar for pepper jack cheese.
- Mediterranean Vibe: Mix in ¼ cup of crumbled feta cheese and a tablespoon of chopped fresh dill. So bright and delicious!
- Cauliflower Combo: Use one cup of broccoli and one cup of riced cauliflower for a different veggie profile.
- Baked, Not Fried: For a lighter option, place the patties on a parchment-lined baking sheet, brush lightly with oil, and bake at 400°F (200°C) for 15-20 minutes, flipping halfway through.
Chef’s Notes & Kitchen Confessions
This recipe has truly evolved in my kitchen. The first time I made them, I was so impatient that I flipped them too early, and they fell apart. It was a cheesy, broccoli-y mess! But from that mess, I learned the golden rule: let them get a proper crust before you even think about moving them. I’ve also started using my box grater to grate the broccoli stems directly into the mix—it adds moisture and body, and it makes me feel like a kitchen wizard for reducing waste.
These patties have also become my go-to for potlucks. They’re always the first to disappear, and I love the look of surprise on people’s faces when I tell them the main ingredient is broccoli. They’re a conversation starter and a crowd-pleaser all in one. Don’t be afraid to make a double batch and freeze some for a rainy day—they reheat beautifully in a toaster oven or air fryer!
FAQs & Troubleshooting
Let’s tackle some common questions to make sure your patty-making is smooth sailing!
Q: My patty mixture is too wet and won’t hold together. What did I do wrong?
A: This is the most common issue, and it’s an easy fix! The culprit is usually excess moisture from the broccoli. Next time, after you chop your broccoli, you can squeeze it in a clean kitchen towel to wring out any extra water. For this batch, just add more breadcrumbs or almond flour, one tablespoon at a time, until the mixture is moldable.
Q: Can I make these broccoli patties ahead of time?
A: Absolutely! You have two great options. 1) You can mix the entire batch, shape the patties, and keep them in the fridge on a plate, covered, for up to 24 hours before cooking. 2) You can fully cook them, let them cool, and store them in an airtight container in the fridge for 3-4 days. Re-crisp them in a skillet, air fryer, or toaster oven.
Q: Why did my patties fall apart when I flipped them?
A> Oh, I’ve been there! This usually means one of three things: 1) The pan wasn’t hot enough, so a crust didn’t form quickly. 2) You flipped them too early. Be patient and wait for that golden-brown edge. 3) The mixture needed a bit more binding agent. Make sure you’re using a large egg, and don’t be shy with the breadcrumbs if the mix feels wet.
Q: Can I freeze these?
A: Yes, they freeze like a dream! After cooking, let them cool completely. Then, place them in a single layer on a baking sheet to “flash freeze” for an hour before transferring them to a freezer bag. This prevents them from sticking together. They’ll keep for up to 3 months. Reheat from frozen in an air fryer or oven until hot and crispy.
Nutritional Information (Approximate)
Please note: This is an estimate per patty, calculated using an online nutrition calculator. Values may vary based on specific ingredients and portion sizes.
- Calories: 180
- Protein: 9g
- Fat: 13g
- Carbohydrates: 6g
- Fiber: 2g
- Net Carbs (with almond flour): 2g
