Spooky, Sweet, and Seriously Fun: Let’s Make Eyeball Truffles!
Hey there, my spooky-season friend! Clara here, welcoming you back to my kitchen, which is currently covered in a light dusting of powdered sugar and, I swear, a few stray candy eyeballs that keep winking at me from the floor. It’s that magical time of year when the air gets crisp, the leaves put on their final fiery show, and we all get a free pass to embrace the wonderfully weird. And for me, that means one thing: it’s time for Halloween baking!
Now, I’m all about nourishment and feeling good, but I’m also a huge believer in the pure, unadulterated joy of playing with your food. Life is all about balance, right? And these Eyeball Truffles are the absolute pinnacle of that balance. They’re the perfect project for a cozy October afternoon—whether you’re prepping for a killer Halloween party, looking for a fun activity to do with your mini monsters (or your fun-loving adult friends!), or you just want to treat yourself to something that’s equal parts creepy and cute.
These little guys are deceptively simple. We’re talking a luxuriously smooth, melt-in-your-mouth white chocolate ganache center, transformed into a delightfully gory eyeball with just a few clever decorations. The best part? You don’t need to be a pastry chef to pull these off. They’re forgiving, fun, and guaranteed to get a reaction. So, tie on your favorite apron (the one with the ghosts on it, obviously), and let’s create something that’s deliciously spooky and totally Instagram-worthy. Let’s make some truffles that are staring right back at you!
A Kitchen Full of Giggles and Goblin Eyes
This recipe always takes me back to my very first Halloween in this apartment. I had just started Unknown, and my confidence in the kitchen was… well, let’s call it a work in progress. I decided to throw a last-minute “Spooky Supper” potluck. My contribution? A disastrous attempt at mummy dogs that looked more like soggy bandages and a pumpkin pie with a cracked face that looked genuinely terrified of its own fate.
Panicking an hour before guests arrived, I scanned my pantry. White chocolate chips, leftover cream from my morning coffee, and a rogue bag of candy eyes I’d bought on a whim. In a frenzy, I melted, mixed, rolled, and started poking eyes into these hurriedly formed balls. I grabbed a tube of red icing to try and salvage the presentation and—BAM!—the bloodshot vein effect was born. They were an instant, hilarious hit. My friends couldn’t stop laughing, picking them up, and making them “look” at each other before devouring them. It was a messy, imperfect, and utterly joyful kitchen moment that reminded me that the best recipes often come from a little bit of chaos and a whole lot of heart. Now, making these eyeball truffles is one of my favorite Halloween traditions.
Print
Eyeball Truffles
- Total Time: 20 minutes
- Yield: 12 truffles 1x
Description
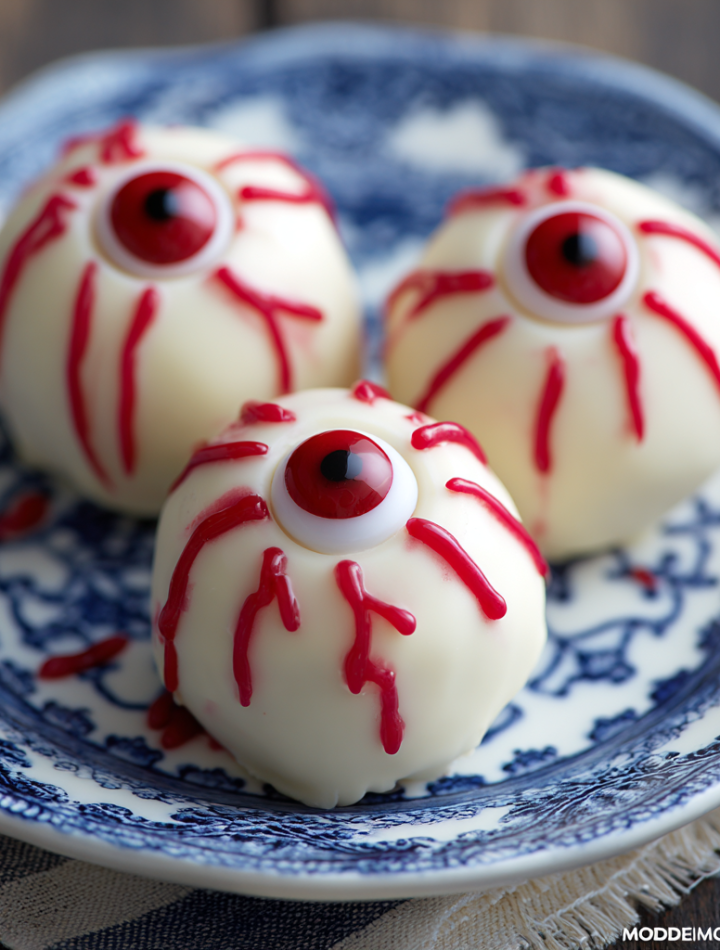
These Eyeball Truffles are creepy, cute, and irresistibly sweet—perfect for Halloween parties or a fun dessert with a gory twist. Smooth white chocolate truffles become spooky “eyeballs” with candy eyes and red icing veins. They’re easy to make, fun to decorate, and just the right mix of eerie and delicious.
Ingredients
1½ cups white chocolate chips
¼ cup heavy cream
1 tsp vanilla extract
Candy eyes
Red decorating gel or icing
Optional: crushed cookies or sprinkles for coating
Instructions
In a heat-safe bowl, melt white chocolate chips with heavy cream in the microwave, stirring until smooth.
Stir in vanilla extract and chill the mixture for about 1 hour or until firm.
Scoop and roll into small balls, about 1 inch wide.
Press a candy eye into the center of each truffle.
Use red decorating gel to draw “veins” coming out from the eye for a bloodshot effect.
Chill until ready to serve.
- Prep Time: 20 minutes
- Category: Snack
Nutrition
- Calories: 130
- Fat: 8g
- Saturated Fat: 5g
- Carbohydrates: 13g
Gathering Our (Spooky) Supplies
Here’s everything you’ll need to bring these peeping treats to life. The beauty of this recipe is in its simplicity, and I’ve included some of my favorite chef-y insights and swaps to make it your own!
- 1½ cups white chocolate chips: This is the sweet, creamy base of our truffle. Chef’s Tip: The quality of your chocolate matters here! Look for brands with real cocoa butter for the smoothest melt. You can also chop up a high-quality white chocolate bar for an even more decadent result.
- ¼ cup heavy cream: This is what we’ll heat and pour over the chocolate to create a rich ganache. It’s the magic that gives truffles their signature creamy, luxurious texture. For a dairy-free version, full-fat canned coconut cream works beautifully!
- 1 tsp vanilla extract: A little splash to deepen the flavor and cut the sweetness of the white chocolate. Pure vanilla extract is always my go-to for the best flavor.
- Candy eyes: The star of the show! You can find these in the baking aisle of most craft stores or supermarkets, especially around Halloween. They usually come in different sizes—I like using the medium ones for the perfect creepy effect.
- Red decorating gel or icing: This is for our brilliant “bloodshot” veins. The gel in a squeezable tube is easiest to control. In a pinch, you could even thin out some strawberry jam or use a little red candy melt.
- Optional: crushed cookies or sprinkles for coating: This is where you can get creative! Roll your truffles in crushed Oreo cookies for a “dirty” look, black sanding sugar for sparkle, or even matcha powder for a weird, moldy effect. It adds great texture and an extra layer of fun.
Let’s Build Some Eyeballs! (Step-by-Step)
Ready to get rolling? Literally! Follow these steps for foolproof, non-blinking truffles.
- Melt the Chocolate & Cream: Place your white chocolate chips and heavy cream in a medium, heat-safe bowl. Pop it in the microwave and heat in 20-second bursts, stirring well after each interval. My #1 Tip: Do NOT over-microwave! White chocolate is delicate and can seize up (become grainy) if overheated. We want to gently melt it until it’s just smooth and glossy. If you see a few lumps, just keep stirring—the residual heat will often melt them. Once smooth, stir in that teaspoon of vanilla extract.
- The Chill Time: This is the most important patience-testing step! Cover the bowl with plastic wrap and pop it into the refrigerator for at least 1 hour, or until the mixture is firm enough to scoop. You can speed this up by placing it in the freezer for about 20-30 minutes, but check it and stir it halfway through to ensure it chills evenly. We’re looking for a fudge-like consistency that holds its shape.
- Scoop and Roll: Use a small cookie scoop or a melon baller to portion out the mixture. I find a 1-inch ball is the perfect eyeball size. Roll them quickly between your palms to form smooth spheres. Chef’s Hack: If your hands are warm, the mixture might get sticky. Keep a small bowl of cold water nearby to dip your fingers in—this prevents sticking and makes rolling a breeze! Place the rolled balls on a parchment-lined baking sheet.
- Press in the Eyes: Now for the personality! Take your candy eyes and gently but firmly press one into the center of each truffle. If they feel like they might fall off, you can use a tiny, tiny dab of the red icing or melted chocolate as “glue” on the back of the eye before pressing it in.
- Create the Veins: This is the art project! Take your red decorating gel and get creative. Draw squiggly lines radiating out from the candy eye to make it look deliciously bloodshot. Some can be long, some short—real eyes aren’t perfect, so embrace the messy, creepy vibe!
- The Final Chill: Once all your eyeballs are assembled and looking appropriately startled, pop the whole tray back into the fridge for another 15-20 minutes to let everything set completely. This ensures they’re firm and ready to be devoured.
How to Serve Your Spooky Masterpieces
Presentation is half the fun with these! For maximum impact, arrange them on a simple white platter so their creepy details really pop. You can nestle them in a bed of black or orange sprinkles or even shredded green coconut “slime” for a full monster effect. I love serving them alongside other Halloween treats like “witches’ finger” cookies or “poison” apple cider for a full thematic spread. Watch your guests do a double-take before they can’t resist grabbing one!
Get Creative: Spooky Variations
Feel free to experiment and make these your own! Here are a few ideas to spark your imagination:
- The Zombie: Before rolling, mix green food coloring into the white chocolate ganache for a truly undead eyeball.
- The Cookie Monster: Roll the finished truffles in crushed chocolate cookies or black sanding sugar for a textured, “dirty” look.
- Bloodshot & Blue: Use blue decorating gel instead of red for a cooler, alien-like vein effect.
- Dairy-Free Ghoul: Use dairy-free white chocolate and swap the heavy cream for full-fat coconut cream. It works perfectly!
- Mocha Eyeballs: Stir a teaspoon of instant espresso powder into the warm ganache for a delicious coffee-flavored truffle with a caffeinated kick.
Chef’s Notes: Tales from the Truffle Trenches
Over the years, I’ve learned a few things. One year, I was in a huge rush and tried to roll the truffles before the ganache was fully set. Let’s just say I ended up with more truffle on my hands than on the tray—it was a sticky, sweet nightmare! Patience truly is a virtue here. Another time, my nephew decided to “help” by giving one eyeball about twenty veins. It looked less like a bloodshot eye and more like a red spider monster, but it was honestly the coolest one of the bunch! So don’t stress about perfection. The messy, creative, slightly uneven ones always have the most character. This recipe is meant to be fun, so put on a Halloween playlist, embrace the mess, and enjoy the process.
Eyeball Truffle FAQs: Solving Your Spooky Problems
Q: My white chocolate seized and became grainy! What did I do wrong and can I fix it?
A: This is the most common issue with white chocolate—it’s very sensitive to heat. If it seizes, it’s often because it got too hot. All is not lost! Try adding a teaspoon of warm cream or even a tiny bit of vegetable oil and stirring vigorously. This can sometimes bring it back to a smooth state. Prevention is key: use low, slow heat and stir often!
Q: My truffle mixture is too soft to roll. What should I do?
A: No worries! Just pop it back into the fridge for another 15-20 minutes. If you’re really in a time crunch, the freezer can help speed things up. Warm hands can also soften the mixture, so remember that water trick to keep them cool!
Q: The candy eyes won’t stick! How can I make them stay on?
A: If the surface of your truffle has dried out a bit, the eyes might not adhere well. A tiny dab of corn syrup, melted chocolate, or even the red icing on the back of the candy eye acts as perfect edible glue.
Q: Can I make these ahead of time?
A: Absolutely! These are a fantastic make-ahead treat. Store them in a single layer in an airtight container in the refrigerator for up to 5 days. You can also freeze them for up to a month! Just thaw in the fridge before serving.
Nutritional Information*
Prep Time: 20 minutes (plus chilling) | Cook Time: 0 minutes | Servings: 12 truffles
*This is an estimate provided for informational purposes only. I am not a certified nutritionist.
- Calories: 130
- Total Fat: 8g
- Saturated Fat: 5g
- Carbohydrates: 13g
- Sugars: 12g
- Protein: 1g
There you have it! Your guide to creating the most talked-about treat at any Halloween gathering. I hope you have as much fun making these Eyeball Truffles as I do.
With love and a slightly bloodshot eye,
Clara