Let’s Settle the Brownie vs. Cookie Debate Once and For All (Spoiler: Everyone Wins!)
Hey there, my fellow flavor adventurer! Clara here, from my flour-dusted kitchen to yours. Have you ever found yourself staring into the abyss of your pantry, your soul torn between two monumental cravings? One voice whispers, “Brownie… fudgy, rich, crackly-topped, melt-in-your-mouth brownie.” The other, slightly sassier voice, chimes in with, “Cookie… chewy, buttery, chocolate-chip-studded, satisfyingly substantial cookie.”
I’ve been there more times than I can count. It’s a deliciously real first-world problem, and for the longest time, I thought I had to choose. I’d make a batch of brownies, only to find myself wistfully dreaming of a cookie’s chew. I’d bake cookies, and miss the deep, dark chocolate intensity of a brownie. It felt like a culinary compromise I just shouldn’t have to make.
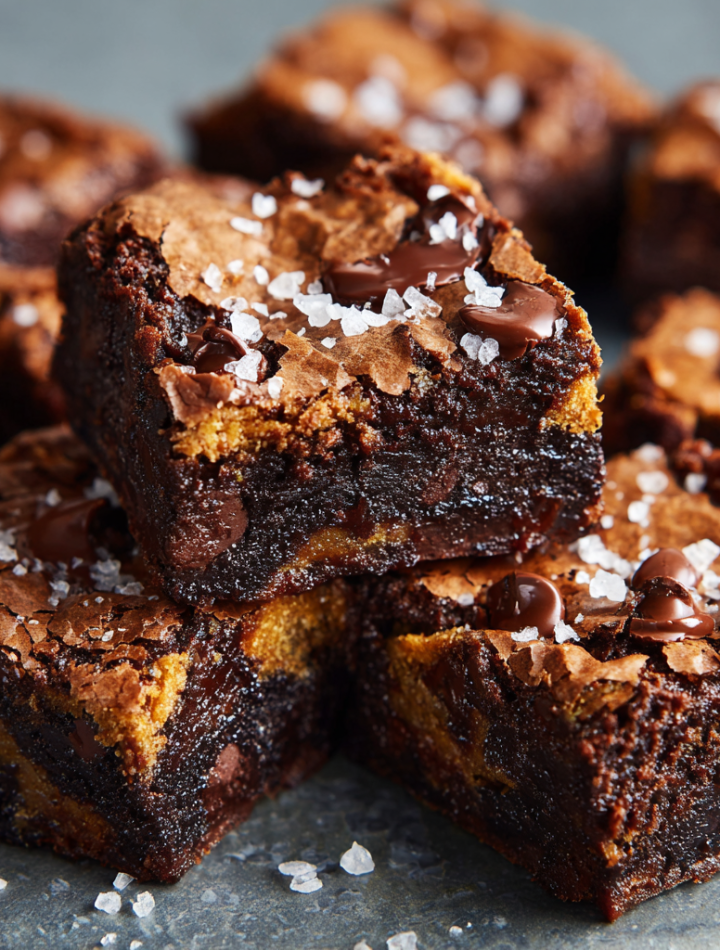
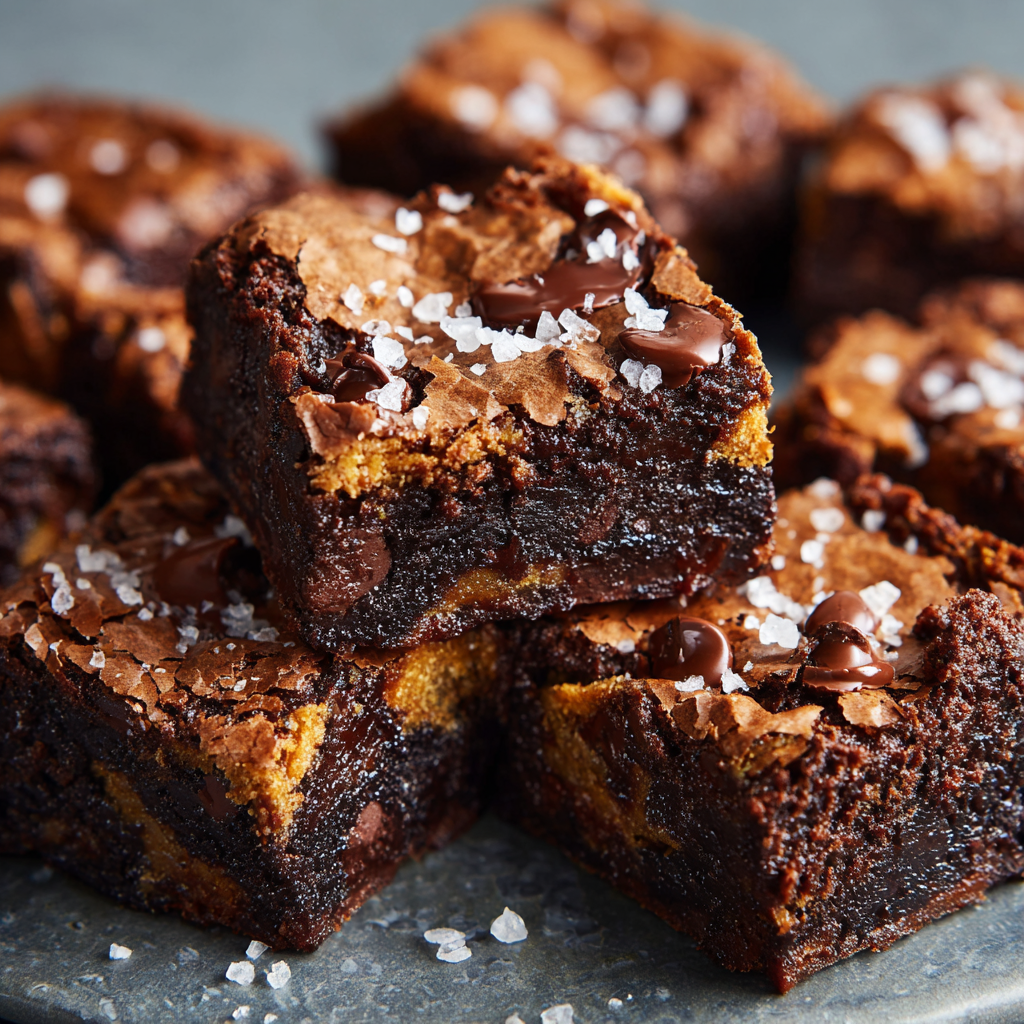
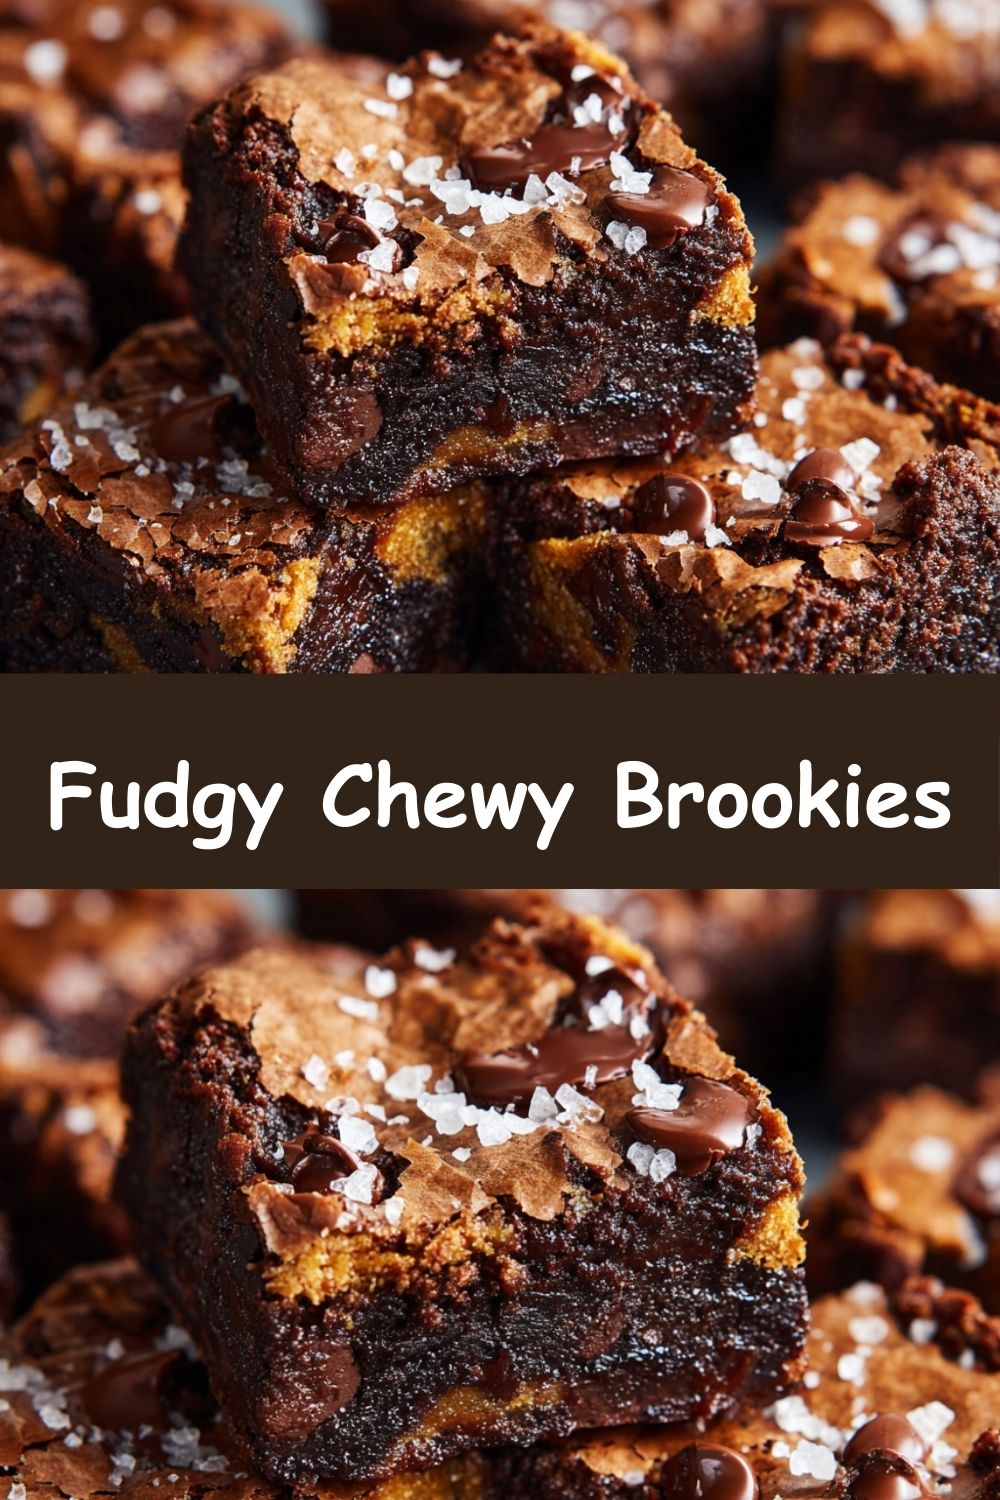
Well, my friends, I’m here to tell you that the universe, in its infinite wisdom (and love of chocolate), provided the most glorious solution: the BROOKIE. That’s right. Brownie + Cookie = the undisputed champion of the baking world. This isn’t just a brownie or just a cookie. It’s a thick, chocolate-packed masterpiece that combines the best textural elements of both into one mind-blowing bite. We’re talking a shattery, paper-thin brownie-like top that gives way to an impossibly chewy, soft-batch-cookie-style center, all loaded with pockets of melted chocolate. It’s every chocoholic’s dream, and today, we’re making a double batch with extra flair. Let’s preheat those ovens and cook up some joy!
The Happy Kitchen Accident That Started It All
I have to confess, my first encounter with a brookie wasn’t some meticulously planned recipe test. It was a classic “Clara in a hurry” kitchen situation. I was hosting my niece’s birthday party and, in a classic underestimation of a seven-year-old’s appetite, I realized I hadn’t made nearly enough dessert. I had one bowl of brownie batter and one bowl of chocolate chip cookie dough sitting on the counter, both too small for their own pans.
In a moment of pure “what’s the worst that could happen” energy, I did it. I literally globbed spoonfuls of each batter haphazardly into the same muffin tin, swirled them together with a knife, and sent them into the oven with a prayer. What emerged was magic. The edges were chewy like a cookie, the centers were fudgy like a brownie, and the top had that perfect, shiny crust. The kids devoured them, and the adults were subtly (and not so subtly) asking for the recipe. That messy, joyful accident became a permanent staple in my recipe box, and it’s evolved into the more refined (but just as soul-satisfying) version I’m sharing with you today. It’s proof that the best creations often come from a little chaos and a lot of heart.
Print
Fudgy Chewy Brookies
- Total Time: 30 minutes
Description
Brookies = brownie + cookie = best of both worlds! These thick, chocolate-packed bites combine a crackly brownie top with a chewy cookie center. Made with rich dark chocolate, a mix of sugars, and melty chips—they’re every chocoholic’s dream, now in a double batch with extra flair!
Ingredients
190g (1½ cups) all-purpose flour
4 tbsp cocoa powder
2 tsp baking powder
½ tsp salt
450g (2½ cups) dark chocolate, chopped
113g (½ cup) butter
4 eggs, room temp
200g (1½ cups) granulated sugar
180g (1 cup) Demerara or raw sugar
2 tsp vanilla extract
170g (1 cup) dark or milk chocolate chips
Optional Twists:
Add ½ tsp espresso powder for depth
Fold in ½ cup chopped walnuts or pecans
Sprinkle sea salt flakes on top before baking
Instructions
Preheat oven to 175°C (350°F). Line baking trays with parchment.
Whisk flour, cocoa, baking powder, and salt in a bowl.
Melt chocolate with butter gently (microwave or double boiler). Cool slightly.
Beat eggs, sugars, and vanilla until thick and pale.
Stir in melted chocolate mixture, then fold in dry ingredients.
Add chocolate chips and any mix-ins.
Scoop dough into mounds. Bake 10–12 mins until just set.
Cool on tray 5 mins, then transfer to rack.
- Prep Time: 15 minutes
- Cook Time: 15 minutes
- Category: Dessert
Nutrition
- Calories: 210
- Sugar: 18g
- Fat: 11g
- Carbohydrates: 25g
Gathering Your Brookie Brigade: The Ingredients
This recipe is all about quality ingredients coming together to create texture and flavor harmony. Here’s what you’ll need and why each one matters:
- 190g (1½ cups) all-purpose flour: The structural backbone of our brookie. It gives the cookie element its chew without making the treat too cakey. For a gluten-free swap, a 1:1 GF baking blend works wonderfully here.
- 4 tbsp cocoa powder: This is our brownie essence! Use a good-quality natural cocoa powder (not Dutch-processed) for that classic, slightly acidic brownie flavor. This is non-negotiable for that crackly top!
- 2 tsp baking powder: Our leavening agent. It gives the brookies a slight lift and that perfect, tender crumb. Make sure it’s fresh for the best rise.
- ½ tsp salt: The flavor enhancer. It heightens the chocolate and balances the sweetness. Don’t you dare skip it!
- 450g (2½ cups) dark chocolate, chopped: The star of the show! I use a bar of 70% dark chocolate for a deep, sophisticated flavor that isn’t overly sweet. The quality of your chocolate directly impacts the quality of your brookie. You can use semi-sweet if you prefer a sweeter bite.
- 113g (½ cup) butter: For richness and that signature cookie chew. Unsalted is best so we can control the salt level. Take it out about 30 minutes before you start so it’s soft.
- 4 eggs, room temp: Crucial for structure and that gorgeous, crackly brownie top. Room temperature eggs incorporate into the batter much more evenly, leading to a better texture. If you forgot to take them out, just place them in a bowl of warm water for 5-10 minutes!
- 200g (1 cup) granulated sugar: Adds sweetness and helps create a crisp exterior.
- 180g (1 cup) Demerara or raw sugar: My secret weapon! The larger crystals and hint of molasses in these sugars create an incredible chew and deep, caramel-like flavor. If you only have brown sugar, that works too!
- 2 tsp vanilla extract: The warm, aromatic background note that makes all chocolate desserts taste… more. Use the real stuff!
- 170g (1 cup) dark or milk chocolate chips: Because more chocolate is always the answer. These provide those glorious melty pockets. I like a mix of dark and milk for complexity.
Let’s Get Baking: The Step-by-Step Magic
Ready to create some magic? Follow these steps, and don’t forget to read my little chef hacks along the way—they make all the difference!
- Preheat and Prep: Preheat your oven to 175°C (350°F). Line two large baking sheets with parchment paper. Chef’s Hack: A light spritz of cooking spray under the parchment helps it stay perfectly in place. This is a no-stick guarantee!
- Whisk the Dry Team: In a medium bowl, whisk together the all-purpose flour, cocoa powder, baking powder, and salt. Whisk it really well! This isn’t just about combining; it’s about aerating the dry ingredients for a lighter texture and ensuring the baking powder is evenly distributed so every brookie rises perfectly.
- Melt the Chocolate Dream Team: Combine the chopped dark chocolate and butter in a heatproof bowl. You can melt this gently over a pot of simmering water (a double boiler) or in the microwave in 20-second bursts, stirring well between each burst. Chef’s Hack: The key here is GENTLE. We don’t want to scorch the chocolate. Once it’s about 90% melted, take it off the heat and keep stirring. The residual heat will melt the rest. Let this cool slightly while you move on to the next step. You don’t want to scramble your eggs!
- Whip the Eggs and Sugars: In a large bowl, combine the eggs, granulated sugar, Demerara sugar, and vanilla extract. Now, here’s the secret to that crackly top and chewy center: beat this mixture with an electric hand mixer or stand mixer for a good 3-5 minutes. You’re looking for it to become thick, pale, and creamy, and when you lift the beaters, the mixture should fall off in a slow, lazy ribbon. This step incorporates air and dissolves the sugar, which is essential for the perfect texture. Don’t rush this!
- Marry the Wet Ingredients: Pour the slightly cooled chocolate and butter mixture into the egg and sugar mixture. Use a spatula and fold gently until it’s completely combined and a beautiful, glossy, dark batter forms. It will smell incredible already.
- Bring in the Dry Ingredients: Add your whisked dry ingredients to the chocolate batter. Now, channel your gentle folding skills again. Mix until just combined and you no longer see streaks of flour. Chef’s Hack: Overmixing at this stage is the enemy of chewy, tender brookies! It develops gluten in the flour and can make them tough. A few tiny lumps are totally fine.
- The Final Fold-In: Gently fold in the chocolate chips (and any other add-ins like nuts) until they’re evenly distributed.
- Scoop and Space: Using a medium cookie scoop (about 1.5 tablespoons), drop mounds of dough onto your prepared baking sheets, leaving about 2 inches between each one. They will spread! For a picture-perfect round brookie, you can roll the scooped dough quickly between your palms to smooth it out, but I love the rustic, craggy look of a simple scoop-and-drop.
- Bake to Perfection: Bake for 10-12 minutes. The tops will be crackly and set, but the centers will still look very soft. Chef’s Hack: This is the hardest part—DON’T overbake! They will continue to cook on the hot tray out of the oven. You’re aiming for a soft, fudgy center. For me, 11 minutes is the sweet spot.
- The Cool Down: Let the brookies cool on the baking sheet for a full 5-10 minutes. This allows them to set up properly so they don’t fall apart when you move them. Then, transfer them to a wire rack to cool completely… or, you know, eat one immediately with a glass of cold milk. I support that life choice.
How to Serve These Glorious Creatures
Honestly, a brookie served warm from the oven, all by its glorious self, is a religious experience. But if you want to take it to the next level, here are a few ideas. For the ultimate indulgence, place a warm brookie in a bowl and top with a scoop of high-quality vanilla bean ice cream. The contrast of hot and cold, chewy and creamy, is sublime. For a decadent dessert, crumble them over Greek yogurt for a breakfast treat (no judgment here!), or simply arrange them on a beautiful wooden board for a party—they disappear faster than you can say “brookie.”
Get Creative: Brookie Flavor Twists!
The basic brookie recipe is a blank canvas for your wildest chocolate dreams. Here are a few of my favorite riffs:
- Mocha Magic: Add ½ tsp of espresso powder to the dry ingredients. It won’t make them taste like coffee, but it will deepen and intensify the chocolate flavor incredibly.
- Nutty Crunch: Fold in ½ cup of chopped toasted walnuts, pecans, or hazelnuts for a wonderful textural contrast.
- Salted Caramel Swirl: After scooping the dough, press a small dollop of good-quality thick caramel sauce into the top of each mound and swirl lightly with a knife. Sprinkle with flaky sea salt.
- Peanut Butter Paradise: Press a small piece of frozen peanut butter cup into the center of each dough ball before baking for a gooey, surprise center.
- Blonde Brookie: Omit the cocoa powder and replace the chopped dark chocolate with white chocolate. Use white chocolate chips for a totally different, but equally delicious, vibe.
Clara’s Kitchen Notes & Stories
This recipe has been on quite a journey from that first harried muffin-tin experiment. I’ve tweaked the sugar ratios a dozen times to nail the chew, tested countless chocolates, and nearly set off my smoke alarm more than once by being too impatient with the melting step (whoops!). The biggest lesson? Trust your instincts and your oven. Every oven runs a little hot or cold, so your perfect brookie might come out at 10 minutes or 13. Keep an eye on them after the 9-minute mark. The evolution of this recipe taught me that baking is equal parts science and soul. It’s about the joy of sharing something you made with your own hands. I once brought a batch to a potluck, and a friend’s husband very seriously told me they were “life-changing.” That’s the power of a good brookie. It’s not just a dessert; it’s a mood booster, a love language, and the answer to all of life’s “should I have a brownie or a cookie?” dilemmas.
Brookie FAQs: Your Questions, Answered!
Q: My brookies came out flat! What happened?
A: The most common culprits are: 1) Your butter was too warm. If the butter/chocolate mixture is hot when you add it to the eggs, it can melt the butter further and deflate the air you whipped in. This is why cooling it slightly is key! 2) Your baking powder might be old and lost its lifting power. 3) Not enough flour—always spoon your flour into the measuring cup and level it off; scooping directly packs it down and you end up with less.
Q: Can I make the dough ahead of time?
A: Absolutely! This dough is a fantastic candidate for freezing. Scoop the dough balls onto a parchment-lined tray, freeze until solid (about 1 hour), then transfer to a freezer bag. You can bake them straight from frozen, just add 1-2 minutes to the baking time. Hello, instant fresh-baked dessert!
Q: Why didn’t I get that shiny, crackly brownie top?
A: That top is a result of dissolving the sugar properly in the egg mixture. Make sure you beat the eggs and sugars for the full 3-5 minutes until they’re truly thick and pale. Also, using a mix of granulated and richer sugar (like Demerara or brown) helps create that perfect crust.
Q: My brookies are too cakey. How do I make them fudgier?
A> A cakey texture usually means you overmixed the batter after adding the flour, or you overbaked them. Next time, mix until *just* combined and pull them out of the oven when the centers still look very soft and underbaked. They will set up as they cool!
Nutritional Information (Per Brookie – Approx.)
Calories: 210 | Fat: 11g | Saturated Fat: 6g | Carbohydrates: 25g | Fiber: 1g | Sugar: 18g | Protein: 2.5g
Prep Time: 15 mins | Cook Time: 12 mins | Total Time: 30 mins | Makes: ~30 Brookies