 Spooky, Sweet, and Seriously Fun: Meet Your New Halloween Party Star!
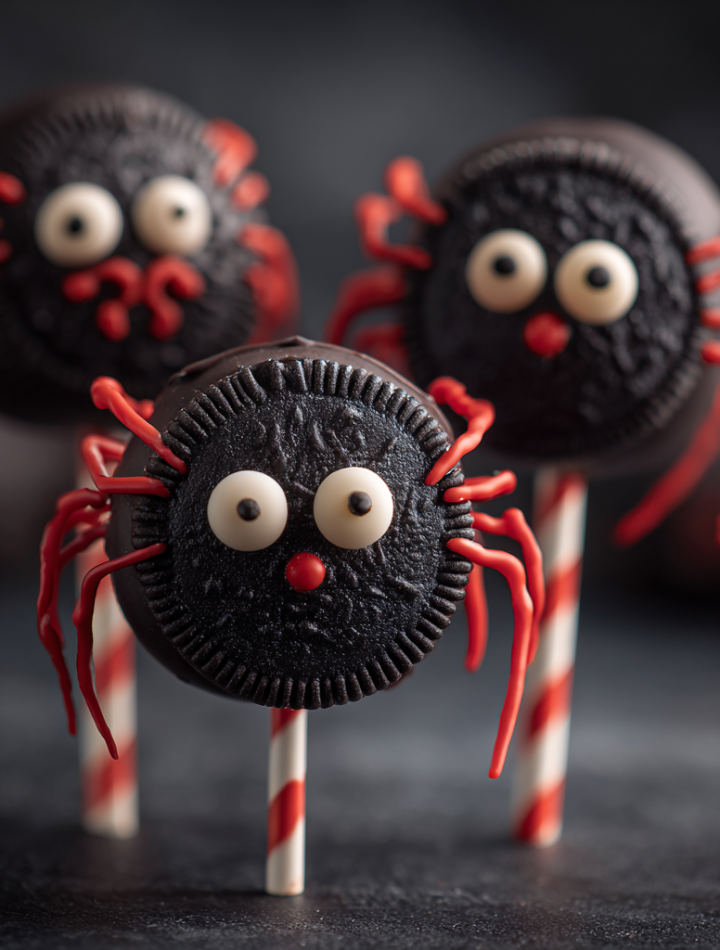
Hey, my spooky-season soulmates! Clara here, your culinary partner in crime for all things deliciously eerie. Picture this: It’s Halloween night. The air crackles with mischief, jack-o’-lanterns wink from porches, and your kitchen… is about to become a mad scientist’s lab for the cutest, creepiest treats ever. Enter the Glowing Black Widow Oreo Pops – your edible ticket to becoming the undisputed MVP of any Halloween bash. 🕷️✨
These little legends aren’t just adorable (in a slightly terrifying way); they’re stupidly easy to make. We’re talking minimal ingredients, zero baking, and maximum “WOW” factor. Imagine rich Oreo cookies dunked in velvety dark chocolate, sporting cheeky candy eyes and wiggly licorice legs, finished with that iconic red hourglass. And the glow-up? Oh yes, we’re making them shimmer like they just crawled out of a haunted forest under blacklight! Whether you’re wrangling mini monsters at a kids’ party or impressing your fellow grown-up ghouls, these pops promise giggles, gasps, and grabby hands. Ready to unleash your inner candy sorcerer? Let’s dip, decorate, and delight!
That One Time I Turned a Kitchen Disaster into a Halloween Legend…
Okay, confession time: My first attempt at “spider-themed” treats? Total carnage. Picture 8-year-old me, overzealous with black icing, transforming innocent cupcakes into hairy blobs that looked more like tar monsters than arachnids. My mom’s kitchen looked like a crime scene! But oh, how I loved that messy, sugar-fueled chaos. Halloween baking was pure magic – a chance to play with food and make edible art that felt delightfully forbidden.
Fast forward to my first “grown-up” Halloween party. I wanted that same playful thrill but… classier (ish). Enter the Oreo pop! Inspired by a vintage cookbook illustration of a black widow, I thought: “What if it glowed?” Cue frantic experiments with edible glitter and a very patient boyfriend taste-testing slightly radioactive-looking prototypes. When I finally nailed it? The moment those pops lit up under blacklight, casting an eerie green glow on my friends’ awestruck faces? Pure, unadulterated kitchen joy. That’s the spirit I want for YOU – where a little mess leads to delicious magic.
Print
Glowing Black Widow Oreo Pops
- Total Time: 40 mins
- Yield: ~12 Oreo pops
Description
Creepy, cute, and coated in chocolate—these Glowing Black Widow Oreo Pops are a Halloween party hit! Made with just a few ingredients and glowing with spooky personality, they’re the perfect no-bake treat for kids, adults, and all snack-loving spiders in between.
Ingredients
pack of Oreo cookies
1 bag of black candy melts or dark chocolate
Red candy melts or red gel icing (for hourglass)
Lollipop sticks
Candy eyes
Black licorice laces (for legs)
Optional: edible glow dust or glow-in-the-dark food spray
Instructions
Prep the Oreos: Gently twist open each Oreo and press a lollipop stick into the cream. Add a bit of melted chocolate to help seal and close the cookie back up. Chill for 10 minutes.
Dip It: Melt black candy melts or chocolate according to package instructions. Dip each Oreo pop until fully coated.
Decorate: While still wet, add candy eyes and press 3 licorice “legs” into each side.
Add the Marking: Use red candy melts or icing to draw a signature Black Widow hourglass on the back.
Glow Up (optional): Lightly dust with edible glow dust or mist with glow food spray. Let set completely.
Display: Stick upright in a foam board or serve flat on a tray lined with festive paper.
- Prep Time: 20 mins
- Category: Dessert
Nutrition
- Calories: 180
- Fat: 9g
- Carbohydrates: 22g
- Protein: 2g
Your Edible Arachnid Army: What You’ll Need
Gather your potions, witches and wizards! Here’s your simple spellbook for summoning 12 glorious Glowing Black Widow Oreo Pops. Don’t stress about exact brands – flexibility is our spooky secret weapon.
- 1 pack Oreo Cookies: The crunchy, creamy heart of our beasties! Regular works best (the filling holds sticks beautifully). Chef’s Tip: Gluten-free? Any similar sandwich cookie works!
- 1 bag (12 oz) Black Candy Melts OR Dark Chocolate Chips + 1 tsp Coconut Oil: Candy melts set faster and give a smoother, jet-black finish. Chocolate tastes richer! The coconut oil thins chocolate for easier dipping. Substitution Alert: Use vegan chocolate chips for dairy-free spiders!
- Red Candy Melts OR Red Gel Icing: For that iconic hourglass marking. Melts give a raised, candy-like feel; gel icing is quicker for piping. Insider Hack: A tiny squeeze bottle makes piping SO much easier.
- Lollipop Sticks (6-inch): Your spider’s lifeline! Find them at craft stores or online. Popsicle sticks work in a pinch but are chunkier.
- Candy Eyes (Small): Go for the classic round ones! Edible googly eyes add extra fun. Chef’s Whim: No eyes? Tiny white sprinkles or dots of white icing work!
- Black Licorice Laces: The wiggly legs! Snip into ~1.5-inch pieces. Hate licorice? Use black pipe cleaners (trim ends) or stiff black frosting “drawn” legs. Safety Note: Warn guests if using non-edible legs!
- Edible Glow Dust OR Glow-in-the-Dark Food Spray (Optional but EPIC): The “wow” factor! Dust creates a subtle shimmer; spray gives intense blacklight glow. Must: Check labels for “edible” and follow instructions!
Conjuring Your Creepy-Crawlies: Let’s Get Dipping!
Don your apron – it’s go time! Work quickly but calmly; chocolate waits for no witch. Line a baking sheet with parchment paper.
- Prep the Oreos (The Foundation!): Gently twist open each Oreo. Press a lollipop stick firmly into the cream filling, stopping about halfway. Pro Tip: Dab a tiny bit of melted chocolate onto the cream around the stick before closing the cookie – this acts as glue! Press the Oreo halves back together firmly. Lay pops flat on the sheet and chill for 10 mins. Why? This sets the stick so it won’t spin during dipping!
- Melt Your “Web” (Choose Your Potion!):
- Candy Melts: Melt in a microwave-safe bowl in 30-sec bursts, stirring well between each, until smooth. Don’t overheat!
- Dark Chocolate + Oil: Combine in a microwave-safe bowl. Microwave in 20-sec bursts, stirring vigorously each time, until silky. The oil prevents seizing.
Critical Hack: Transfer melted coating to a tall, narrow cup (like a mason jar) for easier, less messy dipping!
- The Big Dip (Embrace the Drip!): Hold a chilled Oreo pop by the stick. Dip it COMPLETELY into the melted coating, swirling slightly. Lift straight up, letting excess coating drip off for 5-10 seconds. Gently tap the stick against the rim of the cup. Secret Weapon: If coating thickens, reheat for 5-10 secs. Place dipped pop back on the parchment. Repeat!
- Bring ‘Em to Life! (Decorate While Wet!): WORK FAST! Coating sets quickly.
- Eyes: Press two candy eyes onto the top front of the wet Oreo.
- Legs: Press 3 licorice pieces angled downwards into each side of the Oreo (6 legs total per side? Nope! Spiders have 8! Wait… just kidding! 3 per side makes 6 visible legs – perfect for cuteness!).
Panic Button: Decorations not sticking? Dab a tiny bit of extra melted coating as glue.
- The Mark of the Widow (Red Alert!): Let pops set for 5 mins. Melt red candy melts (same method as black) or grab your red gel icing.
- Melts: Transfer to a piping bag or zip-top bag with a tiny corner snipped off. Pipe a small, slightly elongated upside-down triangle (like a V) on the back of the pop.
- Gel Icing: Use the bottle’s fine tip to draw the same shape. Less precision? It adds charm!
- Glow Up! (Optional Spooky Spectacle): Let pops set completely (15-20 mins). If using glow dust, lightly brush it over the black coating with a clean makeup brush or food-safe paintbrush. If using spray, hold can 8-10 inches away and mist lightly in a well-ventilated area. Let dry as per product instructions. WARNING: Test glow products on a spare cookie first!
- Set Your Spiders Free! Display pops upright by sticking them into a foam block or floral foam covered in spooky paper. Or lay them flat on a parchment-lined tray resembling a spider web!
Web-Worthy Presentation: Show Off Your Creations!
Presentation is half the fun! Stick your pops upright in a block of styrofoam covered in black tissue paper or burlap – instant spider nest! For a table display, arrange pops flat on a platter lined with faux spider webbing (found at party stores) or parchment paper you’ve drawn webs on with white icing. Scatter plastic spiders or autumn leaves around them. Blacklight Bonus: If you used glow products, turn down the lights and hit them with a blacklight flashlight – watch your pops become the glowing centerpiece! Serve with spooky cocktails (for adults) or sparkling cider (for all) and prepare for applause.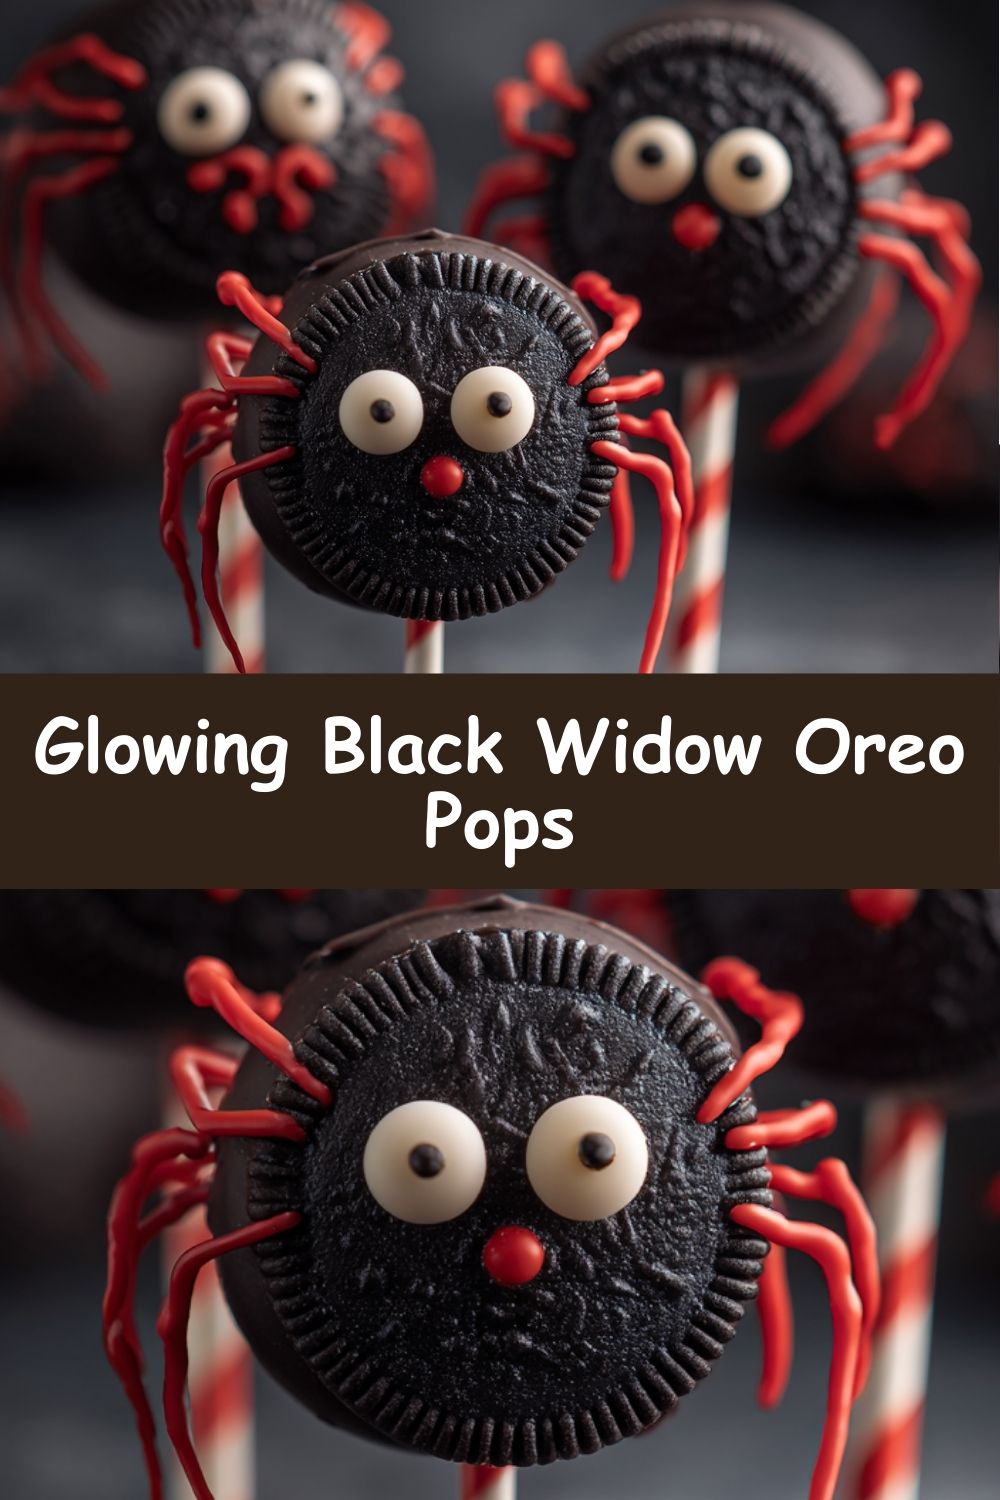
Spin Your Web: Creative Twists on the Classic Widow
Feel like experimenting? Here’s how to remix your arachnid army:
- Peanut Butter Phantoms: Use Peanut Butter Oreos! Swap the red hourglass for white icing. Spooky and nutty!
- Zombie Green Widows: Dip in green candy melts instead of black! Use black gel for the hourglass. Perfect for a zombie apocalypse party.
- Fruity Frights: Swap Oreos for Golden Oreos. Dip in orange melts, add candy eyes, and use black licorice legs. Draw a tiny jack-o’-lantern face instead of an hourglass! Instant Pumpkin Spiders.
- Vegan Venom: Use vegan sandwich cookies (like Trader Joe’s Jo-Jos), vegan chocolate/candy melts, and vegan licorice. Skip candy eyes or find vegan ones (check labels!).
- Minty Monsters: Use Mint Oreos! The cool mint pairs amazingly with dark chocolate. Keep the classic black widow look or add a tiny white “M” for mint.
Clara’s Cauldron Chronicles: Notes from the Spider Lab
This recipe? It’s evolved more than a radioactive spider! My first batch used white chocolate tinted black (it seized… spectacularly). Lesson learned: candy melts or chocolate + oil are your friends! The glow element was born after a Halloween party where someone’s glow necklace dripped on a pop (don’t worry, it wasn’t eaten!). I thought, “EDIBLE glow? GENIUS!” Cue deep dive into food-safe luminescence. A funny fail: Trying to pipe legs with icing. They looked like sad, melted noodles. Licorice laces? Game-changer! The beauty is in the imperfection – if a leg snaps or an eye goes cockeyed, it just gives your spider personality. Mine have been called “derpy,” “sassy,” and “weirdly cute.” Embrace it! These pops are about laughter, creativity, and sharing a little edible magic. Just promise me you’ll lick the spoon after melting that chocolate. Chef’s orders.
Spider Saving Squad: Your Questions, Answered!
Q: My chocolate/candy coating is too thick and lumpy! Help!
A: Don’t panic! For candy melts, add 1/2 tsp of coconut oil or vegetable shortening and reheat in 5-sec bursts, stirring vigorously. For chocolate, add another 1/4 tsp oil. Overheating causes lumps – low and slow is key! If it’s truly hopeless, strain it through a fine mesh sieve.
Q: The decorations won’t stick to the coating! What now?
A: Timing is everything! Make sure the coating is still slightly wet/tacky. If it’s set, use a tiny dot of *extra* melted coating or icing as “glue” for eyes/legs. A toothpick helps with placement.
Q: Can I make these ahead of time? How do I store them?
A: Absolutely! Make them up to 2 days ahead. Store UNCOVERED in a single layer in a cool, dry place (not the fridge – humidity causes condensation and can melt candy coating/smudge decorations). If using glow spray/dust, storage might affect intensity; test one first.
Q: Are the glow products safe? Where do I find them?
A: ONLY use products explicitly labeled “EDIBLE” and food-safe. Check craft stores (baking aisle) or online retailers like Amazon. Common brands: The Sugar Art Luminescence Dust, Wilton Sparkle Gel. NEVER use non-edible craft glitters or paints! When in doubt, skip the glow – safety first!
Nutritional Bite-Sized Info (Approximate per Pop)
Calories: 180 | Fat: 9g | Carbs: 22g | Protein: 2g
Remember: This is a festive treat! Enjoy the magic, savor the fun, and balance it with all the vibrant, wholesome goodness we usually cook up here at Unknown. Life (and Halloween!) is all about delicious balance.
And there you have it—a creepy-cute Halloween treat that’s as fun to make as it is to eat! These Glowing Black Widow Oreo Pops will light up your dessert table (literally!) and are guaranteed to wow kids and grown-ups alike. With their no-bake ease, spooky charm, and optional glow-in-the-dark magic, they’re the perfect blend of festive and frightful. Whip up a batch, turn on the blacklight, and let the Halloween fun begin! 🎃🕷️