The Ultimate Homemade Apple Pie: A Slice of Cozy, From My Kitchen to Yours
Hey, friends! Clara here. Is there anything in the entire world that smells more like pure, unadulterated joy than an apple pie baking in the oven? That incredible aroma of warm cinnamon and sugar weaving through the air, the buttery scent of a golden crust promising something spectacular… it’s a hug for your soul before you even take the first bite.
I’m a firm believer that some recipes are more than just a list of ingredients—they’re time machines. They can whoosh you right back to your grandma’s kitchen table, to a bustling holiday party, or to a simple Tuesday night where the only goal was to create something beautiful and share it with people you love. This homemade apple pie is one of those magical recipes. It’s the undisputed champion of comfort desserts, and today, I’m so excited to pull back the curtain and share my ultimate version with you.
Now, I know the idea of making pie crust from scratch can feel a little intimidating. Believe me, I’ve had my share of pastry disasters! But we’re going to tackle this together, step-by-step, with all my favorite chef hacks and reassuring whispers. We’re not aiming for stiff, picture-perfect, magazine-style perfection here. We’re aiming for a flaky, shatteringly good crust that cradles a spiced, tender apple filling that actually holds its shape when you slice into it. We’re aiming for that glorious, messy, “worth every single calorie” kind of deliciousness. So, tie on your favorite apron, put on a good playlist, and let’s cook something that’s going to make your entire home smell like a autumn dream.
Print
Homemade Apple Pie
- Total Time: ~2 hrs 20 mins
- Yield: serves 8
Description
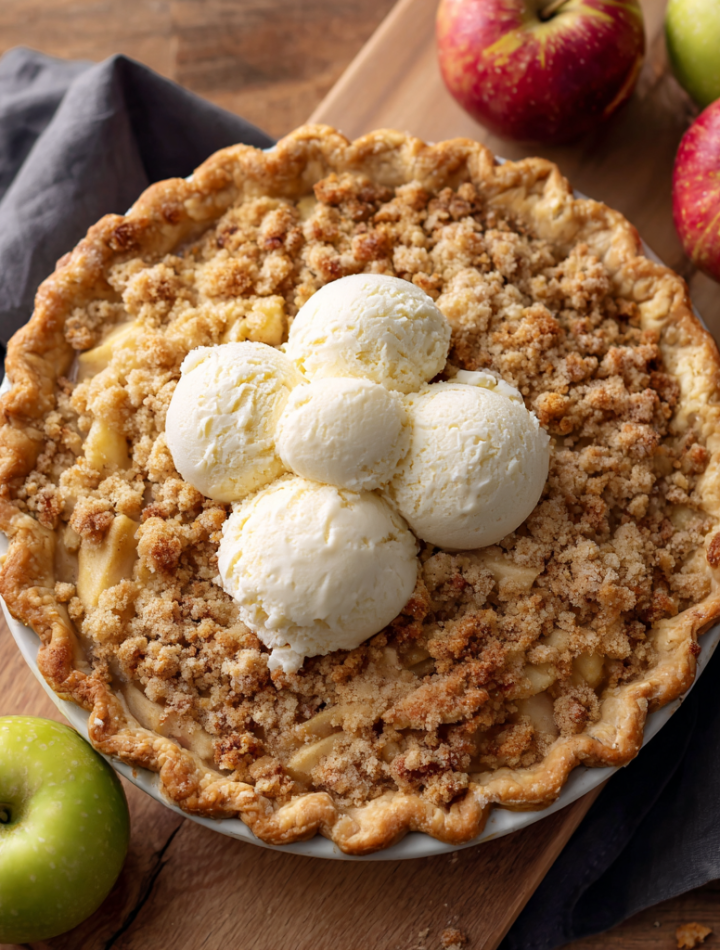
A timeless dessert that speaks of comfort and tradition—this homemade apple pie features a flaky, golden crust filled with tender apples, warm cinnamon, and just the right touch of sweetness. Whether it’s a holiday or just a cozy night in, this pie makes any moment special.
Ingredients
For the filling:
6–7 cups thinly sliced apples (Granny Smith or Honeycrisp)
3/4 cup granulated sugar
1/4 cup brown sugar
1 tsp ground cinnamon
1/4 tsp ground nutmeg
2 tbsp all-purpose flour
1 tbsp lemon juice
1 tbsp butter (for dotting)
For the crust:
2 1/2 cups all-purpose flour
1 tsp salt
1 tbsp sugar
1 cup (2 sticks) cold unsalted butter, cubed
6–8 tbsp ice water
Instructions
Make the crust: Mix flour, salt, and sugar. Cut in butter until crumbly. Add ice water, 1 tbsp at a time, until dough holds. Divide in two, wrap, and chill 1 hour.
Preheat oven to 400°F (200°C).
Mix apple slices with sugars, spices, flour, and lemon juice.
Roll out one dough half and line a 9-inch pie dish. Fill with apple mixture and dot with butter.
Roll out remaining dough for top crust. Place over filling, crimp edges, and cut slits for steam.
Optional: brush top with egg wash and sprinkle with sugar.
Bake 45–50 minutes or until crust is golden and filling is bubbly. Cover edges if browning too fast.
Cool before slicing for clean cuts.
- Prep Time: 30 mins
- Cook Time: 50 mins
- Category: Dessert
Nutrition
- Calories: 370
- Sugar: 26g
- Fat: 17g
- Carbohydrates: 52g
- Fiber: 3g
- Protein: 3g
The Pie That Started It All
My love affair with apple pie began not in a fancy pastry kitchen, but on a wobbly wooden stool in my Nana’s tiny, sun-drenched kitchen. I was maybe seven years old, and my job was the “official apple peeler.” Which, let’s be real, mostly meant I got covered in sticky juice and ate more apple slices than made it into the bowl. But Nana never minded. She’d tell stories about making this same pie with her mother, her hands moving with a confident, flour-dusted grace as she rubbed the cold butter into the flour, explaining that the secret wasn’t in the recipe, but in the feeling.
“You’ll know it’s right when it feels like cold beach sand, Clara-bell,” she’d say, letting me squeeze the crumbly mixture. The lesson was about more than pastry; it was about patience, about the alchemy of simple ingredients, and about the profound love that gets baked into food made by hand. Every time I make this pie, I’m right back on that stool. It’s my edible heirloom, and now I’m so thrilled to pass it on to you. Let’s make some new memories, shall we?
Gather Your Ingredients: A Little Pie-Making Science
Using great ingredients is the first step to a phenomenal pie. Here’s exactly what you’ll need and why each component matters. Don’t worry, I’ve got substitution ideas for everything!
For the Flaky, All-Butter Crust:
- 2 ½ cups all-purpose flour: The foundation. I like unbleached all-purpose for its reliable protein content, which gives us structure without being tough.
- 1 teaspoon salt: Crucial for balancing the sweetness and enhancing all the other flavors. Never skip it!
- 1 tablespoon granulated sugar: A little bit sweetens the crust just slightly and promotes browning.
- 1 cup (2 sticks) cold unsalted butter, cubed: This is non-negotiable for flavor and flakiness! Cold solid butter creates steam pockets as it melts in the oven, which is what gives us those incredible, shatteringly flaky layers. Keep it cold!
- 6-8 tablespoons ice water: The key word is ice water. We need it super cold to keep the butter firm. We’ll add it just a tablespoon at a time until the dough comes together.
For the Spiced Apple Filling:
- 6-7 cups thinly sliced apples (about 6-7 medium apples): The star! I use a mix of Granny Smith (for their tartness and structure that holds up to baking) and Honeycrisp (for their incredible sweetness and juiciness). This balance is my perfect combo. Peel them!
- ¾ cup granulated sugar: Sweetens the deal.
- ¼ cup brown sugar: Adds a deep, molasses-like warmth and helps create a saucier filling.
- 1 teaspoon ground cinnamon: The classic cozy spice.
- ¼ teaspoon ground nutmeg: A warm, nutty background note. Freshly grated is a game-changer if you have it!
- 2 tablespoons all-purpose flour: This is our thickening agent! It soaks up the juices released by the apples so your filling isn’t a soupy mess. Cornstarch or tapioca starch work great too (use 1 tbsp instead).
- 1 tablespoon lemon juice: Brightens the flavor and prevents the apples from browning while you work.
- 1 tablespoon butter: For dotting on top of the filling before adding the lid. Adds richness and flavor.
Let’s Build This Beautiful Pie: Step-by-Step
Ready? Here we go. Read through all the steps first, and remember: pastry can sense fear. Be confident! You’ve got this.
Step 1: Make the Pie Dough (The “Cold is Key” Step)
In a large bowl, whisk together the 2 ½ cups of flour, salt, and sugar. Now, add your cold, cubed butter. Using a pastry cutter, two forks, or even your fingertips, work the butter into the flour. You’re aiming for a mix of sizes—some pea-sized pieces, some smaller flakes. This variety is what creates flakiness! Chef’s Hack: If your hands are warm, run them under cold water and dry them first. You can also pulse this mixture in a food processor until it looks crumbly.
Step 2: Bring the Dough Together
Now, drizzle in the ice water, one tablespoon at a time, gently mixing with a fork after each addition. Stop adding water when the dough begins to form clumps that hold together when you pinch them. You might not need all 8 tablespoons! Dump the crumbly mixture onto a clean surface and gently knead it just two or three times until it forms a cohesive ball. Don’t overwork it! Divide the dough into two slightly uneven discs (one for the bottom, one for the top—the bottom disc can be slightly bigger). Wrap them tightly in plastic wrap and chill in the fridge for at least 1 hour. This relaxes the gluten and re-chills the butter, which is critical.
Step 3: Prep the Apple Filling
While the dough chills, let’s make the filling. In a large bowl, toss your thinly sliced apples with the lemon juice. This adds a bright note and keeps them from turning brown. In a small bowl, whisk together the granulated sugar, brown sugar, cinnamon, nutmeg, and flour. Pour this spicy, sugary mixture over the apples and toss everything until every single slice is beautifully coated. Set this aside while you roll out the crust. Letting it sit for 15-20 minutes helps the apples start releasing their juice, which the flour will then absorb.
Step 4: Roll and Line
Preheat your oven to 400°F (200°C). Take your larger disc of dough out of the fridge. On a lightly floured surface, roll it out into a circle about 12 inches in diameter, turning it a quarter turn after each roll to prevent sticking. Don’t worry if it’s not a perfect circle! Gently drape the rolled dough into a 9-inch pie dish. Don’t stretch it to fit—just gently press it into the bottom and sides. Let the edges hang over for now.
Step 5: Fill and Dot
Pour your apple filling into the crust-lined dish, mounding it slightly higher in the center. Those juices that accumulated at the bottom of the bowl? Pour about half of them over the apples—this is flavor! Take that 1 tablespoon of butter and cut it into tiny pieces. Dot them all over the top of the apple filling. This little step adds a glorious richness.
Step 6: Top It Off and Crimp
Roll out your second disc of dough. You can do a full top crust, a lattice weave (so pretty!), or cut out shapes. For a classic pie, place the rolled dough over the filling. Trim the overhang to about 1 inch all around. Tuck the top crust’s edge under the bottom crust’s edge, sealing them together. Now, crimp the edges: use your thumb and forefinger on one hand to push the dough inward, and the index finger on your other hand to create a fluted shape. Finally, cut 4-5 slits in the top crust to allow steam to escape. Chef’s Hack: For a gorgeous golden shine, brush the top crust with a beaten egg mixed with a teaspoon of water (an egg wash) and sprinkle generously with coarse sugar.
Step 7: Bake to Golden Perfection
Place your beautiful pie on a baking sheet (this catches any bubbling-over juices and saves you from oven cleanup!). Bake at 400°F for 20 minutes, then without opening the door, reduce the heat to 375°F (190°C). Continue baking for another 35-45 minutes. The pie is done when the crust is a deep, golden brown and the filling is visibly bubbling through the slits. If the edges of the crust are browning too quickly, tent them with strips of aluminum foil. This is a pie-saver!
Step 8: The Hardest Part: Wait!
I know, I know. It’s torture. But you MUST let the pie cool on a wire rack for at least 3-4 hours. This waiting period allows the filling to set properly. If you cut into it while it’s piping hot, it will be a delicious but soupy mess. Trust me, it’s worth the wait.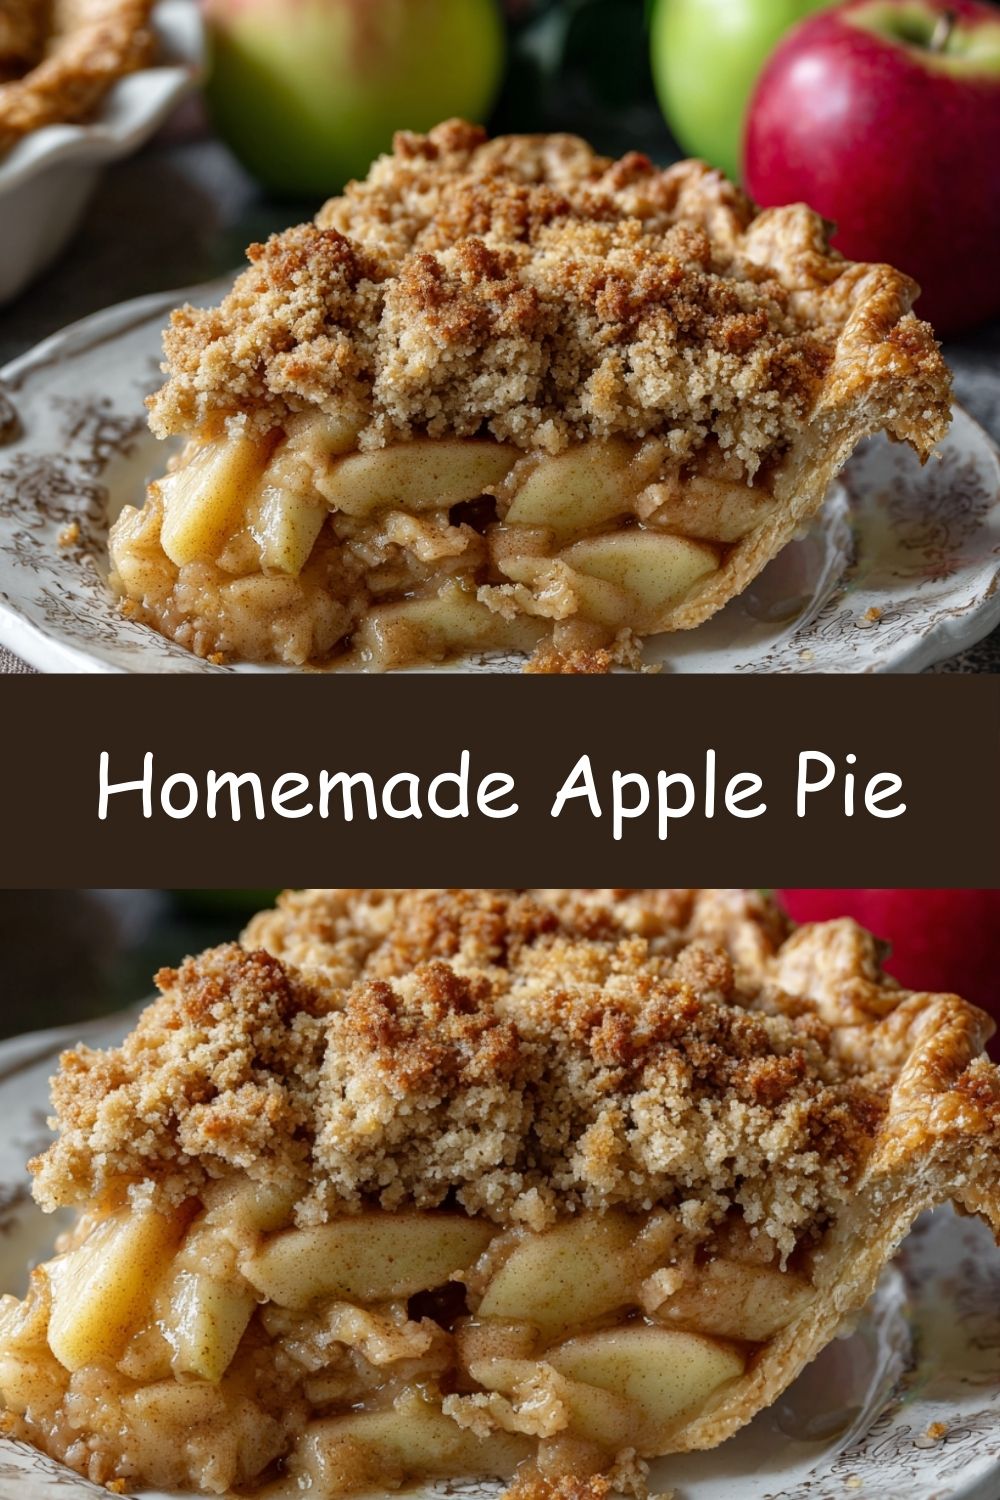
How to Serve Your Masterpiece
Once your pie has cooled and set, it’s showtime! Use a sharp, thin knife for clean slices. This pie is sublime all on its own, but let’s be real, it’s a canvas for delicious companions. A giant scoop of vanilla bean ice cream melting over the warm slice is the classic, and for good reason—that hot/cold contrast is everything. For a simpler approach, a dollop of freshly whipped cream or even a sharp cheddar cheese slice on the side is pure nostalgia. Serve it on a pretty plate and watch everyone’s eyes light up.
Get Creative: Recipe Variations
Once you’ve mastered the classic, try one of these fun twists!
- Salty-Sweet Sensation: Add ½ teaspoon of flaky sea salt to the filling mixture and sprinkle a little on the crust before baking.
- Apple Cranberry: Add ¾ cup of fresh or frozen cranberries to the apple filling for a gorgeous tartness and pop of color.
- Ginger Spice: Add 1 teaspoon of grated fresh ginger or ½ teaspoon of ground ginger to the spice mix for a warm, zesty kick.
- Vegan & Dairy-Free: Use a plant-based butter stick (like Miyoko’s or Earth Balance) for the crust and filling. The results are fantastic!
- Gluten-Free: Swap the all-purpose flour in the crust for a 1:1 gluten-free baking blend and use 1 tablespoon of cornstarch instead of flour in the filling.
Clara’s Chef Notes & Kitchen Confessions
This recipe has evolved so much from my Nana’s original notes. My biggest “aha!” moment was realizing the power of a mixed apple variety. Using just one type never gave me the perfect balance of flavor and texture I craved. I also went through a phase of being terrified of a soggy bottom crust (aren’t we all?). My solution? A hot oven to start, and making sure my filling isn’t too wet before it goes in. Letting the apples macerate with the sugar and then draining off a *little* of the excess liquid is a secret weapon.
And a funny story: I once, in a frantic pre-Thanksgiving haze, accidentally used powdered sugar instead of flour in the filling. The result was a weirdly shiny, cloyingly sweet, liquid mess that we now fondly refer to as “The Great Pie Soup Incident of 2018.” We still ate it with spoons over ice cream, but it was a powerful lesson in always, always labeling your pantry containers!
Apple Pie FAQs: Solving Your Pie Problems
Q: My bottom crust is always soggy! How can I prevent this?
A: This is the #1 question! First, make sure your filling isn’t overly watery. Letting the sugared apples sit and then draining a bit of liquid helps. You can also blind bake the bottom crust for 10-15 minutes before adding the filling. Or, place your pie dish on a preheated baking sheet to give the bottom an instant blast of heat.
Q: Why did my crust shrink down the sides of the pan?
A: This usually happens if the dough was overworked or wasn’t chilled enough. When you roll it out, handle it gently and make sure to let it rest in the fridge. When you place it in the pan, don’t stretch it; just let it settle in naturally.
Q: My filling is watery after baking, even though I waited for it to cool. What happened?
A: This could be a few things: 1) Your thickener (flour) might be old and lost its potency. 2) The pie might have needed a few more minutes in the oven to fully activate the thickener. 3) The apples you used might have been exceptionally juicy. Next time, try tossing the apples with the flour mixture and letting them sit for 10 minutes. Then, drain off any accumulated liquid before piling them into the crust.
Q: Can I make this pie ahead of time?
A: Absolutely! You can make the dough discs up to 3 days ahead and keep them wrapped in the fridge. You can also assemble the entire pie, wrap it tightly, and freeze it unbaked for up to 3 months. Bake directly from frozen, adding about 20-25 minutes to the baking time. A baked pie will keep at room temperature for 2 days or in the fridge for up to 4 days.