
Let’s Make Some Magic: Ice Cream Cake Pops in Mini Cones!
Hey there, my fellow flavor adventurer! Clara here, and I am absolutely buzzing with excitement to share today’s recipe with you. We’re stepping into the world of pure, unadulterated joy with a treat that’s guaranteed to make you feel like a kid in a candy store (literally!). We’re making Ice Cream Cake Pops in Mini Cones!
Now, I know what you might be thinking. “Clara, a recipe blog called ‘Unknown’ and we’re starting with Funfetti?” Absolutely! Because here at Unknown, we believe that nourishing your spirit is just as important as nourishing your body. And sometimes, that means celebrating with a sprinkle-covered, handheld, utterly delightful dessert that looks almost too cute to eat. (Keyword: *almost*.)
These aren’t your average cake pops. We’re taking everything we love about a classic birthday cake—the soft, fluffy crumb, the joyful burst of sprinkles, the sweet vanilla frosting—and serving it up in the most whimsical way possible: perched atop a tiny ice cream cone and dipped in a glossy candy coating. They’re the star of any party platter, the ultimate conversation starter, and a guaranteed smile-maker. So, grab your favorite mixing bowl and let’s cook up a little bit of happy together. This is one kitchen experiment you won’t want to miss!
A Sweet Trip Down Memory Lane
This recipe takes me right back to my seventh birthday party. It was a classic backyard bash, complete with a wobbly piñata and grass stains on my favorite dress. But the crowning glory was the ice cream cake my mom had special-ordered. It had that magical layer of crunchy chocolate fudge in the middle, and I remember thinking it was the most sophisticated, incredible dessert ever created.
Years later, I wanted to capture that same feeling of wonder and celebration, but in a way that was a bit easier to share with a crowd. I started playing with cake pop recipes, and after one particularly messy (but hilarious) attempt involving actual ice cream, the idea for these mini cone versions was born. They’re my nostalgic nod to those childhood summers, a perfect bite-sized package of joy. Every time I make them, I can almost hear the laughter and feel the summer sun from that long-ago birthday. It’s a reminder that food isn’t just fuel; it’s a vessel for our sweetest memories.
Print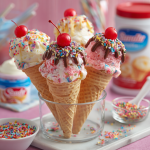
Ice Cream Cake Pops in Mini Cones
- Total Time: ~1 hour 40 minutes
- Yield: 70 mini cone cake pops 1x
Description
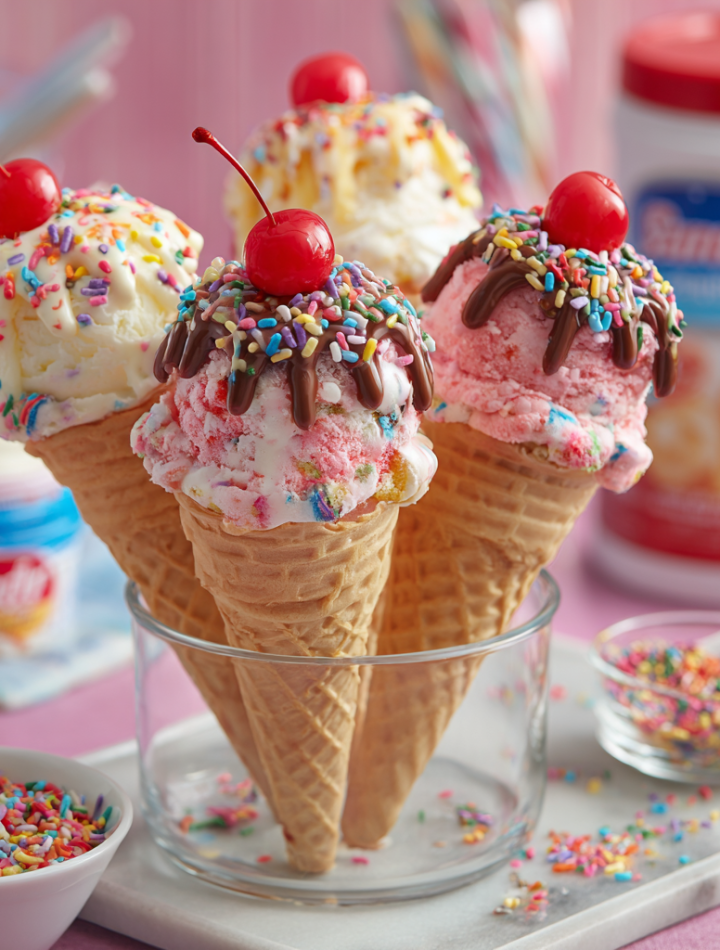
These playful cake pops are shaped like mini ice cream cones and topped with colorful drizzles, sprinkles, and a candy “cherry” on top. Funfetti cake inside and candy-coated on the outside—these are a guaranteed hit for birthdays, baby showers, or festive celebrations.
Ingredients
2 boxes Funfetti cake mix
Eggs, oil, and water (as listed on the box)
1 cup vanilla frosting
70 mini cup cones
24 oz vanilla almond bark (or white chocolate melts)
⅔ cup chocolate melting wafers
⅔ cup pink (or other colored) melting wafers
70 large round red or pink sprinkles (for the cherry on top)
Rainbow sprinkles for decorating
Optional Flavor Twists:
Swap vanilla frosting for cream cheese or chocolate frosting
Add 1 tsp almond extract or lemon zest to cake batter
Use red velvet, chocolate, or lemon cake mix for variety
Mix in crushed cookies or freeze-dried strawberries into the cake mixture before rolling
Dip in colored candy melts to match party themes (pastels for baby showers, bold
Instructions
Bake both cakes according to package instructions. Let cool completely.
Crumble cake into a large bowl. Add frosting and mix until dough-like.
Roll into 70 evenly-sized balls (about 1 inch each).
Press each cake ball gently onto a mini cone and set aside.
Melt almond bark in a microwave-safe bowl. Dip each cake ball to coat, letting excess drip off.
Immediately drizzle with melted chocolate or pink wafers, then top with a large round sprinkle “cherry” and rainbow sprinkles.
Chill in the fridge for 30–45 minutes to set.
- Prep Time: 30 minutes
- Cook Time: 25 minutes
- Category: Dessert
Nutrition
- Calories: 140
- Sugar: 12g
- Fat: 6g
- Carbohydrates: 20g
Gathering Your Cake Pop Arsenal
Here’s everything you’ll need to create these miniature masterpieces. Don’t be intimidated by the list—a lot of these are pantry staples or easy finds at any grocery store!
- 2 boxes Funfetti cake mix: The heart and soul of our pops! That confetti-speckled interior is pure magic. Chef’s Insight: The boxed mix gives a consistent, fluffy texture that’s perfect for crumbling and binding. For a from-scratch option, use your favorite vanilla cake recipe and stir in ¼ cup of rainbow jimmies.
- Eggs, oil, and water: As listed on the cake mix box. This is our easy button!
- 1 cup vanilla frosting: This is our “glue” that binds the cake crumbs into a pliable dough. Substitution Tip: Feel free to swap this with cream cheese frosting for a tangy twist, or chocolate frosting for a cookies-and-cream vibe. You can even use a homemade buttercream!
- 70 mini ice cream cones: Look for the “pointed” or “cup” style mini cones in the ice cream aisle. They’re the adorable little vessels that make this treat so special.
- 24 oz vanilla almond bark (or white candy melts): This is going to be our smooth, creamy coating. Chef’s Insight: I highly recommend almond bark (also called confectionery coating) for beginners. It melts like a dream, sets firmly, and is much more forgiving than real chocolate, which can temper poorly and leave you with streaks.
- ⅔ cup chocolate melting wafers & ⅔ cup pink melting wafers: For our gorgeous drizzles! You can use any colors you like to match your party theme.
- 70 large round red or pink sprinkles: This is our faux “cherry” on top! The bigger, the better for that classic ice cream sundae look.
- Rainbow sprinkles for decorating: Because more sprinkles are always the answer. Use jimmies or nonpareils—or both! Go wild!
The Fun Part: Let’s Build Our Cake Pops!
Okay, team! Let’s roll up our sleeves and create some magic. This process is so much fun, especially if you enlist a few helpers. Pro tip: put on some good music and maybe sneak a few cake crumbs along the way—I won’t tell!
- Bake the Cakes: Prepare both boxes of cake mix according to their package directions, baking them in their designated pans. Let them cool completely—and I mean completely. This is non-negotiable! If you try to crumble warm cake, you’ll end up with a gummy, greasy mess. I usually bake the cakes the night before and let them cool on the counter overnight. Little Chef Hack: To speed up the cooling process, you can break the cakes into chunks and spread them out on a baking sheet. They’ll cool down in a fraction of the time!
- Create the Cake “Dough”: Once the cakes are totally cool, crumble them into a large bowl. You want fine, even crumbs with no big lumps. Now, add your 1 cup of frosting. Use your hands (yes, get in there!) or a stand mixer with a paddle attachment to mix it until it’s fully combined and has the consistency of a soft, pliable dough. You should be able to roll a ball that holds its shape without feeling too sticky. Pro Tip: Start with ¾ cup of frosting and add more only if needed. You can always add more, but you can’t take it out!
- Roll and Conquer: Time to portion! Using a small cookie scoop or a teaspoon, portion out the cake mixture and roll it into smooth, tightly packed 1-inch balls. You’re aiming for 70 balls. Lining them up on a parchment- or wax paper-lined baking sheet keeps everything organized.
- The Big Assembly: Take a mini cone and gently press a cake ball onto the top. You don’t need to shove it on there—just a light press is enough to make it adhere. The coating in the next step will lock it all in place. Repeat until every single cone has a cute little cake ball hat.
- The Dip of Destiny: This is the messy-but-fun part! Melt your vanilla almond bark according to the package instructions, usually in 30-second bursts in the microwave, stirring in between until perfectly smooth. Holding a cone by the… well, cone… carefully dip the cake ball into the melted coating. Swirl it gently to cover completely, then lift it out and let the excess coating drip off. Little Chef Hack: To get a super smooth drip-free finish, gently tap your wrist while holding the pop over the bowl. Don’t stir it or you might lose the ball off the cone!
- Decorate Immediately! Working quickly before the coating sets, place your dipped pop back on the parchment paper (it will stand up on its own!) and get decorating. Drizzle with your melted pink and chocolate wafers, add your “cherry” sprinkle, and shower it with rainbow sprinkles. The world is your oyster!
- The Final Chill: Once all your pops are decorated, carefully transfer the baking sheet to the refrigerator for 30-45 minutes. This allows the candy coating to set completely, becoming firm and giving you that satisfying *snap* when you bite into it.
How to Serve These Showstoppers
Presentation is everything with these little guys! For a party, I love to stand them upright in a styrofoam block or a box I’ve poked holes into. It creates a dazzling “field” of ice cream cones that will have your guests gasping with delight. For a more rustic look, simply lay them on their sides on a beautiful platter. They’re perfectly portable, so no plates or forks are needed—just happy hands and even happier faces.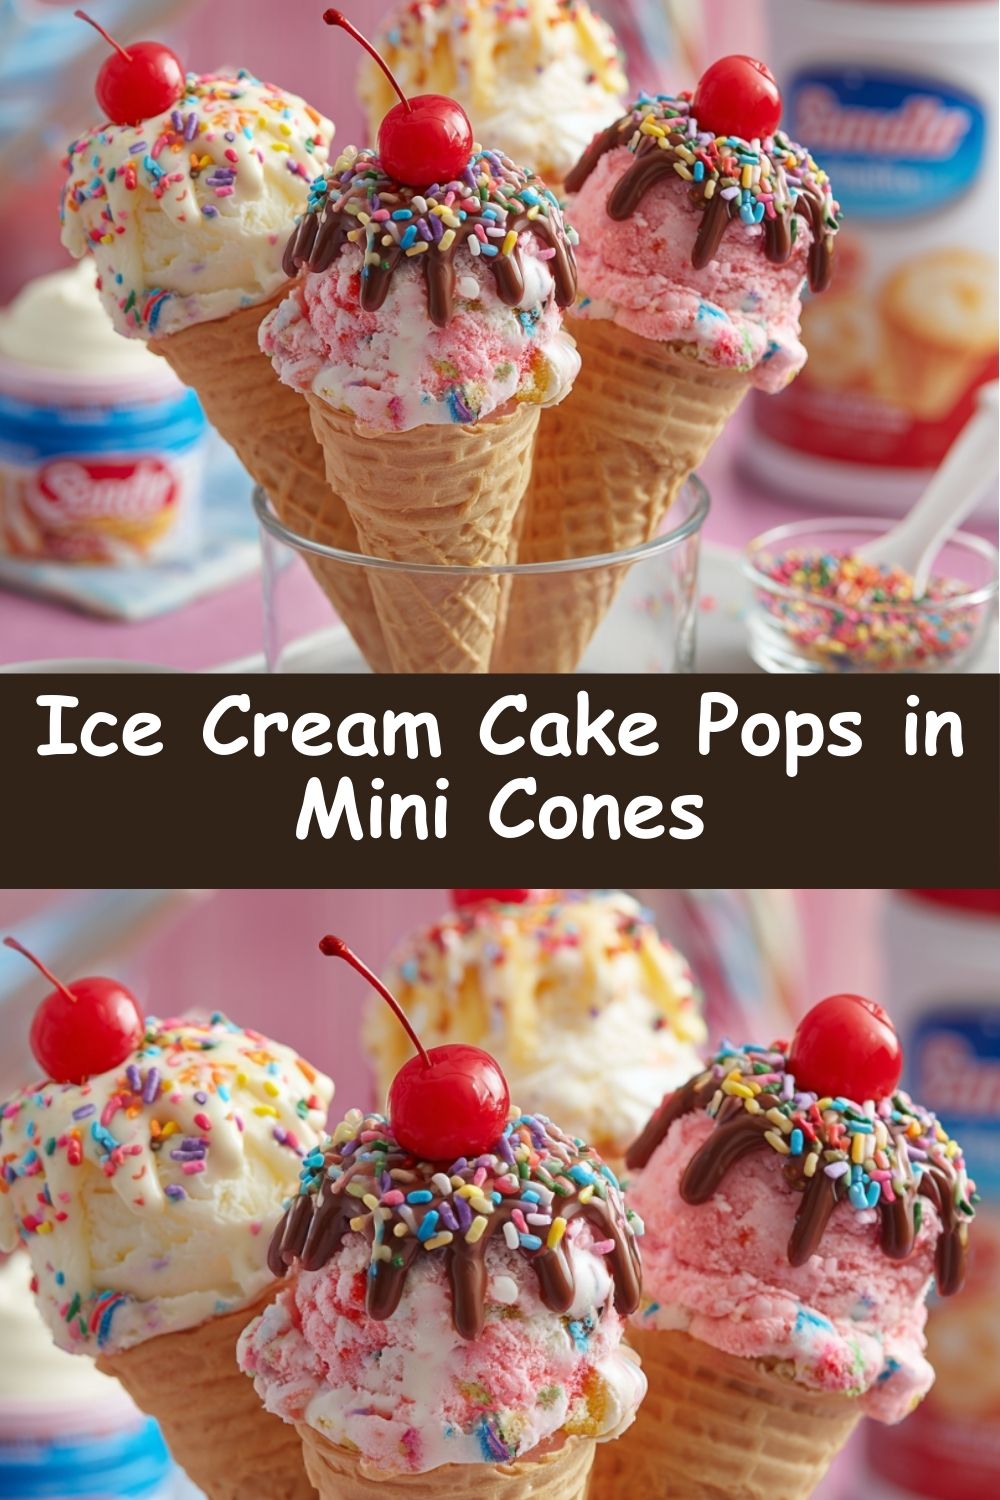
Mix It Up! Endless Flavor Possibilities
The beauty of this recipe is its versatility. Don’t be afraid to play and make it your own!
- Chocolate Lover’s Dream: Use chocolate cake mix, chocolate frosting, and dip in dark chocolate coating. Drizzle with white chocolate and crushed Oreos.
- Berry Blast: Use lemon or vanilla cake mix, stir in ½ cup of freeze-dried strawberry powder, and use cream cheese frosting. Dip in pink candy melts and top with a freeze-dried strawberry piece.
- Cookies & Cream: Use chocolate cake mix, mix in ½ cup of crushed Oreo pieces, and use vanilla frosting. Dip in white chocolate and roll in more Oreo crumbs before it sets.
- Tropical Escape: Add 1 teaspoon of coconut extract to a vanilla cake mix. Dip in white chocolate and sprinkle with toasted coconut flakes and a dried pineapple piece for the “cherry.”
Clara’s Chef Notes & Kitchen Confessions
Oh, friends. The first time I tried to make these, it was a comedy of errors. I didn’t let the cake cool enough, so my “dough” was a sticky nightmare. I over-microwaved my first batch of almond bark into a chalky, un-dippable mess. And I may have accidentally glued a cake pop to the kitchen counter. The learning curve is real, but so worth it!
Over time, I’ve learned a few secrets. If your cake mixture is too sticky, pop it in the fridge for 20 minutes. If your coating is too thick, a tiny, *tiny* bit of coconut oil can help thin it out. And most importantly, embrace the imperfections! Not every pop will be a perfect sphere, and that’s okay. They are made with joy, and that’s the most important ingredient of all.
Your Cake Pop Questions, Answered!
Q: My cake balls keep falling off the cones! What am I doing wrong?
A: The most common culprit is a cake mixture that’s too wet from too much frosting. Next time, use a bit less. For this batch, after you dip the pop, hold it upside down for a few extra seconds to let the coating seal the ball to the cone before you set it right-side-up to dry. That coating acts as a powerful glue!
Q: Why is my candy coating clumpy and hard to work with?
A: You likely overheated it! Almond bark and candy melts are delicate. Always melt in short bursts and stir vigorously in between. If it’s already seized up (turned clumpy), it’s sadly very difficult to save. It’s better to start with a new batch. Remember, low and slow is the way to go!
Q: Can I make these ahead of time?
A: You absolutely can! Once fully set, these cake pops store beautifully. Keep them in a single layer in an airtight container in the refrigerator for up to a week, or you can even freeze them for up to a month. Just let them come to room temperature for about 15 minutes before serving for the best texture.
Q: Help! My hands are a mess from rolling the balls. Any tips?
A: Welcome to the club! This is a notoriously messy job. I like to keep a slightly damp paper towel nearby to wipe my hands between every few rolls. You can also lightly grease your palms with a neutral oil or butter to prevent sticking.
Nutritional Information*
*Please note: This is a celebratory treat! The info below is a rough estimate per cake pop cone based on the specific ingredients used.
- Calories: 140
- Fat: 6g
- Carbohydrates: 20g
- Sugar: 12g
- Protein: 1g
Prep Time: 30 minutes | Bake Time: 25 minutes | Chill Time: 45 minutes | Total Time: ~1 hour 40 minutes | Yield: 70 mini cone cake pops
There you have it! My ultimate guide to creating pure, sprinkle-filled joy. I hope you have the best time making these and an even better time sharing them.