
Forget Sad Snacks: Meet Your New Favorite Bite-Sized Obsession
Hey there, my fellow flavor adventurer! Let’s be real for a second. How many times have you stood in front of the fridge, door swung wide open, hoping a magical, delicious, and *actually good-for-you* snack will suddenly materialize? You’re craving something savory, something with a little protein punch, something that feels a tiny bit indulgent but won’t leave you in a mid-afternoon slump. I’ve been there more times than I can count, my friend.
That’s exactly why I’m so ridiculously excited to share this recipe with you today. We’re talking about Turkey Sausage & Cheddar Biscuit Bites. Now, if you’re from the South or have ever been to a potluck, you might be flashing back to those classic, incredibly addictive sausage balls. You know the ones—they’re usually the first platter to be completely wiped clean. I have a deep, abiding love for those little guys, but I wanted to create a version that felt a bit lighter, a bit leaner, but without sacrificing an ounce of that cheesy, fluffy, savory magic.
And the best part? We’re doing it with just three simple ingredients. Yes, you read that right. THREE. This recipe is the ultimate proof that you don’t need a pantry overflowing with obscure ingredients to create something truly spectacular. It’s the kind of easy, breezy, “why-didn’t-I-think-of-that” recipe that will become a permanent fixture in your cooking repertoire. They’re perfect for meal prep, a lifesaver for busy mornings, and the undisputed star of any game day spread or party platter. So, tie on your apron, and let’s cook up some joy!
Print
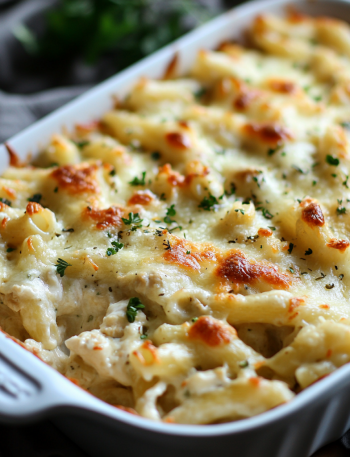
Turkey Sausage & Cheddar Biscuit Bites
- Total Time: 35 mins
Description
A lighter take on the classic sausage ball, these turkey sausage bites are still loaded with cheesy goodness and fluffy biscuit texture. With just three simple ingredients, they’re the perfect quick-fix for breakfast, parties, or protein-packed snacking—easy to prep, easier to devour.
Ingredients
1 lb ground turkey sausage, room temperature
2 cups biscuit baking mix (like Bisquick)
12 oz sharp cheddar cheese, shredded
Instructions
Preheat oven to 350°F (175°C). Line a baking sheet with parchment paper.
Mix all ingredients in a large bowl until fully combined. You may need to work it with your hands or a mixer.
Roll into 1-inch balls and arrange on the baking sheet.
Bake for 20–25 minutes, or until golden brown and cooked through.
Cool slightly before serving. Great warm or at room temp!
- Prep Time: 10 mins
- Cook Time: 25 mins
- Category: Snack
Nutrition
- Calories: 105
- Carbohydrates: 4g
- Protein: 7g
A Ball of Nostalgia (With a Lighter Twist)
My love affair with sausage balls started not in a fancy kitchen, but in my Nana’s warm, always-smelling-like-butter house every Christmas morning. It was a sacred tradition. While my brother and I were distracted by presents under the tree, the real magic was happening in the kitchen. My dad would be manning the electric griddle for pancakes, and my Nana would be pulling tray after tray of golden-brown, peppery sausage balls from the oven. The smell of baking cheddar and savory sausage is, for me, the absolute scent of holiday cheer. We’d pop them straight from the baking sheet, burning our fingers and not caring one bit.
When I started my own health journey, I knew I couldn’t just abandon these beloved bites. They were woven into too many happy memories! So, I began tinkering. I tried with different lean meats, different cheeses, even making my own baking mix from scratch. After many (many) batches—some triumphs, some downright hockey pucks—I landed on this perfect trio. Swapping in lean turkey sausage keeps them incredibly moist and flavorful without the grease, and that sharp cheddar? It still gives you that classic, nostalgic flavor we all crave. It’s my little way of keeping Nana’s tradition alive, but making it work for the life I live now. It’s a hug from the past, with a healthy, high-five for the present.
Gathering Your Flavor All-Stars
Okay, let’s get down to the brass tacks. Or should I say, the *baking* tacks? Here’s your super simple shopping list. The beauty of this recipe is in its simplicity, but a few little chef insights can make all the difference!
- 1 lb Ground Turkey Sausage, room temperature – This is our MVP! Using sausage that’s already seasoned with sage, fennel, or a little heat is the secret flavor bomb. Chef’s Insight: Bringing the sausage to room temperature is NOT a skip-able step! Cold sausage is stiff and much harder to mix evenly with the other ingredients, which can lead to overmixing and tough bites. Let it sit on the counter for 20-30 minutes before you start. Substitution Tip: Feel free to use chicken sausage, pork sausage, or even a plant-based ground “sausage” if that’s your jam!
- 2 cups Biscuit Baking Mix (like Bisquick) – This is the magical shortcut that gives our bites that perfect, fluffy biscuit texture. It’s pre-mixed with the leavening agents and flour, so we don’t have to worry about it. Chef’s Insight: I always fluff the mix in the box with a fork before measuring, then spoon it lightly into my measuring cup and level it off. No packing it down! This ensures you don’t use too much and end up with dry bites. Substitution Tip: For a gluten-free version, your favorite gluten-free baking mix works like a charm.
- 12 oz Sharp Cheddar Cheese, shredded – The glue that holds our happy little universe together! Sharp cheddar brings a bold, tangy flavor that stands up to the savory sausage. Chef’s Insight: I cannot stress this enough—BUY A BLOCK OF CHEESE AND SHRED IT YOURSELF. The pre-shredded stuff is coated in anti-caking agents like potato starch or cellulose, which can prevent it from melting as smoothly and can make your mixture a bit gummy. Taking the two extra minutes to shred your own cheese is a total game-changer for texture and meltiness.
Let’s Get Rolling: Your Foolproof Guide to Perfect Bites
Ready to see some magic happen? This process is so simple and satisfying. I love getting my hands in there—it’s like being a kid playing with play-dough, but you get to eat the delicious results!
- Preheat & Prep: First things first, get that oven preheating to a cozy 350°F (175°C). This is the perfect temperature to cook our bites through without burning the outside. While it’s warming up, line a standard baking sheet with parchment paper. Chef’s Hack: The parchment paper is your best friend here. It prevents sticking *and* makes cleanup an absolute dream. No scrubbing pans for us!
- The Big Mix: In a large mixing bowl, combine your room-temperature turkey sausage, the biscuit baking mix, and that gorgeous pile of freshly shredded cheddar cheese. Now, you can start with a sturdy spatula or a wooden spoon, but I’m a hands-on kind of cook. I find the best way to get this perfectly combined is to just dive in with clean hands! Squish, fold, and mix until everything is evenly incorporated and no dry patches of baking mix remain. Little Chef Tip: If the mixture feels a little too sticky to handle, you can pop the whole bowl in the fridge for 15-20 minutes. This firms up the fats and makes rolling a breeze.
- Roll Call! Now for the fun, meditative part. Pinch off small amounts of the mixture and roll them into 1-inch balls. You want them to be about the size of a walnut. I use a small cookie scoop (about 1 tablespoon size) to keep them uniform, which helps them bake evenly. Place them about an inch apart on your parchment-lined baking sheet. They don’t spread a ton, but they do need a little room for hot air to circulate. Chef’s Insight: If you want a slightly crispier exterior on all sides, you can use a mini muffin tin! Just press a ball of the mixture into each greased cup. They come out with adorable little “muffin top” edges.
- Bake to Golden Perfection: Slide that beautiful tray into your preheated oven and bake for 20-25 minutes. You’re looking for a lovely golden brown color on the outside and for them to be cooked all the way through. Little Chef Tip: Ovens can be sneaky and have hot spots! I like to rotate my baking sheet halfway through the baking time to ensure an even, all-over tan. The smell in your kitchen at this point will be absolutely intoxicating.
- The (Brief) Cool Down: Once they’re beautifully golden, pull them out of the oven and let them cool on the baking sheet for at least 5-10 minutes. I know, the temptation is real to eat one immediately, but trust me—this rest time allows the cheese to set a bit so they don’t fall apart when you pick them up. They are fantastic served warm, but honestly, they’re just as delicious at room temperature, which makes them ideal for parties and packed lunches.
How to Serve Up These Savory Gems
Presentation is part of the fun! For a casual family snack, I just pile them high in a rustic wooden bowl and let everyone dig in. If I’m feeling a bit fancier for a party, I’ll arrange them on a beautiful platter with a small bowl of dipping sauce in the center. My go-to is a simple honey mustard (just mix equal parts Dijon mustard and honey) or a quick spicy ranch. They also look adorable speared with little decorative cocktail picks. For a full breakfast or brunch spread, pair them with a bright fruit salad, some scrambled eggs, and a pot of strong coffee. Pure bliss!
Mix It Up! 5 Fun Flavor Twists
Once you’ve mastered the classic, the flavor playground is wide open! Here are a few of my favorite ways to mix things up:
- Spicy Southwest: Use a spicy turkey sausage and swap half the cheddar for a pepper jack cheese. Add in 1/2 teaspoon of cumin and a tablespoon of finely chopped cilantro.
- Everything Bagel Bliss: Before baking, brush the tops of the balls lightly with a beaten egg white and sprinkle generously with everything bagel seasoning. It adds the most incredible crunch and flavor.
- Apple & Sage: Use a mild turkey sausage and fold in 1/2 cup of very finely diced apple (like a Granny Smith) and an extra 1/2 teaspoon of dried sage.
- Pizza Party: Swap the cheddar for a low-moisture, shredded mozzarella and add in 1/4 cup of finely chopped pepperoni and a teaspoon of Italian seasoning. Serve with marinara for dipping!
- Dairy-Free Delight: Use your favorite plant-based sausage and a good melting vegan cheddar shreds. It works like a dream!

More Kitchen Chatter & Pro-Tips
This recipe has become such a staple in my life that I’ve learned all its little quirks. I remember one time I was in a huge rush and used ice-cold sausage straight from the fridge. Let me tell you, my arm got a workout trying to mix it, and the texture was definitely not as tender. Lesson learned—patience is a kitchen virtue!
Another fun evolution? The great “make-ahead” test. I can now confirm with 100% certainty that you can assemble the entire batch, roll the balls, and freeze them raw on a baking sheet. Once they’re solid, toss them into a freezer bag. When a snack emergency strikes, you can bake them straight from frozen, just adding 5-10 extra minutes to the baking time. It’s the ultimate “future you” thank-you note.
Most importantly, have fun with it! Cooking should be a joy, not a stress. If your balls aren’t perfectly round, who cares? They’ll taste just as amazing. This is about nourishing your body and soul with food that makes you feel fantastic.
Your Questions, Answered!
Over the years, I’ve gotten a lot of brilliant questions about this recipe. Here are the answers to the most common ones!
Q: My mixture is really sticky and hard to roll. What did I do wrong?
A: Don’t panic! This usually happens for one of two reasons: 1) The sausage was too warm or 2) The cheese was extra oily. The easy fix is to just pop the whole bowl into the refrigerator for 15-30 minutes. This will firm up the fats and make the dough much easier to handle. You can also lightly dampen your hands with water or oil to prevent sticking while you roll.
Q: Can I make these ahead of time and reheat them?
A: Absolutely! They reheat like a dream. For the best texture, I recommend reheating them in an air fryer or a conventional oven at 350°F for 5-8 minutes until they’re warm and crisp again. The microwave works in a pinch, but it will make them a bit softer.
Q: My biscuit bites turned out a bit dry. How can I prevent that?
A: Great question! Dryness is usually a result of over-baking or over-measuring the baking mix. Make sure you’re using the “spoon and level” method for your baking mix—don’t scoop it directly from the bag with the measuring cup, as it packs it down. Also, all ovens vary, so start checking at the 18-minute mark. They are done as soon as they’re golden and firm to the touch.
Q: Are these freezer-friendly?
A> They are the KINGS of the freezer! You have two options: 1) Freeze the baked and cooled bites in a single layer on a tray before transferring to a bag. Reheat from frozen. Or 2) (My preferred method) Freeze the *unbaked* balls on a tray, then bag them up. You can bake them directly from frozen, adding 5-10 minutes to the bake time. So convenient!
Nourish Your Glow
While I’m all about the joy of eating first and foremost, I know it’s helpful to have a nutritional snapshot. This is an estimate based on a batch of 30 bites. Remember, these are a fantastic source of protein to keep you satisfied and energized!
Nutrition (per serving, est.): Calories: 105 | Protein: 7g | Carbs: 4g | Fat: 7g