
The Ultimate Christmas Bark: Your New Favorite No-Bake Holiday Tradition
Hey friends! Clara here. Can you smell it? That magical blend of pine needles, cinnamon sticks, and… is that a hint of melted chocolate wafting from the kitchen? It’s officially the holiday season, and my heart is doing a happy little dance. While I’m all for a day spent crafting intricate layer cakes and perfectly iced cookies, let’s be real: sometimes, you need a show-stopping treat that doesn’t require a physics degree or the patience of a saint.
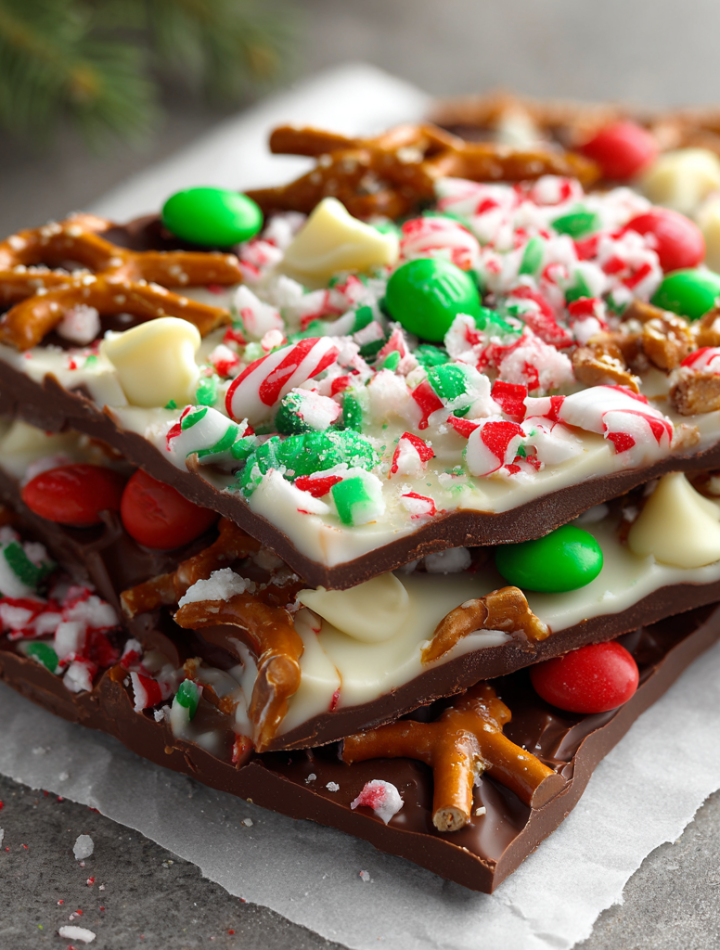
That’s where this glorious, foolproof, and absolutely stunning Ultimate Christmas Bark swoops in to save the day. Imagine this: a rich, dark chocolate base, swirled with creamy white chocolate, and then loaded up with a confetti of crunchy pretzels, minty candy canes, cheerful M&M’s, and those irresistible holiday sprinkles. It’s sweet, it’s salty, it’s crunchy, and it’s so ridiculously easy to make, you’ll want to whip up batch after batch for gifting, parties, or… you know… a little secret stash for yourself. I won’t tell.
This isn’t just a recipe; it’s a holiday activity. It’s the perfect project to do with kids, a fun thing to make with friends over a cup of hot cocoa, or a lifesaver for when you remember you need a hostess gift in exactly one hour. So, tie on your favorite apron, put on some festive tunes, and let’s create some edible magic that’s guaranteed to make your eyes light up.
Print
Ultimate Christmas Bark
- Total Time: ~1 hour 10 minutes
- Yield: 20–24 pieces 1x
Description
Christmas Bark is the ultimate no-bake holiday treat—festive, colorful, and endlessly customizable. With layers of smooth chocolate, crunchy add-ins, and cheerful toppings, this sweet treat doubles as both dessert and a gift. It’s quick to make, fun to decorate, and guaranteed to spread Christmas cheer.
Ingredients
16 oz semi-sweet or dark chocolate, chopped (or chips)
8 oz white chocolate, chopped (or chips)
½ cup pretzels, broken into pieces
½ cup mini candy canes, crushed
½ cup red & green M&M’s
¼ cup holiday sprinkles
Optional: dried cranberries or pistachios for extra color and flavor
Instructions
Line a baking sheet with parchment paper.
Melt semi-sweet chocolate in the microwave or double boiler until smooth. Spread evenly over the prepared sheet. Chill for 10 minutes to set slightly.
Melt white chocolate and drizzle or spread over the dark chocolate layer. Use a toothpick to swirl for a marbled look if desired.
Quickly top with pretzel pieces, crushed candy canes, M&M’s, sprinkles, and any other toppings you love.
Gently press toppings into the chocolate so they stick.
Refrigerate for at least 1 hour, or until completely firm.
Break into rustic pieces and store in an airtight container.
- Prep Time: 10 min
- Category: Dessert
Nutrition
- Calories: 160
- Sugar: 15g
- Fat: 9g
- Carbohydrates: 18g
A Messy Kitchen & The Birth of a Tradition
This recipe takes me right back to my first apartment holiday party. I was determined to impress my new friends with a sprawling dessert table, but I’d seriously overestimated my energy levels after a full week of work. The ambitious gingerbread house was lopsided, the sugar cookies were… well, let’s call them “abstract art,” and I was on the verge of a pre-party meltdown.
In a moment of desperation, I stared into my nearly bare pantry. A bag of chocolate chips, some leftover pretzels from Thanksgiving, and a handful of candy canes from the tree stared back. With nothing left to lose, I melted, spread, sprinkled, and chilled. In under an hour, I had this rustic, beautiful, broken-up chocolate slab. I placed it on a platter, fully expecting it to be the ignored cousin of the dessert spread.
To my utter shock, it was the first thing to disappear. People were raving about the sweet-and-salty combo, the festive colors, and how fun it was to break off a piece. That messy, thrown-together bark taught me one of my biggest cooking philosophies: the best recipes often come from a place of joyful improvisation, not perfection. Now, making this bark is my official kick-off to the holiday season—a delicious reminder to keep it simple and have fun.
Gather Your Festive Ingredients
Here’s the beautiful part: this recipe is more of a guideline than a rigid rule. Feel free to raid your pantry and get creative! Here’s what I’m using for my ultimate version, with a few chef-y insights to help you along the way.
- 16 oz Semi-Sweet or Dark Chocolate, chopped (or chips): This is our flavor foundation. I love the deep, rich bitterness of dark chocolate (around 60-70% cacao) because it balances the sweetness of the toppings perfectly. Chef’s Tip: Using a high-quality chocolate bar you’d enjoy eating on its own will make a world of difference in the final taste. But if you’re in a pinch, good old chocolate chips work just fine!
- 8 oz White Chocolate, chopped (or chips): This creates that gorgeous marbled effect and adds a creamy sweetness. Substitution Tip: White chocolate can be a bit tricky to melt. If you’re nervous, look for vanilla almond bark or candy melts, which are formulated to melt smoothly and set firmly.
- ½ cup Pretzels, broken into pieces: The salty crunch is the secret weapon! It cuts through the sweetness and adds a fantastic texture. Chef’s Insight: I like using the mini twist pretzels and giving them a rough chop for a variety of sizes.
- ½ cup Mini Candy Canes, crushed: This is where that classic Christmas peppermint flavor comes in! Quick Hack: Unwrap the candy canes, place them in a zip-top bag, and use a rolling pin to crush them. So therapeutic!
- ½ cup Red & Green M&M’s: Pure holiday cheer in candy-coated form. They add a wonderful crunch and vibrant color.
- ¼ cup Holiday Sprinkles: Go for the jimmies or nonpareils! These are the final touch of magic. Pro Tip: If you can find them, “quins” (the little disc-shaped sprinkles) hold their shape beautifully and look extra special.
- Optional: ¼ cup Dried Cranberries or Pistachios: I love adding these for a pop of tartness (cranberries) or a sophisticated, nutty flavor (pistachios). They make the bark feel a bit more grown-up and add another layer of texture.
Let’s Make Some Magic: Step-by-Step Instructions
Ready? This is where the fun begins. I’ll walk you through every step, complete with my favorite kitchen hacks to ensure your bark is absolutely perfect.
- Prep Your Pan. First things first, line a standard baking sheet (a half-sheet pan, about 13×18 inches) with parchment paper. Smooth it out as best you can—this will be the back of your bark, so a smooth surface is nice! Little Chef Hack: If your parchment is being rebellious, use a tiny dab of the melted chocolate to “glue” the corners of the parchment to the pan. It works like a charm!
- Melt the Dark Chocolate. You can use a double boiler (a heatproof bowl set over a pot of simmering water, making sure the bottom of the bowl doesn’t touch the water) or the microwave. For the microwave, place the chocolate in a microwave-safe bowl and heat in 30-second bursts, stirring vigorously after each interval, until it’s almost completely melted. The residual heat will melt the last few lumps. Crucial Tip: Do NOT overheat the chocolate! If it gets too hot, it can “seize” and become grainy. If this happens, stir in a teaspoon of neutral oil (like coconut or vegetable) to bring it back.
- Create the Base Layer. Pour the beautifully melted dark chocolate onto your prepared parchment paper. Use an offset spatula or the back of a spoon to spread it into an even layer, about ¼ inch thick. It doesn’t have to be a perfect rectangle—rustic is the goal here! Once spread, gently tap the pan on the counter a few times to release any air bubbles. Pop the entire pan into the refrigerator for about 10 minutes. This allows the base to set just enough so that when we add the white chocolate, they won’t completely blend together.
- Melt the White Chocolate. While the dark layer is chilling, melt your white chocolate using the same gentle method. Heads up: White chocolate is even more sensitive to heat than dark chocolate, so be extra careful. It has a tendency to burn easily.
- Swirl and Decorate! Now for the artistic part! Take the pan out of the fridge. You can drizzle the white chocolate over the dark layer in zig-zags, or you can plop spoonfuls all over and then gently spread it. Then, take a toothpick or a butter knife and gently drag it through the two chocolates to create beautiful marbled swirls. Work relatively quickly here! This is the time to get all your toppings ready to go.
- The Topping Extravaganza. Immediately after swirling, start scattering your toppings. I like to start with the bigger items (pretzels, M&M’s) and then follow with the smaller bits (crushed candy canes, sprinkles). Don’t be shy—pile it on! The goal is full coverage.
- Press and Set. Once all your toppings are on, gently press them down into the soft chocolate with the palm of your hand or the back of a clean spoon. This ensures they’ll stick once the bark is fully set. Now, transfer the pan back to the refrigerator for at least 1 hour, or until the chocolate is completely firm and snaps when you break it.
- Break and Enjoy! The most satisfying step! Remove the bark from the pan by lifting the parchment paper. Place the giant slab on a cutting board and use your hands to break it into rustic, uneven pieces. Alternatively, you can use a knife to cut cleaner shapes. It’s your masterpiece—you choose!

How to Serve Your Gorgeous Christmas Bark
Presentation is part of the fun! Pile the broken pieces high on a beautiful wooden board or a festive platter for a casual, shareable dessert at a party. For gifting, layer pieces between sheets of parchment paper in a cellophane bag tied with a ribbon, or stack them in a decorative tin. It makes for such a thoughtful, handmade gift that everyone adores. Honestly, just having it in a bowl on your kitchen counter is a perfect way to bring a little joy to your day.
Get Creative: 5 Fun Recipe Variations
The beauty of bark is its versatility. Once you master the basic method, the flavor combinations are endless! Here are a few of my favorite twists:
- The Nutty Reindeer: Use milk chocolate as the base, and top with roasted almonds, pecans, and a sprinkle of sea salt. So simple, so good.
- Peppermint Patty Bark: For the mint chocolate lovers! Use dark chocolate for the base and mix a ¼ teaspoon of peppermint extract into the white chocolate before swirling. Top with extra crushed candy canes.
- Cookie Lover’s Bark: Swap the pretzels for crushed peppermint Oreos or holiday-themed sugar cookies. Use the leftover filling from the Oreos to stir into the white chocolate for a cookies-and-cream vibe!
- Superfood Bark (My Healthy-ish Twist!): Use a high-quality dark chocolate base and top with goji berries, chopped pistachios, pumpkin seeds, and a delicate sprinkle of flaky sea salt. It feels indulgent but is packed with good-for-you ingredients.
- S’mores Bark: A year-round favorite! Use milk chocolate, and top with crushed graham crackers and mini marshmallows. You can even lightly toast the marshmallows with a kitchen torch before breaking the bark for that authentic campfire flavor.
Clara’s Chef Notes & Kitchen Confessions
This recipe has evolved so much since that first panicked batch! I’ve learned that the quality of chocolate is the single most important factor. I’ve also embraced the “messy is beautiful” aesthetic—the more haphazard the breaking, the more charming it looks. One year, I got a little too enthusiastic with the candy cane crushing and ended up with peppermint dust all over my kitchen floor. My dog thought it was a fantastic surprise, and let’s just say he had very minty-fresh breath for days.
Another fun evolution? I now love adding a tiny pinch of flaky sea salt over the chocolate right before adding the other toppings. It just makes all the flavors pop. Don’t be afraid to make this recipe your own. That’s the whole point of cooking—it’s an adventure!
Your Christmas Bark Questions, Answered!
Let’s tackle a few common questions to make sure your bark-making is smooth sailing.
Q: My chocolate got thick and grainy when I melted it. What happened, and can I fix it?
A: Ah, you’ve encountered “seized” chocolate! This happens when a tiny bit of moisture (even steam!) gets into the chocolate. To rescue it, try stirring in a small amount of a neutral fat—about a teaspoon of vegetable oil, coconut oil, or even shortening. Stir continuously until it becomes smooth again. It might not be perfect for delicate tempering, but it will work just fine for bark!
Q: Can I make this bark ahead of time?
A: Absolutely! That’s one of its best features. Once broken, store it in an airtight container in the refrigerator for up to 2 weeks, or in the freezer for up to 2 months. It’s the perfect make-ahead treat for the busy holiday season.
Q: My toppings won’t stick! What did I do wrong?
A: This usually means you waited too long to add the toppings after spreading the chocolate. The chocolate starts to set quickly, especially if your kitchen is cool. The key is to have all your toppings pre-measured and ready in little bowls before you even start melting the chocolate. As soon as you finish the white chocolate swirl, it’s go-time for the toppings!
Q: Is there a way to make this dairy-free or vegan?
A> Yes, easily! Look for high-quality dairy-free dark chocolate (many are naturally vegan) and vegan white chocolate chips ( brands like Enjoy Life make them). All the other toppings are typically safe, but just double-check the ingredients on your candy canes and M&M’s if you need strict vegan options, as some contain gelatin or shellac.
Nutritional Information*
*Please note: This is an approximate calculation and can vary based on specific ingredients used.
- Prep Time: 10 minutes
- Chill Time: 1 hour
- Total Time: 1 hour 10 minutes
- Servings: 24 pieces
- Calories per piece: ~160
- Fat: 9g
- Carbohydrates: 18g
- Sugar: 15g
- Protein: 2g
Well, that’s it, my friends! My ultimate guide to creating the most festive, delicious, and stress-free Christmas Bark. I hope this recipe brings as much joy to your kitchen as it has to mine.
With love and a full cookie jar,
Clara